The Easiest Way to Install Wainscoting / Beadboard in the Bathroom
Learn how to install wainscoting (also known as beadboard) in the bathroom or any room of your house! We’ll walk you through it with this step-by-step tutorial!

The longer I decorate, the more I’ve realized that the rooms I end up loving the most have a little “extra something.” I love the stenciled wall in my office. I love the vertical shiplap in our laundry room. And I really love the high board and batten in our living room.
So when I started planning out our little half bathroom, I knew it needed something to give it that “wow” factor, and I thought that the combo of wainscoting + wallpaper could be just the thing!
You can get my best tips and tricks for installing wallpaper in this post. And today I wanted to talk alllllllllllll about wainscoting, also known as beadboard!
How to Install Wainscoting / Beadboard Paneling
This post contains affiliate links. For more information, see my disclosures here.
Step 1- Gather all necessary supplies.
As with any project, the first thing we did was gather up all of the supplies we’d need to do the job. Here’s what we used to install the beadboard in our powder room:
- Wainscoting / Beadboard Paneling
- 1×4 primed flatstock
- Header Stop Trim Piece (from Windsor One Craftsman Series)
- Cordless Drill
- GRK trim head screws
- Ryobi 18 Guage Brad Nailer + 1 1/2″ brads
- Bosch Miter Saw
- Ryobi Circular Saw
- Kreg Rip Cut Circular Saw Guide
- Fein Multimaster with Flush Cut Tool
- Stud Finder
- Wood Filler
- Painter’s Tool
- Caulk
- Orbital Sander
- Paint of Choice (We used Behr Marquee Cameo White in a satin sheen.)
- Paintbrush and Roller
- Tape & Drape
- Baseboards and Trim for Windows and Doors, If Desired
How do I know how much wainscoting to buy?
Wainscoting typically comes in one of two ways: in smaller packs of planks or in large panels. We opted to go for the 4′ x 8′ panels. A big reason for this is that I wanted a wider plank look rather than the super skinny wainscoting that you sometimes see, and the larger panels offered that option.
Our small powder room is 5′ x 4.5′, for a total of 19′ all around, so we purchased five 4′ x 8′ panels. (We knew we wouldn’t need beadboard where the door and window are, so 20′ of beadboard ended up being plenty.)

To minimize the number of cuts we had to make at home, we had the guys at Home Depot cut down our panels to our desired height of 5’1/2″. We chose this height because we wanted the final trim height to be 6 feet, or 2/3 the height of our 9′ ceilings. (Cutting a wall into thirds rather than in half tends to be more pleasing to the eye.) Our baseboard + top trim piece added up to 11.5″ total, so when we added that to our beadboard height, we ended up with our desired 6 feet. Yay math! 😉
Step 2- Replace any trim work that needs to be switched out.
Before we could just start installing the wainscoting, we had to think about our trim situation. You may have the exact baseboards and trim you want already. If that’s the case, you have it easy and can skip this step!
Unfortunately, our house came with really cheap looking trim work. So we have been replacing the baseboards and trim around the windows and doors room by room as we work on our house.
Our windows only have a small ledge, with no trim around the rest of the window. And with the style of baseboards that the builders put in, our beadboard paneling would stick out over the edge and look odd.

The trim around our doorways is also really thin…

We love chunky craftsman style trim because it gives our cookie cutter house so much more character, so we ripped out all of the trim we didn’t like…

And put in new baseboards and door/window trim. (You can see the tutorial for installing craftsman style trim here.)

Once we had the new trim all situated and ready to go, then we could…
Step 3- Install the beadboard panels.
Because we had the guys at Home Depot rip down our beadboard panels to the correct size, some of them could just be placed on top of the new baseboards and attached to the wall!
We first used a stud finder and marked all available studs. Fortunately, with most sections of the beadboard we were able to anchor the piece to the studs.

We pre-drilled a small pilot hole with a cordless drill and then attached the beadboard to the wall with GRK brand trim screws. The screws have a small head that makes the hole easier to fill.

For sections where no stud was available, we attached the beadboard with liquid nails and 18 gauge brads into the drywall.

Making Cuts Around Obstructions
As nice as it was not to have to cut down the height of the wainscoting ourselves, we didn’t totally get out of having to make cuts.
Sometimes the amount of wall we needed to fill required only a partial beadboard panel, so we had to cut it down. Sometimes we needed to work around the plumbing, so we created an extra cutout for that…

We had to cut around the outlets and light switches as well.

And underneath the window, we obviously needed a shorter piece of wainscoting than we were using on the full walls.

When cutting the beadboard to fit around obstructions, it’s important to carefully measure. Once we were sure of our measurements, we marked the cutouts on the beadboard with a pencil. We then used our Fein Multimaster flush cut tool to make the various cutouts.

In some places, we needed to rip down one of our sheets of beadboard. A table saw would be ideal for making these long, straight cuts, but we didn’t have one set up at the time. Instead, we attached the Kreg Rip-Cut Circular Saw Guide to our cordless Ryobi circular saw.
The Kreg tool worked perfectly. The guide has a long ruler, and we used the gray adjustment clip (see in picture below) to set our desired width. Once the width is set, the guide makes it easy to make a long, straight cut.

Step 5- Patch screw and nail holes.
Once all of our beadboard panels were attached to the wall, it was time to patch up all of the screw and nail holes. We used this wood filler and a painter’s tool to fill in the holes.

While we were at it, we also filled in any larger gaps that wouldn’t be able to be filled by just caulk alone.

Once we had filled in everything with the wood filler, we used an orbital sander to smooth down the surface to make it nice and flat. That way after we paint, no one will be able to tell where the holes were.

After using the sander, the whole bathroom was pretty dusty! So I took a damp cloth and wiped everything down really well before moving on to the next step.
Step 6- Caulk small gaps in the wainscoting.
To make the beadboard really look seamless, we also needed to caulk any gaps. Pretty much anywhere that wood met wood– in the corners, at the baseboards, and near the door and window trim– got the caulk treatment. I used this caulk.

I simply squeezed a thin line of caulk into the gap…

Then I used my finger to smooth out the bead of caulk, helping it to fill the entire gap.

Patching and caulking is a tedious process, but it is absolutely vital to having a polished final look! I treated myself to a new audiobook, popped in my ear buds, and started patching and caulking away! 🙂
Step 7- Paint the beadboard paneling and trim.
Once everything was patched and caulked, it was time to paint! I sort of lucked out because our beadboard and trim were both being painted the same color (Behr Marquee Cameo White). Also, we were going to be installing wallpaper in the space above the beadboard, so I didn’t have to be super careful around the edges.

Painting beadboard is a little tricky because you’re dealing with a lot of small dips and crevices. I used a paint brush to get into all of the dips and crevices really well first. Then I used a roller over the entire wall of wainscoting to make sure that everything was covered with paint.
The only spot that I ended up needing to tape off was where the shoe moulding met our wood floor. I used my favorite product for this– Tape & Drape— to tape off the shoe moulding and protect the floor with plastic sheeting at the same time.

Step 8- Install wallpaper (optional), then add the top trim piece to the wainscoting.
Since we were doing wallpaper above our wainscoting, we decided to install the wallpaper before we added the top trim piece to the beadboard. I am SO glad we did– it made wallpapering so much easier.

While I was putting up wallpaper, Donnie put together the top trim pieces. To make the top trim piece we combined a standard 1×4 and a header stop piece from Windsor One. It’s the same method we used to make the board and batten in our living room.
Unlike the wainscoting, we painted the top trim pieces before attaching them to the wall so we wouldn’t have to cut in and risk messing up the wallpaper.

Since we attached the trim pieces to the walls with our nail gun, we did have to patch those holes with wood filler and touch up the paint a little bit. But that was only on the front surfaces of the top trim pieces, so we didn’t have to worry about messing up the wallpaper.
We also caulked the area where the beadboard panel met the trim piece and painted over that once it was dry.
Step 9- Enjoy your beautiful bathroom (or other space)!
Once the top trim piece was installed, patched, and painted, our wainscoting was finished! I think it definitely accomplished that “wow” factor we were going for in this space!

The new trim also looks so much more substantial and adds a ton of character to this very small bathroom.

Here’s the boring “before” compared to the super happy after!
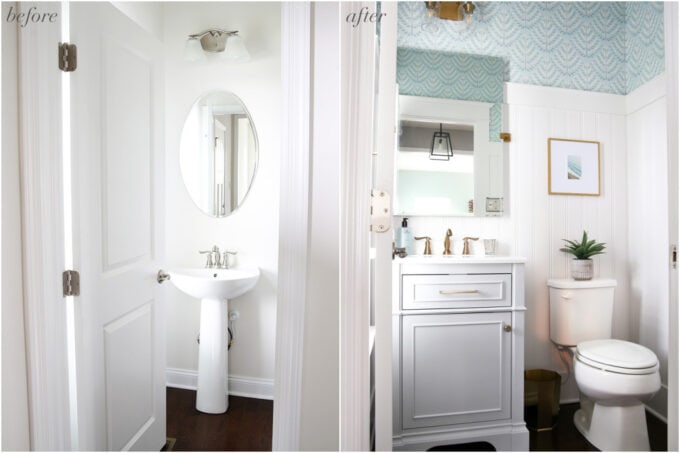
I confess, I find myself lingering a little bit in the doorway of this bathroom anytime I come in our front entrance or come down the stairs! It just makes me smile to see this cute, cheery space!
If you’re thinking of adding wainscoting to a space in your own home, be sure to pin the image below so you can easily find this post later!

Have you ever installed beadboard / wainscoting in your home? I’d love to hear about it in the comments below!
Thank you so much for following along! Have a wonderful day!

This post contains affiliate links. For more information, see my disclosures here.
Very nice, clean, beautiful! Love it!
Hi, Elle! Thanks so much! Have a great week! <3
~Abby =)
This turned out so beautiful! It gives be inspo for my very small toilet room. Thanks for the tutorial.
Thanks so much, Amanda! Hope you have a great week! <3
~Abby =)
Gorgeous makeover! And I love the wallpaper – can you tell me what it is?
Hi Paula! It is from Anthropologie and is linked in this post: https://www.anthropologie.com/shop/norrland-wallpaper
Have a great week!
~Abby =)