Organized Craft Room Pegboard Storage
Add pegboard storage to create an organized craft room that is both functional and beautiful!

A few weeks ago, I was helping clean out an old building that was donated to my parents’ non-profit when I found something that got me pretty excited.
Tucked in the back of the basement, behind a bunch of other stuff we were moving around was a big, old green pegboard.
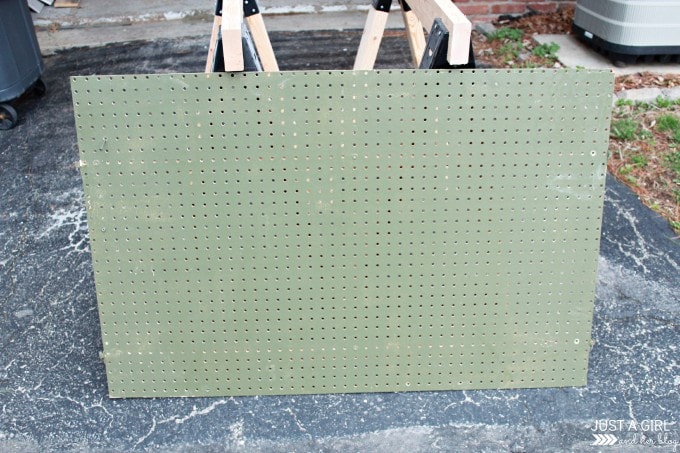
It was destined for the trash, but I knew it would be the perfect way to add some much needed storage to my craft room / home office, so I brought it home and rescued it. It may have started out pretty rough, but I had big plans for it!
How to Create Cute Craft Room Pegboard Storage
This post contains affiliate links. For more information, see my disclosures here.
Step 1- Gather your supplies.
Before I could turn my ugly, old green pegboard into the cute craft room storage of my dreams, I had to gather all of my tools. And if you don’t have an old pegboard that you rescued from an even older building, don’t worry! You can easily snag one (and it will probably start out looking way better than mine did 😉 ).
Pegboard Supplies
Step 2- Cut the pegboard to size, if needed.
Once we had gathered our supplies, we started by cutting down the pegbard. This thing was BIG and since I wanted it to fit between the bookcases in my new office, we sliced off a couple inches here and there until it was the just the right size.
Donnie used a circular saw to cut it, making sure to create nice, straight lines so our pegboard maintained its perfect rectangle shape.
Step 3- Paint the pegboard.
After we had cleaned it up, it was time to paint the pegboard! Since my craft room/home office is going to be my girly haven in my house full of boys, I chose Behr’s Rosy Lavender. I could not be more delighted with how the color turned out!
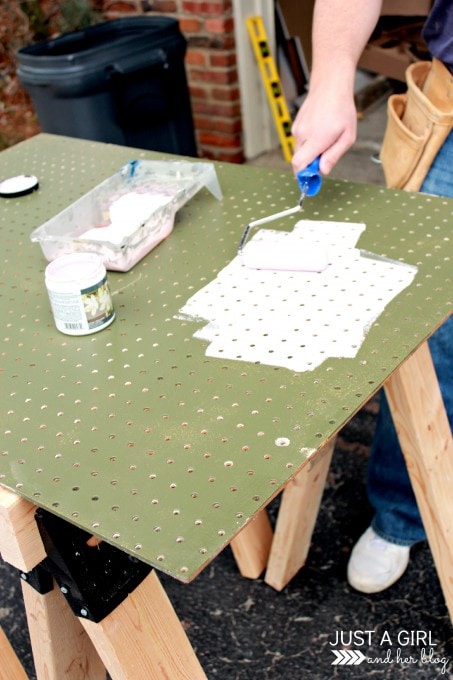
To paint the pegboard, we used a little foam roller and small paint tray. (I think that my favorite part is that Donnie’s saw horses are now sprinkled with Rosy Lavender, which will look extra masculine when he pulls them out to do his next very manly project.)
Two coats of paint covered the pegboard completely, and there was no hint of its former olive shade. I followed up the paint with two coats of Minwax Polycrylic just to make sure the paint didn’t scrape off when I added my pretty pegboard accessories.
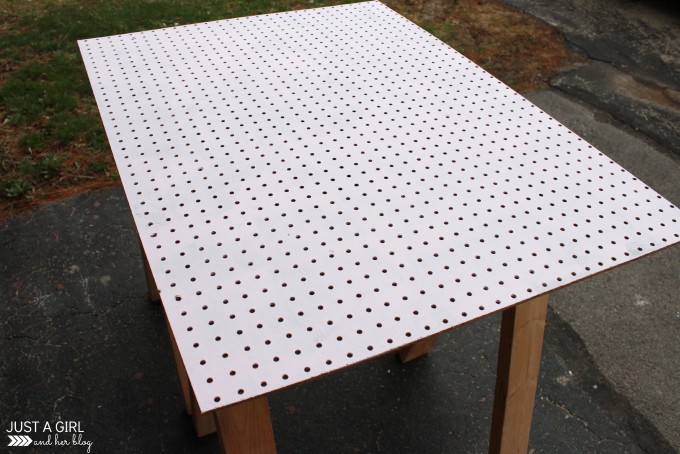
Looking better already, right?!
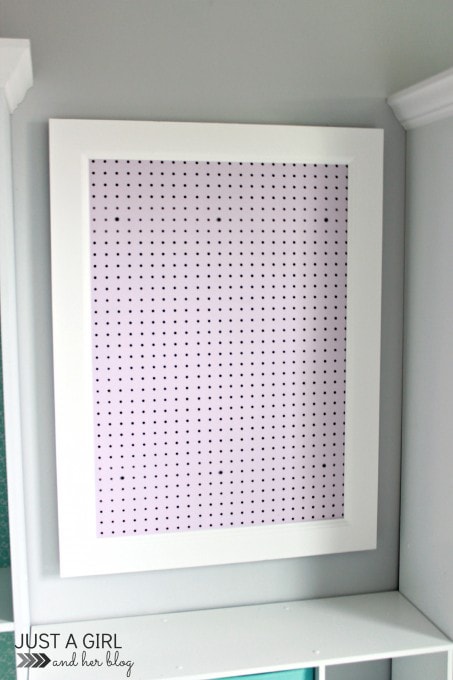
Step 4- Add a frame.
Next it was time to frame in the pegboard. Similar to our framed in bathroom mirror, we used pieces of baseboard molding and cut them down to the dimensions we needed.
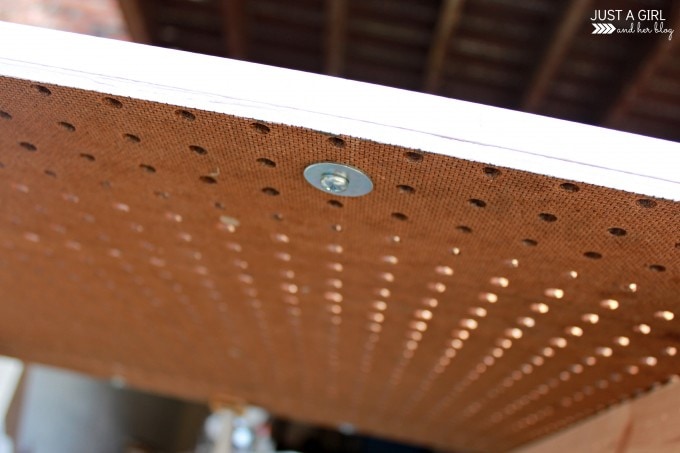
We used wood glue to adhere the frame to the pegboard and clamped it down to let it dry.
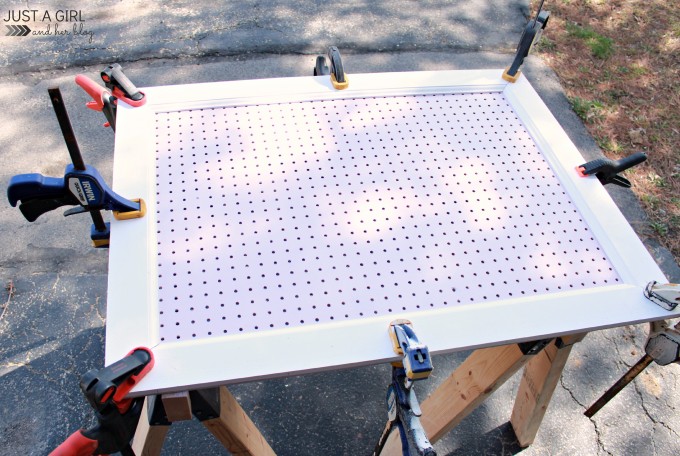
Worried that the glue wouldn’t be enough, Donnie also used wood screws to attach the frame to the pegboard from the bottom so that they were inconspicuous.
Step 5- Hang your beautiful pegboard!
When we were confident that the frame wasn’t going to fall off the pegboard, it was time to hang it up!
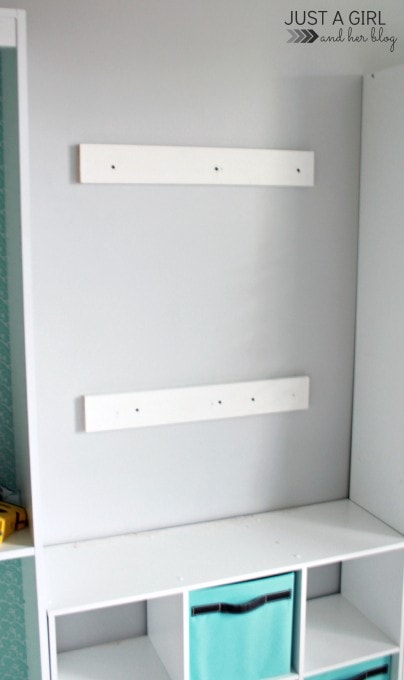
We wanted to make sure the pegboard had plenty of support so it stayed secure on the wall, and it also needed to be out away from the wall a little bit so there was room to hang the accessories.
Donnie screwed two 1×4 boards into the studs of the wall to make sure they could hold the weight of the pegboard.
Then using flat wood screws, we screwed the pegboard to the wood frame behind it using the existing pegboard holes.
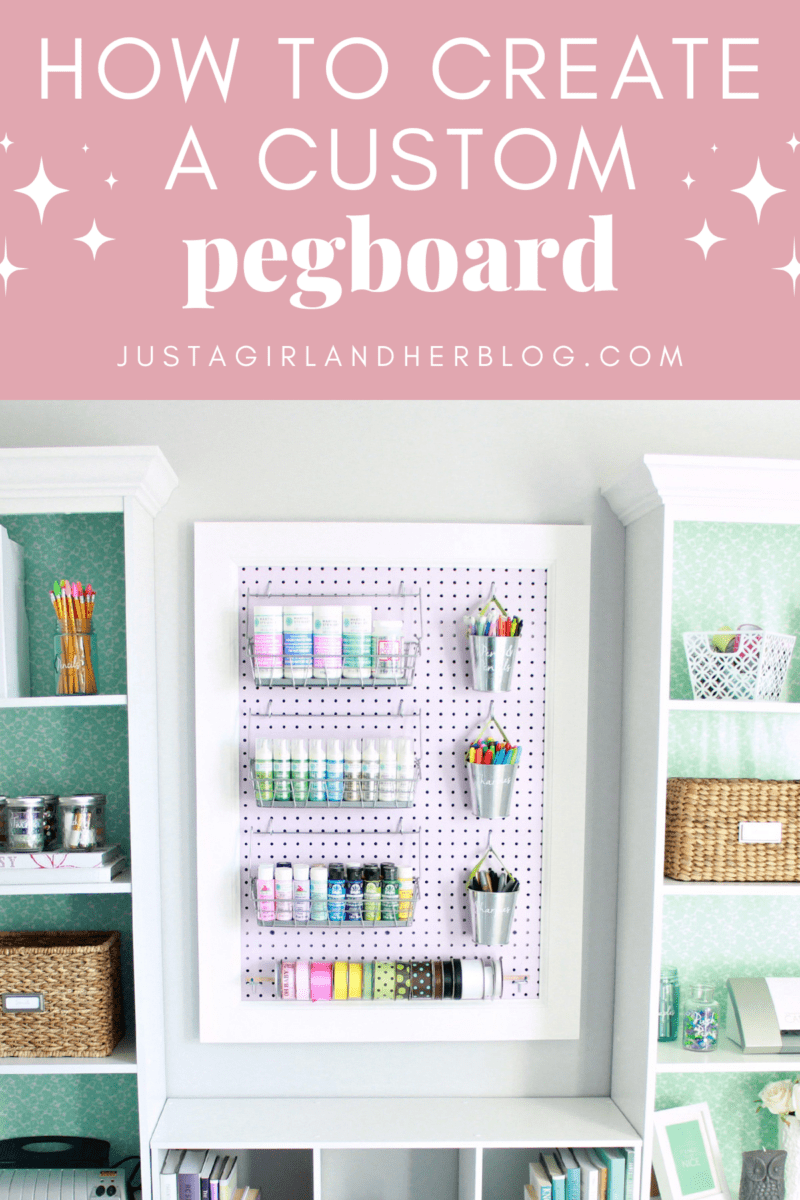
I gave the trim a few coats of bright white paint, and I had the beautiful pegboard of my dreams!
Step 6- Add accessories and organize!
I had already decided which of my craft supplies I wanted to store on the pegboard and sought out the perfect accessories to hold them.
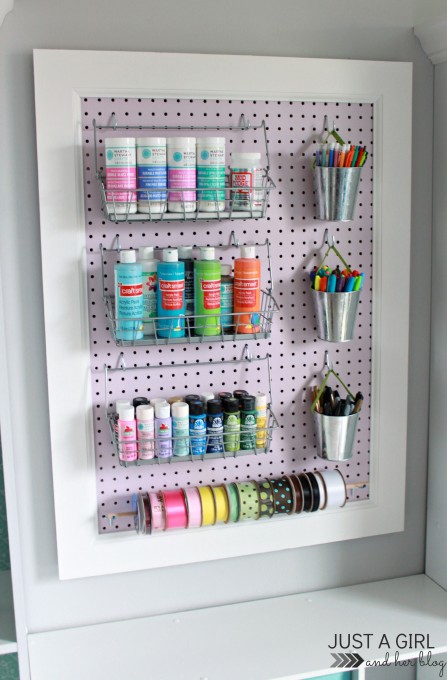
I used a small dowel rod to hold my ribbon and little pails from Target’s Dollar Spot with pegboard hooks to hold various writing utensils. The baskets holding my paint and modge podge were from IKEA and are sadly no longer sold.
There are a ton of cute pegboard accessories out there, so I’m sure you’ll be able to find the perfect ones to hold your supplies as well! Here are just a few favorites…


Organized Craft Room Pegboard Storage: Final Thoughts
Let’s take a look at the before and after:
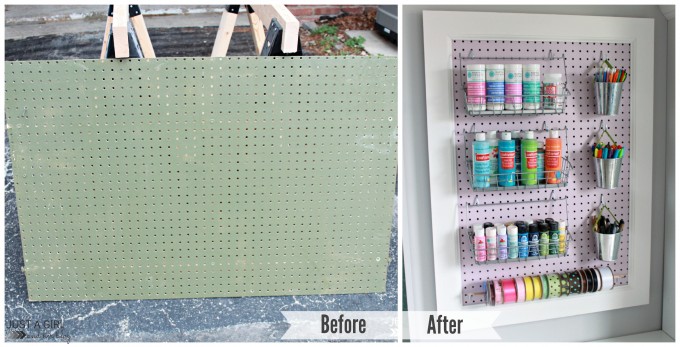
Quite a difference, right?! I am so excited about my new pegboard storage! It definitely has me thinking about other places where I could use pegboards to get organized in the future. They are such a fun tool and can take on any look or color you’re going for. Have fun organizing!
[Psssttt… Don’t miss our top 100 tips for organizing every single room in your house!]
Organized Pegboard Storage: Frequently Asked Questions
Want to save this post to revisit later? Be sure to pin the image below so you can find it easily!
Have you ever used a pegboard for organization? Any tips for me?

This post contains affiliate links. For more information, see my disclosures here.
It looks great! I love how you framed it.
Thank you, Megan! You are the sweetest! Hope you had a wonderful weekend!
~Abby =)
I am doing up my craft area right now too and this is my latest project!!! I have always hated pegboard but it has grown on me all of a sudden. I love your girly space so far!
Oooh your craft area sounds like it’s going to be lovely! Hooray for pegboards! 😉 Hope you had a wonderful weekend!
~Abby =)
Gorgeous, Abby! I desperately need to do something like this to organize my laundry/craft room! 🙂 The light purple shade is so subtle and pretty. Can’t wait to see the whole office reveal.
Thank you so much, Danielle! You are the sweetest! Hope you had a wonderful weekend!
~Abby =)
I really like this project, Abby. When I think “peg board” images if hardware stores and garages come to mind. But you made this one fun, functional AND pretty. I’d live to have one gracing my office as well!
Thank so so much, Christine! Mine definitely looked like it was meant to store hardware at first, lol! But nothing a girly paint color can’t fix! 😉 Hope you had a wonderful weekend!
~Abby =)
This is so cute. Very organized and I love your color selection. Great job.
Thanks so much, Debbie! Can’t go wrong with Rosy Lavender, lol! Hope you had a wonderful weekend!
~Abby =)
Love your idea! What a smart way to keep clutter off a desk and still see your suplies!! Pinning!
Thank you, Wendi!! I’m loving it so far! Hope you had a wonderful weekend!
~Abby =)
I want to come craft with you in your new space already! This has to be the prettiest pegboard installation I’ve ever seen! Sharing and pinning! XO
Thank you so much, Christy! You are always invited to come craft with me any time! That would be SO fun!! Hope you had a wonderful weekend!
~Abby =)
Awesome girlie! I bet you are feeling so good to be getting this done and organized!! Can’t wait to see it all done 🙂
Thank you so much, friend! It’s coming along slowly but surely, lol! Hope you had a wonderful weekend!
~Abby =)
Love how it turned out!!! I follow you on Instagram and have been curious how this project was going to turn out. You guys did a great job!
Thank you so much, Tahnee! You are the sweetest! “See” you on IG! 😉 Hope you had a wonderful weekend!
~Abby =)
Looks beautiful and so handy, Abby!! Thanks for a sneak peak! There’s not many projects I love more than turning something headed to the trash, into something amazing! Way to go!
Thank you so much, Kendra! I love a good upcycle too! Enjoy your weekend!
~Abby =)
This came out awesome! I could totally use something similar for all of my jewelry supplies.
OOooh that’s a great idea, Jen! Maybe I need a pegboard in every room of my house… 😉 Thanks so much for your sweet words! Enjoy your weekend!
~Abby =)
Oh I love it, Abby! And the color coukdnt be more feminine which is perfect!!
Thank you so much, Selene! Hooray for girly! 😀 Enjoy your weekend!
~Abby =)
Love this! Such a good idea for storage. Pinning now!
Thank you so much, Paige! You are the sweetest! Enjoy your weekend!
~Abby =)
Aren’t you the clever decorator, using quiet serene colors in your new office/craft room? I love the lavender, would love that color on our bedroom walls but have changed my colors of lavender/light mint green to aqua and coral. Our room is good size, cold in winter, hot in summer so want something that looks cool and soft.
Your pegboard project looks so pretty and a great spot to hang it. You’re really doing things up awesomely. Looking forward to final total reveal.
Happy Spring
Oooh your bedroom sounds lovely, JaneEllen! Thanks so much for your sweet comments! You are always so encouraging! Enjoy your weekend!
~Abby =)
I have to say, I totally lack the patience to do that. All that clamping and drying and waiting, oh my! But, I suppose knowing the outcome makes it all the better.
Love the colour too!
Lol! The key is to keep myself busy with other projects while I’m waiting so I’m not just sitting there staring at it the whole time! Otherwise, it would totally drive me nuts! Enjoy your weekend, Renee!
~Abby =)
Great work!! I love the step by step and being able to see the before and after. I can not wait to see the final reveal.
Thank you, Reichal! It’s coming along little by little, so it shouldn’t be much longer now! Thanks so much for stopping by! Enjoy your weekend!
~Abby =)
soooo awesome!!!! pinning!! Christine from Little BRags
Thank you, Christine! I appreciate the pin! Enjoy your weekend!
~Abby =)
LOVE how this turned out…it looks brand spankin’ new! Kudos to your hubby for roughing through the pretty paint, what a trooper! And GENIUS to add the poly acrylic…I didn’t think of that, and my pegboard thing already has some scratched paint on it 🙁 Can’t wait to see more on this fabulous office!
Thank YOU for the heads up on Facebook! I had the poly from another project, but I don’t know if I would have thought to add it if you hadn’t said something! You are the best, my friend!
~Abby =)
Oh I’m so glad I said something, then! Has it held up pretty well so far, no scratching? I’m having so much fun following along on your room makeover journey! Plus, it’s so fun to share ideas and whatnot! 😀 Today I’m working on some curtains…just finding it hard to commit to a pattern/color for them LOL
No scratching yet! Woohoo! Have fun with your curtains– I know they will be beautiful!
~Abby =)
Ohhhh Abby! I just love this… my OCD is going crazy with envy! 🙂
Lol! OCD bloggers unite! 😀 Now if I can just get the rest of the room in order, I’ll be good to go! Have a great weekend, Jen!
~Abby =)
Love the peg board, lady! So great that you could use something that would have been thrown away and instead made it awesome! Such a great job!
Thanks, Allison! It was fun to see it transform! Thank you so much for stopping by! Enjoy your weekend!
~Abby =)
Very nice. I’ve seen so many pegboards projects lately and I’m inspired to try my own.
Thanks so much, Andrea! I love a good pegboard! I say go for it! Enjoy your weekend!
~Abby =)
This is beautiful!!! What a fabulous organizational tool. Great job! I could use this 🙂
Thank you, Taryn! I’m loving it so far! Hope you had a wonderful weekend!
~Abby =)
This is such a pretty pegboard! Can I add a link to this for my craft room plans? This is exactly what I was looking for!
Absolutely! I’m honored! Have fun with your craft room, Amber!
~Abby =)
What a great project! It’s a beautiful way to store craft supplies!
We would love for you to come and link up with us at Your Designs This Time, Mondays 8:00amEST.
https://elizabethjoandesigns.com/2014/04/desings-time-no-5
Emily @ elizabethjoandesigns.com
Thanks so much, Emily! Have a great week!
~Abby =)
Featuring on at party this week!
You are the best!! Thank you so much, friend!! <3
~Abby =)
Awesome, pegboard! Your office looks great! So glad you mentioned the detail of screwing two boards into the studs of the wall to make sure they could hold the weight of the pegboard. How long were the screws? Thanks
Hi Irene! Honestly, I can’t remember how long the screws were but I’m guessing 3-3.5″.
I am so painting my pegboard in my newly organized workshop! Thank you for the idea!
Abby it is so pretty! Love the colour??
Aw, thanks so much, Shelley! Hope you’re having a wonderful week! <3
~Abby =)