How to Install Board and Batten in a Small Space (Primary Bathroom Update)
*A huge thank you to Behr for providing the paint for this transformation! My favorable opinion of gorgeous, high-quality paint is 100% my own. 🙂 For more information, see my disclosures here.*

I bet you all thought I forgot about our master bathroom, huh? I didn’t. If you’re new to the blog and don’t know the backstory here, let me catch you up. When we moved into our house, our master bathroom was way less than cute. The shower had this gross accordion door that I refused to shower behind, so literally the first thing we did after we moved in was rip it out.

{Bye bye, accordion door!}
It still wasn’t our dream master bathroom, but we weren’t ready to do any major demolition yet, so we hung up a shower curtain, painted the walls, and called it a day.
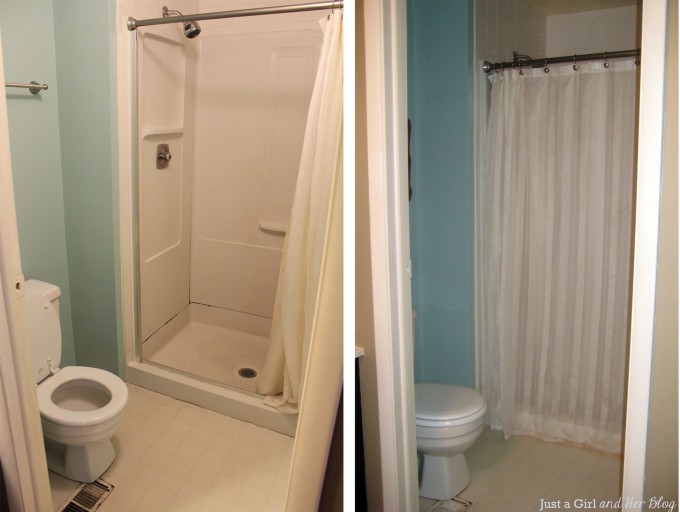
But still, the shower insert was stained from the previous owner, the linoleum flooring was icky, and it was just a bad situation all the way around, so 16 loooonnnnnngggg months ago, we tore out everything, taking the bathroom down to the studs.

As excited as we were to have a beautiful new bathroom, though, life happened. We got going on other projects, we had family events and vacations, and the bathroom sat and sat and sat. Then in May I shared some exciting news: we had finally gotten to the point where we could start tiling!

Woo hoo! It turns out that tiling, even just in this very small space, was a pretty tedious task. I have to hand it to my hubby– he spent hours with the wet saw making cuts and fitting everything together just right.
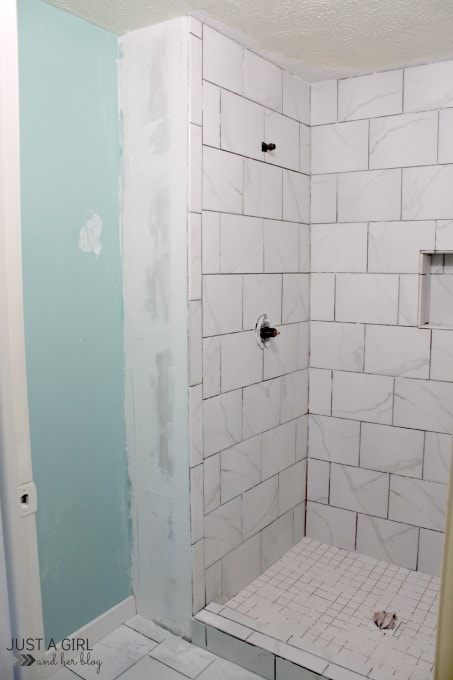
{tile installed; grout still needs to be applied}
Finally, though, the tile was up, and we began work on the other project we wanted to complete in the bathroom: board and batten! I have always loved the look of b&b, and I knew it wouldn’t be a hard job in this small space. {Well, that’s easy for me to say. Donnie did most of the installation! 😉 }
There are a gazillion different ways to approach board and batten and about a gazillion more tutorials out there about it. {Believe me, I think I read them all!} We ended up combining bits and pieces of tutorials from Centsational Girl, The House of Smiths, and Thrifty and Chic to complete our transformation.
The Materials
We went with pieces of pre-primed MDF for our board and batten. They were inexpensive and easy to work with, and they gave us the look we were going for. Lengths will differ for each space obviously, but the same width and thickness of boards would apply. We used…
- 3/4″ x 3 1/2″ pre-primed MDF boards for our base and top
- 3/4″ x 2 1/4″ pre-primed MDF boards for the vertical battens
- 1″ x 2″ piece to cap off the top and create a small ledge
- Caulking
- Nail gun + nails
- Spackling
- Paint of choice
- Rollers and paint brushes
The Process
Our process for installation/painting was kind of unconventional because Donnie would work on installing the board and batten in the evenings after work, and I would paint during the day while the Cs were napping, so we just did what we could when we could and it all worked out! He began by installing the horizontal top and bottom 3 1/2″ boards, simply measuring and cutting them and then using the nail gun and 16 gauge nails to put them into place.

Next it was my turn to come in and paint. We went with Behr Premium Plus Ultra Pure White in a semi-gloss finish for the board and batten and Behr Marquee Silver City in an eggshell finish for the wall color.

It was nice to be able to get in and paint before the battens were up so I didn’t have to work around them. This is just with one coat, and it was already looking good! {PS… My hubby, the paint snob, is pretty much obsessed with Behr’s Marquee line of paint. He had his own painting business for a while, so he has worked with all different brands, and he’s found his new favorite!}

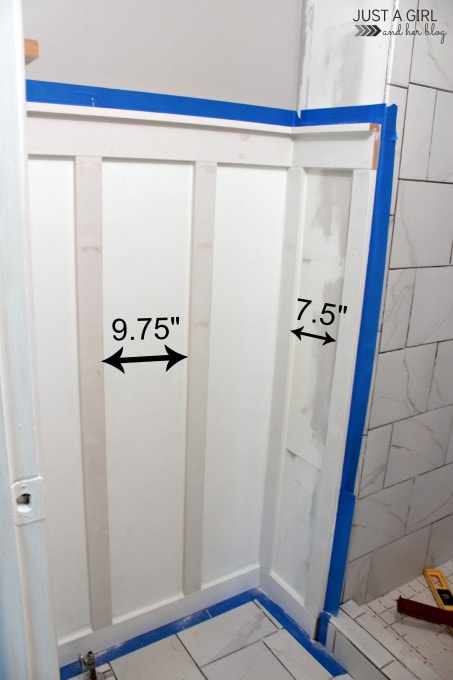
Next Donnie got to work installing the battens. Figuring out the spacing was a little tricky in such a tight space. I thought we would space out all of the battens evenly, which is what we would have done if we were working with a long, straight wall. In this small area with a lot of corners, however, we approached it a little differently. We knew we wanted to place a batten any time there was a transition from tile to wall, so we started with those. Then we were able to tell how many battens would fit on each wall, and distributed them evenly from there.
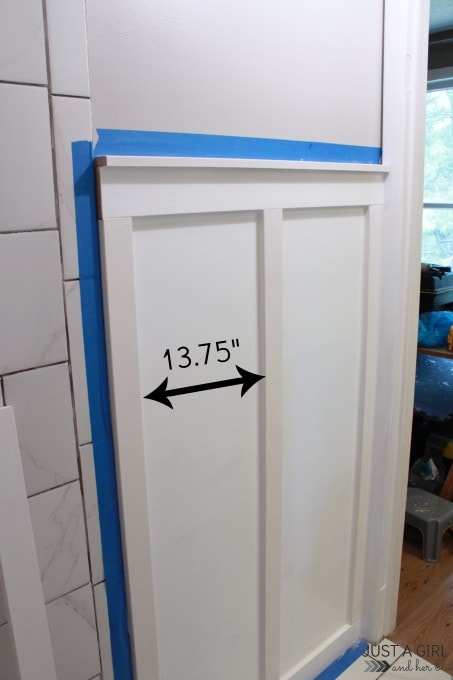
So on the wall below, we placed a batten by the tile, another one next to the door frame, and one in the center, leaving 13.75″ on each side of the middle batten.
On the other side of the room, you can see that we had a super small wall that only allowed for 7.5″ between battens, and we were able to split the slightly larger wall into three sections with 9.75″ between the battens.
On the diagram below, you can see which widths of boards we used where:

The bottom board is a 3/4″ x 3 1/2″ piece of MDF. Each of the battens is 3/4″ x 2 1/4″ MDF, and the board above the battens is the same as the board below, 3/4″ x 3 1/2″. Finally, we created a small ledge with a 1″ x 2,” which Donnie first adhered with liquid nails for added strength and then nailed in from the top with the nail gun and slightly smaller 18 gauge nails.
Donnie created a seamless look by applying caulking, and then I patched all of the nail holes and applied the final coats of paint on all the walls and trim. Little tip when painting board and batten: use a mini roller! It made it so much easier to get in between the battens AND I didn’t have to worry about streaky brush marks on the board and batten because the mini roller rolled the paint on perfectly. Having high quality paint also helps with this! Once all of the painting was finished up, we had…

…our beautiful board and batten walls! I think the Behr’s Pure White and Silver City really make it pop!

I love a good before and after, too, so let’s take a peek:

Looking better already! I’m so excited to be almost done with the bathroom! We still have to finish grouting all of the tile, install the toilet, and add some pretty accessories, but it won’t be much longer now! Stay tuned to the blog for the BIG reveal coming up soon! Have a wonderful week, friends!
Have you ever installed board and batten? What are your best tips?

*A huge thank you to Behr for providing the paint for this transformation! My favorable opinion of gorgeous, high-quality paint is 100% my own. 🙂 For more information, see my disclosures here.*
It looks great, Abby! Are you sure you didn’t have a team of professionals come in and install everything? 🙂 Those colors really do make the board and batten pop.
I hope you’re recovering well from surgery! Been thinking about and praying for you. A good friend here is recovering from recent breast cancer surgery, and I know it’s been uncomfortable for her, so I hope you’re able to rest well. Give yourself the time you need!
Sending gentle hugs from Germany,
Alicia
Hi, Abby! Your master bathroom looks great! I hope you are recuperating well from your surgery, and I hope your kids and hubby are spoiling you!
Looking good! I’m loving the board & batten and wainscoting trends right now – so classic! Can’t wait to see how it all comes together.
Hope your recovery is going smoothly, friend!
I actually think it makes the biggest impact in small spaces like this! LOVE how this is turning out. We just moved into our house 30 days ago- I’m already dying to do a project like this in all our smallest spaces. One because the small spaces are less intimidating but also because they can be the hardest spaces to truly decorate any other way. It packs a big punch & needs not much more. LOVE LOVE LOVE!
I love love love the board and batten. We have installed a lot of it in our houses (it’s sort of addicting). It just makes such a great impact. Awesome job.
Abby …
It’s looking awesome! It never ceases to amaze me how adding white paint changes everything. I told my hubby the other day that I want to do board and batten in our master bath. He kinda gave me a quizzical look. He’ll come around … eventually 🙂
Hugs!
Lani
Seeing the incredible job you and hubs did on this board and batten makes me want to do it in our bathroom. What a difference huh? Looks like a fancy spa bathroom. W
You better not be doing any bathroom cleaning for while. Take good care of yourself, let those guys spoil you rotten.
You supplied such a wonderful tutorial how to figure out distances between boards, etc. very appreciated. It just looks so nice, do you smile when you go into your bathroom? Pinning this post
I scrub the shower walls down from top to bottom every time. Have a thing about dirty bathrooms and kitchen even when they’re not dirty. Think it’s not as hard on a person when you have surgery on bottom half of a body, instead of top half. Doc told me no house cleaning but I couldn’t let bathrooms and kitchen be dirty for weeks til I was better. Hubs was not cooperative. His favorite refrain is “why does it need to be done”, especially when it’s his turn. Your hubs sounds like he’s much more cooperative, thankfully for you.
Do you have a separate tub to clean also? We have one of those garden tubs except I don’t get to bathe in it, takes too much water, just get to clean it.
Hope so much you are doing well on your recovery. Take very good care of yourself, you’re a special lady.
Love this update!! The tile had to be tough but the batting seems like a big impact for not a super difficult diy project! I’m loving the whole look of the new bathroom! Can’t wait to see it all done!
I’ll love it! I think we are going to attempt board and batten in our formal living room and maybe one wall in our front hallway. Seeing how yours turned out makes me want to get started right away!
Oh, and we used Behr Marquee paint on our front door… Loved it! We’ve always used Behr paint but I love how well the Marquee paint covered even when doing thin coats with a foam brush.
Wow! I’m totally impressed!! We totally need to do this with our bathroom. Sees this really gives me hope that even our ugly little bathroom could be transformed 🙂
Whoa!!! This bathroom is looking so good! Love that you managed to pack so much character in such a small space! Can’t wait to see the final product! 😉 xo
Looks awesome! I love board and batten!
Deb
@Seeking Lavender Lane
Lookin’ good, Abby! You guys did a great job with the board & batten! We installed some in our bathroom back in November and it’s made the space look SO much better. I’m kinda obsessed with board & batten, LOL! I’m seriously considering a shower curtain for our old stand up shower door. It’s the frosted glass kind (eww). It’s pretty atrocious and makes the space seem so much smaller. Anyway, that tile is gorgeous and it goes perfectly with new paint color. Can’t wait to see the whole space when it’s finished. Hope you’re feeling better and better each day. We can’t wait to see you back in full force around blogland! Have a great weekend. 😉
I am so in love with this project! You did an amazing job – it’s crazy how transformative this was. We’ll be moving out of our rental soon, but I am definitely going to keep this in mind when we move on into a different place!
Great job! I did this in my master bedroom last year. I love it so much!
Thank you for this post!! We have been working on our master bath for three yeas, other projects always push it aside, but this post fills me with hope! lol Not to mention, you guys did a stunning job!!!
It must feel amazing to have this part of your home, well on its way!
I just told my husband I’m doing this. No question. What a dramatic difference – great job Abby, it looks BEAUTIFUL!
We are redoing our bathroom and just used the exact same tile as yours in our large shower. I am agonizing over which Behr gray to use (like you I love Behr paint). Do you really love the Silver City? I am going back and forth between Silver City and Dreamscape Gray, and I’m just not sure which would match the tile the best. I did a gray in our kitchen that turned out looking slightly blue, and I am kicking myself for that because my husband will be severely unhappy if I tell him I want to redo it, LOL. Now I’m hesitant about the bathroom gray choice because I’m afraid it will look blue again. Anyway, your bathroom is definitely the look I am going for so I was wondering if you are still really happy with your Silver City paint color.
Hi, Hailey! We do really love Silver City, and it is a true gray, not blue-ish. We actually did our guest bathroom in Dreamscape Gray (https://justagirlandherblog.com/bathroom-refresh-reveal/) funny enough, and I love it too, but it does have some blue to it, so if you’re avoiding blue, don’t do Dreamscape Gray. I hope this helps!
~Abby =)
This looks SO great! I recently visited a friend’s new house and they have board and batten in a few different areas of their home and I remarked how it looked SO fancy and made their house look so expensive and nice! Now seeing how you can DIY it, I MUST have it in my home! I hope my husband won’t mind me adding it to my honey-do list 😉
This looks great! Can I ask what the height is at the top of the horizontal board?
thanks!
Hi, Sheryl! We’re not in that house anymore, so I can’t measure, but I know we went about 2/3 of the way up the wall and the ceilings were 7.5′ high. So I’m guessing the top of the top of the horizontal board was around 5′, maybe slightly lower. Sorry I couldn’t be more exact!
~Abby =)
I used Silver City in my daughter’s room and love it!
I love it, too! So pretty! 🙂
~Abby =)
Looks great!
Here’s a tip for you that we learned from renovating my FILs house for resale…
Remove the light switches and use white spray paint on the switches to clean them up. They will look brand new and erase years of use.
Thanks so much for the tip, Kathy! I’ll have to try that.
Have a great week!
~Abby =)