The Beginner’s Guide to Patching and Painting Baseboards
Patching and painting baseboards doesn’t have to be a difficult task! These simple strategies with help the patching and painting process go smoothly from start to finish.
I am not a painting expert. In fact, Donnie recently confessed that he used to watch me paint and laugh because I was so terrible at it.
Even though I’ve gotten in a lot of practice and improved my skills, when it came time for patching and painting baseboards, I just assumed that he would be the one to do it.
Donnie had different ideas, though. He said it was easier for me to “bend that way” (true). He also made the point that I get to spend time with the boys all week while he’s at work (also true). So he agreed to take them to the park on Saturday and I could work away at painting baseboards.
(Someone has a new-found confidence in my painting skills all of a sudden…)
So the job of patching and painting baseboards fell to me, and after doing a little bit of research, I was confident that I could do it well.
I thought I’d share the method that worked best for me. Because surprisingly, patching and painting baseboards didn’t end up being too bad at all!
A Simple and Effective Strategy for Patching and Painting Baseboards
List contains affiliate links. For more information, see my disclosures here.
The easiest way to paint baseboards is with a high quality angled brush and some simple tools to help mask off the flooring and walls.
Here are the supplies I used to patch and paint our baseboards:
- Spackling
- Painter’s Tool
- Behr Premium Plus Ultra Pure White Paint in Semi-Gloss
- Tape & Drape
- Large Paint Shield
- HANDy Paint Pail
- Angled 1 1/2″ Paint Brush
- Light Sandpaper
Step 1: Clean the baseboards before patching and painting.
Unless someone is super meticulous and has very, very clean baseboards, we will want to clean them before we jump into patching and painting. (There is nothing worse than getting dust and grime mixed in on your paint brush– yuck!)
I typically vacuum off the baseboards with the hose attachment and then wipe them down with a damp cloth, adding a gentle cleanser if they are especially dirty.
Step 2: Patch the holes in the baseboards.

My first job was to fill in all of the little tiny holes in the baseboards and shoe molding in the living room, dining room, stairwell landings, upstairs hallway, and our bedroom. That’s a lot of little holes!
My painter’s tool did a great job on the flat baseboards, but the curved shoe molding was another story.
It was taking forever to get the patching putty in there because of the angle. So eventually I ditched the tool and just used my finger, which was much quicker!

It was much easier to maneuver the spackling into the holes on the curved shoe molding using this method.
Step 3: Smooth and sand the baseboards.
Since the spackling will cause some extra bumps and lumps in the baseboards, we’ll want to smooth those out before we begin painting.
I first took a wet cloth and wiped away the excess putty. Then I followed up with a light sandpaper to get the baseboards nice and smooth. I wiped away the dust from sanding, grabbed my HANDy Paint Pail, and I was ready for the next step…
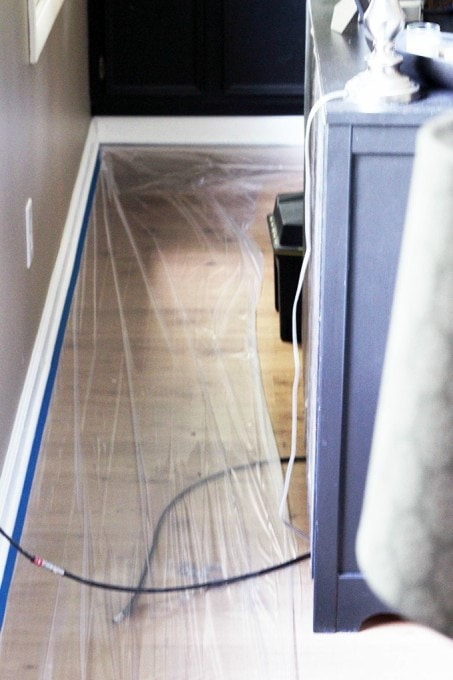
Step 4: Painting Baseboards with Tape and Drape!
Since I wasn’t confident in my ability to cut in without getting paint on the flooring, Tape & Drape was my best friend. It’s tape and plastic liner in one.

I had the benefit of a solid tape line so I didn’t have to worry about being rigidly exact with my painting. And the plastic sheeting acted as my drop cloth so I didn’t get any drips on the floor either.
Making the Most of the Tape & Drape when Painting Baseboards
I tried to make the most of each piece of the plastic sheeting. So for the majority of my painting, I worked with two three-foot long pieces of Tape & Drape.
I would paint the section of baseboard above piece #1 and while that was drying a little, I painted above piece #2. While piece #2 was drying, I carefully peeled up piece #1 and moved it to my next section of baseboard and so on, alternating pieces #1 and #2 so I didn’t have to throw away as much plastic.

When my tape would start to lose its stickiness (evidenced by more leaks), then I knew it was time to start with new pieces of Tape & Drape.

A Quicker Tape & Drape Method
By the time I got to my bedroom (the last room to paint), my kids were going to be waking up from nap soon, so I was trying to get done in a hurry.
I just taped up the entire room at one time, painted everything, and then peeled up all the plastic and threw it away. This method was definitely quicker, but I did end up using most of a roll of Tape & Drape.
The Tape & Drape did a great job at protecting the flooring, but I also wanted to make sure that I didn’t accidentally get paint on the wall.
I could have used painter’s tape above the baseboard, but I found a quicker method…
Step 5: Use a paint shield to keep paint off the walls while painting baseboards.
The paint shield allowed me to have a barrier between my paint brush and the wall without the tedious task of taping every single baseboard.
Instead of holding up the paint shield the entire time I was painting, I would usually paint the lower part of a 10-ish foot section of molding. Then I’d break out my paint shield and hold it at the top edge of the baseboard so I could quickly paint the top section without getting white paint all over the walls.
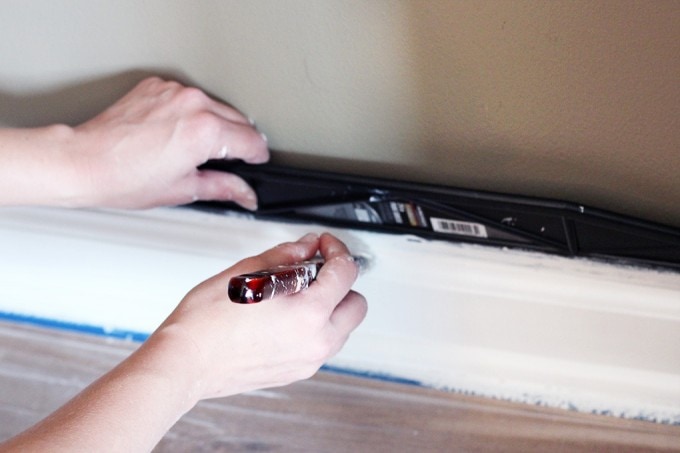
As long as I was diligent about cleaning off the edge of the shield every once in a while and pressing it down firmly while I was painting, this method worked like a charm and was much faster than trying to tape off the top of the baseboards.
Painting Baseboards When You Have Carpet
Painting baseboards with carpet brings a whole new set of challenges! We don’t want to ruin our carpeting, so there are a few things we can do to protect it.
When painting baseboards with carpet, Tape & Drape can be used to mask off the carpeting to keep it protected. When I’ve used this method, I just try to get the tape very close to the baseboard (or even under the baseboard if possible!) and make it as snug as I can with the carpet.
For this particular project, I was only painting baseboards in a very small carpeted area (our stair landing). So I just used the paint shield to press down and cover the carpet as I painted, trying not to get paint on the shield as much as possible.

I then went back and used the paint shield at the top of the baseboards to get a nice, clean line, and I was in business.

Baseboards may not be a glamorous project like a furniture makeover or room reveal, but they can definitely make a big impact in a room, so it’s important to do them well.
After waiting almost two years to paint ours (terrible, I know!) I am thrilled to finally be able to check that project off the list!
Patching and Painting Baseboards: Frequently Asked Questions
Have you painted any baseboards lately? What are your best tips and tricks?

This post contains affiliate links. For more information, see my disclosures here.


Thank you so much, I need to see this right now! I am dreading dreading dreading paint my baseboards, but they need it desperately! I have given myself a deadline, which is a week away. So glad to know you did your’s in a day. I was thinking it would take me several days.
I’m so glad this helps! Good luck with your baseboards–you can do it!!
~Abby =)
Isn’t it amazing what a difference freshly painted baseboards make! You did a great job… it is worth all the effort for sure:)
Thanks, Krista! I love seeing how they really “pop” now…so worth the effort! Have a wonderful weekend!
~Abby =)
Oh!! Looks GREAT!!! I will probably need to do this in a few areas of our home…even though it’s a new construction! Great tips! – I’ve been nervous!
Thanks, Kacia! You can do it! 😉 See you tonight!
~Abby =)
Hi Abby! I found your blog and you have given me so many ideas on projects to work in my new home. I need to paint my wood color baseboards and this post is so helpful! I already have DAP drydex spackle at home ( see link below)
https://www.amazon.com/12345-drydex-spackle-patch-PRICE/dp/B0039O2HFK/ref=pd_sim_sbs_hi_2
Do you think I can also use this product to patch the little holes? My husband has been using this for the walls and ceilings but, I wasn’t sure if it is OK to use in baseboards. Help!
Thank you
Carolina
Thanks for stopping by, Carolina! That your product will work just fine for your baseboards! Happy painting!
~Abby =)
oh! yes they do make a great impact into any room Abby! yours look great you did a great job and your boys were sleeping! 🙂 thanks for not making it look complicated, I might consider painting the ones from my son’s bedroom, I’ve been asking hubby for a while and I’m still waiting for him to start 😉
Thanks, Ingrid! Ours were on the “honey-do” list for a while before I finally tackled them myself! Hope you have a wonderful weekend!
~Abby =)
I was just thinking about painting my baseboards. They need a good touch-up. Thanks for the tutorial! It really helps!!
Yay! So glad it was helpful! Happy painting, Crystal!
~Abby =)
I wish I had read you post months ago when I tackled my own baseboards. I did okay but I really could have used Tape and Drape, wow what a great product. Thank you for sharing. I’m pinning so I don’t forget your great tips.
I do heart tape & drape for sure! Thanks so much for stopping by! Hope you’re having a wonderful weekend!
~Abby =)
Painting trim is the WORST! And somehow I always get stuck with it. But you make it look so easy, I’ll have to use some of your methods next time:)
I know– I can’t use power tools, so I always get the painting jobs too! 😉 Hope this method works for you! It was so wonderful to meet you last night, Miss Eva!
~Abby =)
Oh why did I see your post??? Now that I know how to tackle the baseboards I should volunteer to do this? I literally haven’t done nothing to our home in 9 years…pretty much the age of my oldest kid. (I only have 3 but feel I have maybe 5 or 6.. with the boundless energy they have.)
Please quick question, I have never painted a wall or a baseboard or nothing… I should probably paint a wall first and then the baseboards right? Do you have a tutorial or could you point me to a tutorial for painting? I feel embarassed even asking for this! Anyway, I loved, loved this tutorial. Very simple! Nice to meet you! Hope you come visit my blog too!
Good luck with all of your painting, Ursula! Opinions definitely vary on whether to paint walls or baseboards first. We did our walls first, then baseboards, but I know there are others who swear by doing it the other way around–it’s really a preference thing. I have several great painting tutorials pinned on my “Home Tips” Pinterest board, which can be found here: https://pinterest.com/justagirlabby/home-tips/ ! Happy painting!
~Abby =)
Thanks for the easy tips! I had no idea that paint shield existed!!!
I had never used one before this project, but it is a gem! Thanks so much for stopping by, Selene!
~Abby =)
Loving this post! Thank you for posting! I have to paint my living room by the 15th =)
Thanks, Kayla! Good luck with your painting!
~Abby =)
I used tape and drape all the time when I worked on our college paint crew. I learned so much during that time. Great tips and tricks!! :o)
Sounds like you’re a pro! The tape & drape was a lifesaver! Thanks so much for stopping by, Larissa!
~Abby =)
I have never heard of Tape and Drape, but am so glad to know of it now… everything looks fabulous! It is just beautiful… I love it! Thank you so much for sharing at Monday Funday this week! Have a good one!
Take care,
Trish
Thank you, Trish! The Tape & Drape really was a huge help! Thanks for hosting such a fun party!
~Abby =)
Great Tips! I’ll be painting a lot of baseboards in my house soon so I can use all the help I can get! Pinning this right now! I’m stopping by from Give Me The Goods Monday.
I also have an open blog hop & I’d love it if you linked it up there.
Thank you so much, Carrie! Good luck with your baseboards! Hope you’re having a wonderful week!
~Abby =)
Right on! I understand the hesitation. Every piece of bead board, baseboard, chair rail, crown molding we have put up over the last three years (trust me it is a lot) has yet to be painted or caulked. I still stuck in the phase of it looks good enough but I don’t want to mess with it again just yet. Although after reading all these blogs I am starting to think I need a date with my caulk gun.
Manda @ Our Wolf Den
Have fun on your caulk gun date, Manda! Lol. I put off our trim for-ev-er, but it does feel nice to finally have it done! Thanks for reading!
~Abby =)
Thank you for all the great tips! My sister-in-law is visiting us for the first time from CA and I”m looking at rooms with a more critical eye. It’s funny how you get used to stuff! I’m painting the baseboards in the bathrooms this week and your post was so timely!
Linda at The French Hens Nest
Glad to be of help! Have a fun time with your sister-in-law!
~Abby =)
Great tips! These are my least favorite thing to paint because of all the prep, but it’s worth it in the end.
I agree, Megan! I definitely put it off for too long, but they look so white and pretty now! Thanks so much for stopping by!
~Abby =)
GREAT tips Abby!!! I need to attack my baseboards!!!
Thanks, Christine! Go for it! 😉 Thank you again for hosting a fun party each week!
~Abby =)
That tape and drape looks awesome. I am the world’s sloppiest painter paint goes every which way when I paint so that would be so handy.
I hear ya on the sloppy painting! I really need all the help I can get! Thanks so much for stopping by, Heidi! Have a great weekend!
~Abby =)
Great tutorial Abby! And great job on your baseboards! In case you didn’t see it earlier, I featured this on my blog today! I’m stopping by to pin, and to let you know you can grab a Featured button if you don’t already have one! https://practicallyfunctional.net/2013/07/10-creative-ideas-3/
Thank you so much, Jessi! I am always excited and honored to be featured on your fabulous blog! Hope you’re having a great week!
~Abby =)
This is an awesome post, and comes at the perfect time for me! I need to give all my baseboards a touch up, but didn’t even know where to start. Now I have something to reference to! Thanks for sharing!
Yay! So glad I could help! Happy painting, Monica!
~Abby =)
These are great tips & thanks so much for introducing me to tape & drape — that is an awesome product! Pinning 🙂
Thank you so much, Lora! I’m so flattered that you stopped by! Love your blog! Hope you’re having a wonderful week!
~Abby =)
This is brilliant!! we desperately need to do ours! but they are a scratchy horrible stained wood. And I fear they will need sanding back before painting :S
I hear ya! I put off ours forever!! It feels so great to have them done now, though! Just keep telling yourself, “I think I can, I think I can!” Lol. Have a great week!
~Abby =)
Ever heard of liquid sand paper? A MIRACLE product!!! When all else fails call your local paint store or Home Depot or Lowe’s paint Dept. They carry all the best tools and/ or know the best shortcuts/tricks!!
Great tutorial and very useful as I too have baseboard touch up on my to do list. On a different note, I love the color on your walls. What color is that? I love the contrast. 😉
Thanks so much, Alix! Our wall color is called “Barnwood” by Valspar (Lowe’s). Good luck with your baseboards!
~Abby =)
FYI…Duct tape works great when painting baseboards and protecting your carpet. As long as you rip it up right away it should be fine. That’s what I used and there were no leaks. Way cheaper than a roll of Tape and Drape.
I should have known…Duct tape works on everything! 😀 Thanks for the tip, Kim!
~Abby =)
I need to patch and paint new baseboards but I also need to caulk the tops of them. Any ideas on a quick, easy way to do that too? Thanks!
I have been putting off painting our dark brown 70’s style baseboards for months (we just moved in 6 months ago) because our house is mostly carpet and I dreaded taping the carpet… the paint shield is genius! I will be making a run to Lowe’s this week to get one! Thanks for the inspiration and newly found confidence! 🙂
Yay! Good luck with all of your painting! We put ours off for a long time but then ended up knocking it out in a weekend, and it feels so good to have that item checked off the to-do list! Happy painting!
~Abby =)
This is on my to-do list badly so I’ll use these tips as I’m sure it will be ME doing the work. Our baseboards/trim are an off white which is annoying so I might do them all white but then if have to repaint all the doors and trim of whole house…eek!
Thanks for the tips. I’ve always used my finger to apply the compound into smaller holes. It’s just easier overall. I like the idea of using a paint shield or spackle knife as a painting guide. Not sure why I never thought of that, although with heavily textured walls it might not work quite as well for me. Will certainly give it a try when the time comes though.
Thank you!! I didn’t even know about a painting shield. I just painted our dining room this weekend and felt all proud of myself, until I pulled off the tape from the baseboards – definitely not a clean line! Gray paint on white baseboards is not a good luck. I need to touch them up, and that little shield looks like just the ticket.
*good look
Thank so much for the tips. We have dogs and the baseboards near the doors really need painting.
Great post! Thanks for all of the great tips! I need to paint my own baseboards and this has given me the motivation to finally do it. I think it will make such a huge difference though! I can’t wait to see the finished product. Hopefully mine look as good as yours do. 🙂
-Brooke
http://www.beautydecorandmore.com
Hi Abby! I came across this post and because I am just really looking forward to painting my baseboards (HA!) I had to read it and I have a question about the BEHR Paint you used. It says on the Home Depot website that it resists stains and scuffs and has excellent durability. So my question is, have you found this to be true with your baseboards after painting them? I know you have 2 boys and I have 4 boys that are always throwing and kicking things around and if it can protect my boards from them even a tenth better than other paints, then its worth the money! Thank you for any advice!
Hi, Janeen! We don’t live in that house anymore, but I felt like the baseboards held up pretty well while we were still there. We would do the occasional touch up here and there, but nothing major. Hope you’re having a wonderful week!
~Abby =)
Great blog, baseboards are typically white, which is easily coverable with the wall paint color. So, if you happen to slop white baseboard paint on the wall, you can paint over it.
Do I have to first sand the paint off my old baseboards? They seem to be painted white with a sheen to them.
Can I skip this step? Should I prime them and then paint white?
Mine were new, pre-primed baseboards, so they didn’t have any prep work. If yours have a bit of a sheen to them, I might do a quick sanding over the old paint, just to rough them up a little bit and help the paint stick. If they’re already white and you’re painting white over them, I wouldn’t think you’d need to prime. If you’re covering up a darker color, priming may help or an all-in-one paint may do the trick. I hope this helps!
~Abby =)
What was the style of flooring in this house? Do you have the brand/color name?
Hi, Mel! This was actually IKEA laminate flooring from when they used to make it way back when. We installed it in 2009, but they no longer make flooring like this, unfortunately. So sorry about that!
~Abby =)