How to Make Your Own Party Invitations in Microsoft Word
Learn how to make birthday invitations for free using Microsoft Word and this simple step-by-step tutorial!
Our little Caleb just turned 2, (I’m still in shock. And denial. He’s never allowed to grow up.) and we will be having a party for him in a few weeks to celebrate. I love all of the cute invitations that I see on Etsy and Pinterest, but I really feel like it’s extra special when I can make my own. (Also, I’m cheap.)
So today I’m going to show you how to make your own party invitations too. They truly are so simple! And the beautiful thing is, once you complete this tutorial, you will have the skills you need to make whatever type of invitation you want. Ready to go? Let’s do it!
This post contains affiliate links. For more information, see my disclosures here.
How to Make DIY Party Invitations Step-by-Step in Microsoft Word
This post contains affiliate links. For more information, see my disclosures here.
Step 1: Create a Background
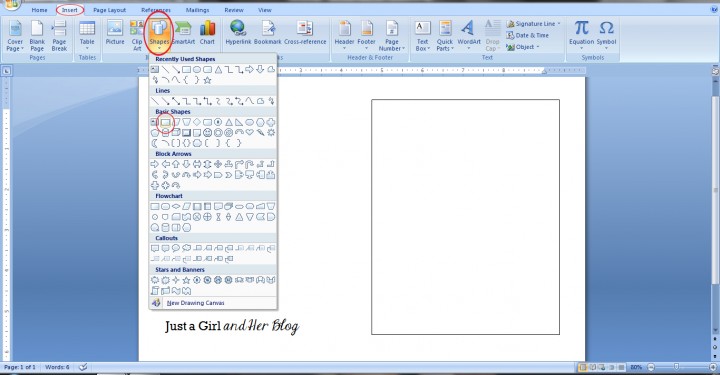
Start by opening up Microsoft Word. Then change the orientation of the page from “Portrait” to “Landscape” (found in the “Page Layout” tab).
Then I was ready to start creating my background. I am making vertical invitations. If you would like to make horizontal invitations, I recommend leaving the page in “Portrait” orientation. I went under the “Insert” tab, clicked “Shapes” and chose the rectangle.
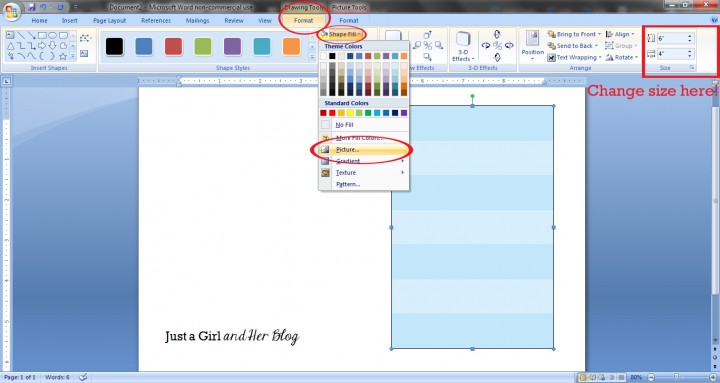
Once I drew my rectangle background, I needed to make it pretty! In the “Drawing Tools” tab, I changed the size to 6″ tall by 4″ wide so it would fit in my envelope.
Then I wanted to fill my shape with a pretty picture that I had saved on my computer. (If you don’t already have an image you’d like to use, do a Google image search for what you want, i.e. “blue polka dots” or “pink stripes.”) Under the “Drawing Tools Format” tab, click “Shape Fill” and choose picture. Then choose the picture file you have saved on your computer.
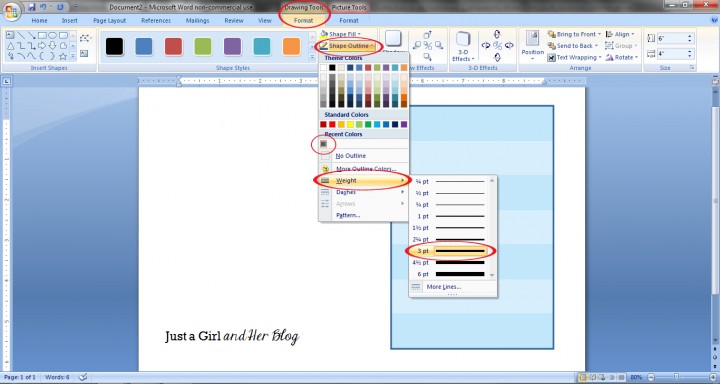
You may also want to change the border color and weight. Again under the “Drawing Tools Format” tab, click “Shape Outline” and you will be able to choose the color you want (I picked blue.) and make the outline as thick as you want it. (I went with 3 pt.)
Step 2: Make a Writing Canvas
I usually like to have a white background where my words are going to be so everyone can read them clearly. Using the same method as Step 1, I chose the “Insert” tab, clicked “Shape” and pick the rectangle. I drew mine 5.5″ tall and 3.5″ wide and gave it the same blue, 3 pt border as above, leaving the “Shape Fill” white.
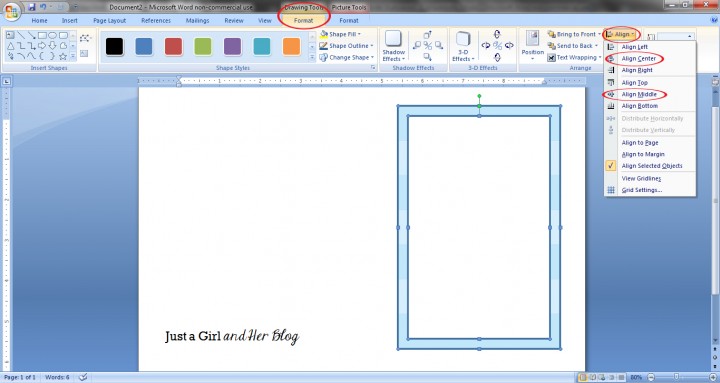
Then, since I wanted to make sure my white box was centered in my striped box, I selected both boxes by holding down the “Ctrl” key (Command on a Mac) and clicking each box. Under the “Drawing Tools Format” tab, I clicked “Align,” then chose both “Align Center” and “Align Middle.”
Boom. Perfectly centered.
Step 3: Create a Heading
We are planning Caleb’s party around the “If You Give…” books, (If You Give a Mouse a Cookie, If You Give a Dog a Donut
, If You Give a Cat a Cupcake
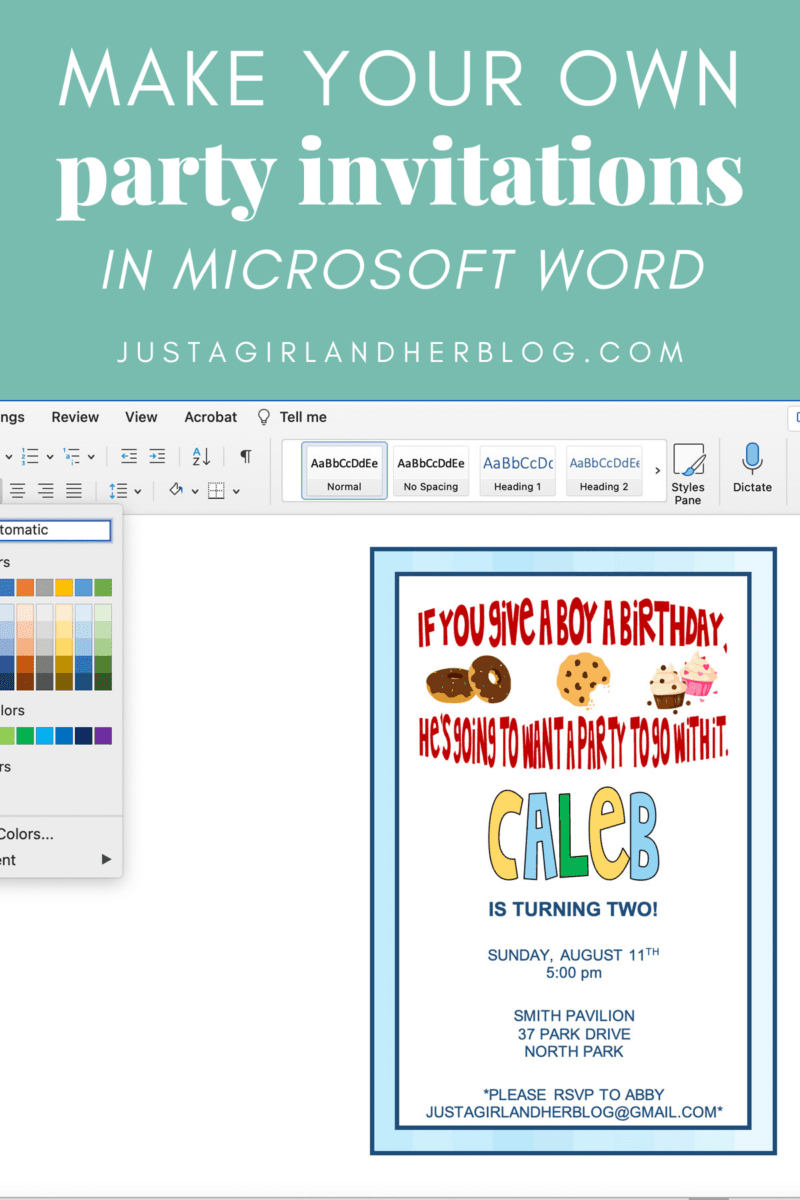
, etc.) so my tagline for the invitation is going to be “If You Give a Boy a Birthday, He’s Going to Want a Party to Go with It…”
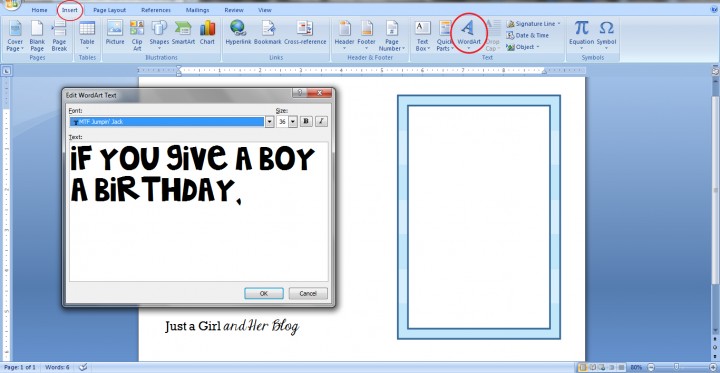
To put this line on the invitation, I used WordArt. Choose the “Insert” tab and choose “WordArt.” Then choose any of the style options. We’re going to change it later anyway. Type your text in the box and choose your font. I chose a font that looked similar to the one on the books. (It’s called MTF Jumpin’ Jack and can be downloaded at dafont.com.) Then click “Ok”!
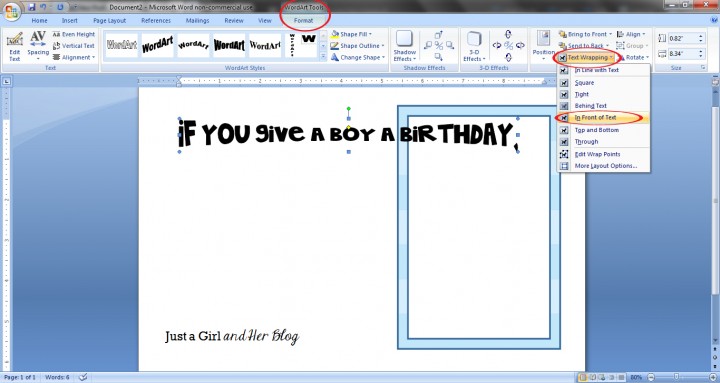
To make your WordArt easier to move around, click on it and then go under the “WordArt Format” tab. Click “Text Wrapping” and choose “In Front of Text.” You should now be able to move your WordArt wherever you want on the page.
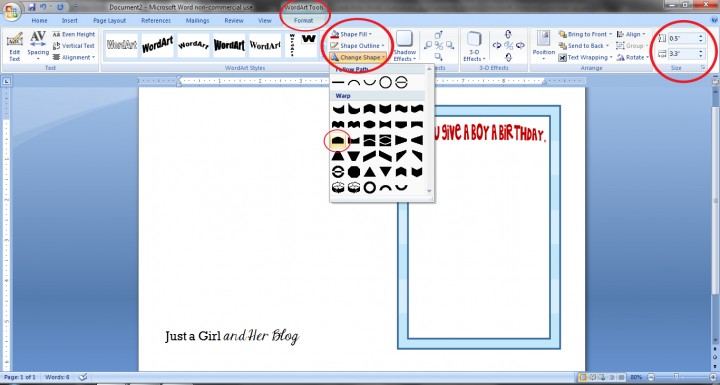
Now to make it pretty! Resize the wording to fit in on your writing canvas, and play around with the colors and shape until you get what you want! All of these options can be found in the “WordArt Format” tab. I went with 3.3″ wide by 0.5″ tall for the size, a dark red fill with no outline for the color, and a domed shape.
Then I simply repeated the process to create the second half of my tagline.
Step 4: Add Some Pictures
I wanted to add some pictures to my invitation to make it a little more pleasing to the eye. I decided to go with a cookie, cupcakes, and donuts to play along with my “If You Give…” theme.
There are a few options for finding images. You could find pictures from the web via Google image search, save them, and use the “Insert” tab then “Picture” button to add your picture.
I went with options from Clip Art because they had exactly what I was looking for. Click the “Insert” tab, choose “Clip Art,” and use the “Search for:” feature to find what you’re looking for. Click the picture to insert it on your page.
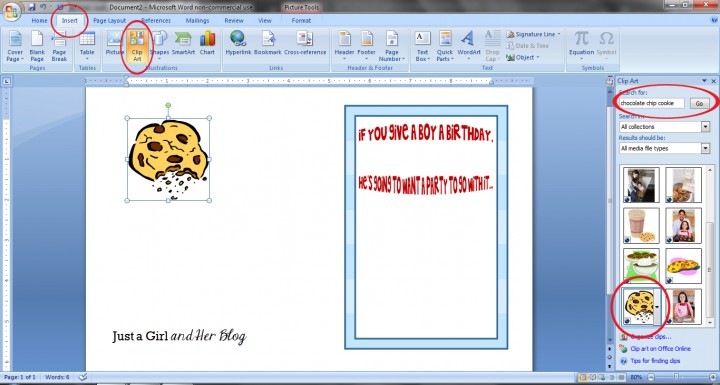
Whether you’ve chosen a piece of Clip Art or used a picture of your own, you’ll want to go under the “Picture Tools” tab, click “Text Wrapping” and select “In Front of Text” like you did for the WordArt. This allows you to move your picture to the location of your choice. Resize it to your liking, and repeat the process to add as many pictures as you’d like!

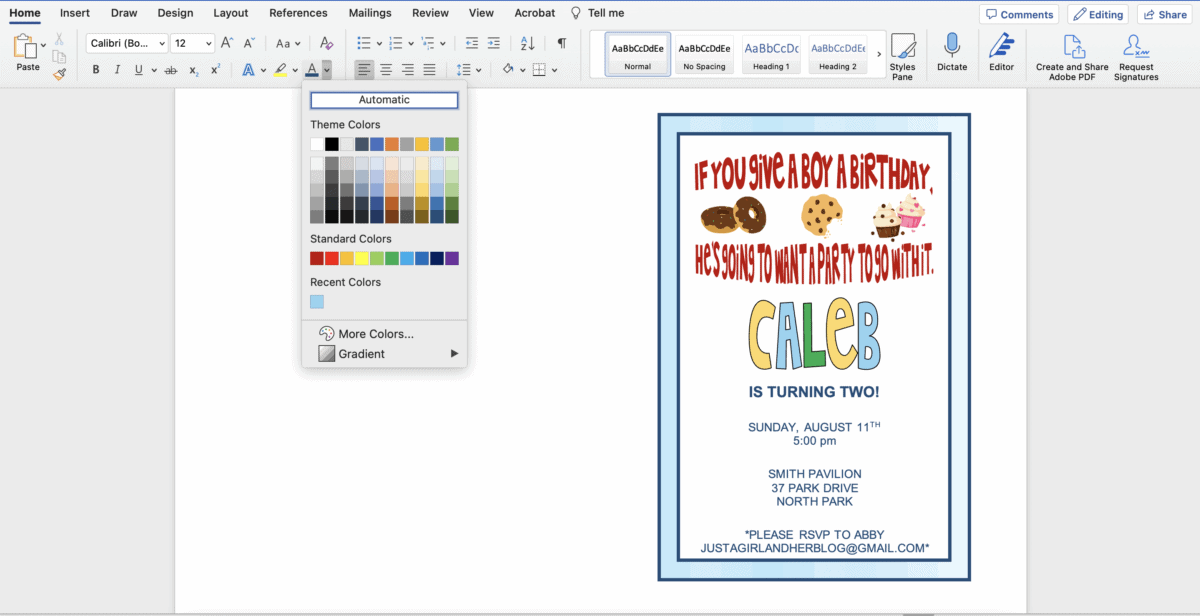
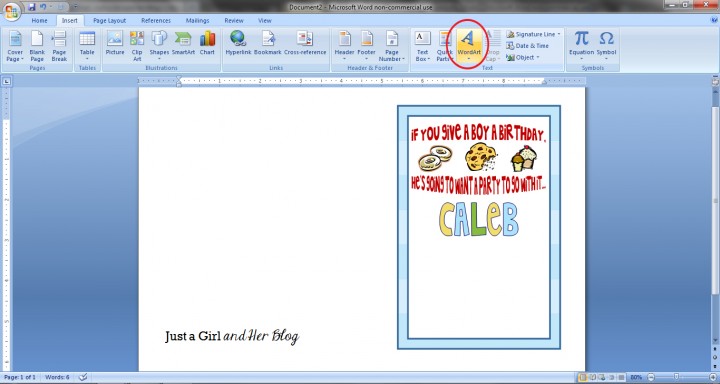
Step 5: Add the Party Info
Everyone will need to know where/when the party is, right?! I wanted to make Caleb’s name jump out, so I used WordArt to make that happen using the process in Step 3.
I then used a text box to list all of the pertinent party information. Under the “Insert” tab, click “Text Box,” then choose “Draw Text Box.”
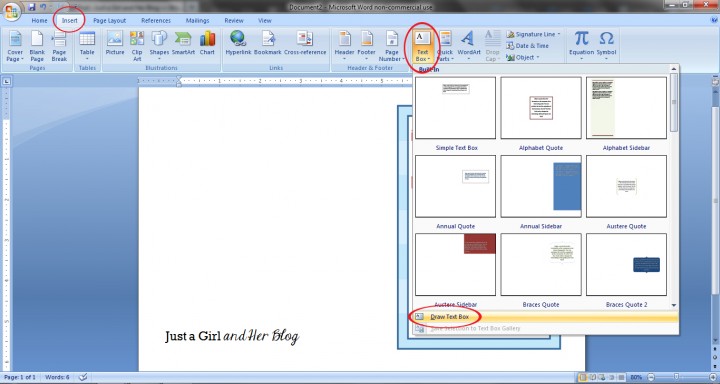
Draw the text box where you want it, then in the “Text Box Tools Format” tab, click “Shape Fill” and choose “No Fill” and “Shape Outline” and pick “No Outline.” This is to make sure your text box doesn’t cover up any of your other graphics.
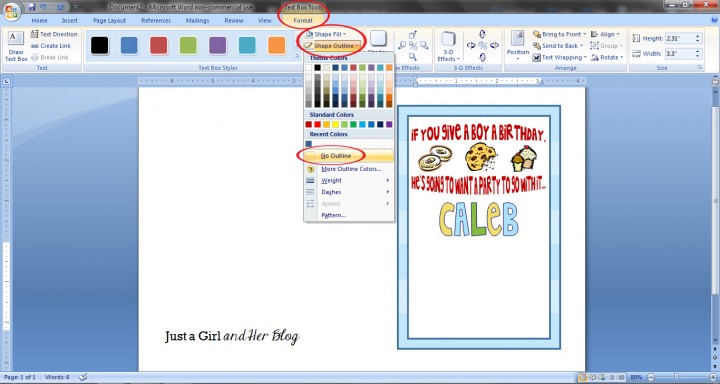
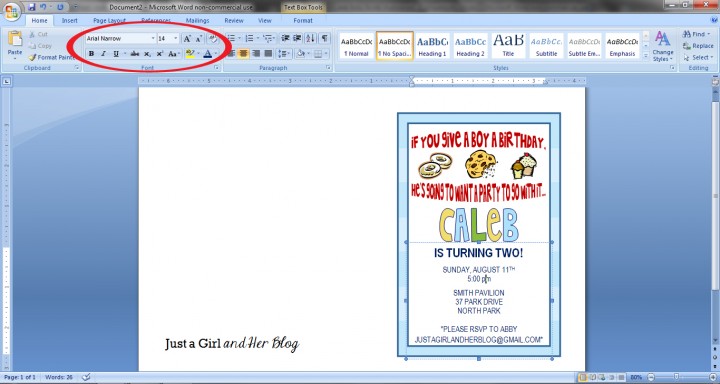
Now you can go ahead and type your info. You can change the size and color just like you would for a regular Word document, under the “Home” tab.
Step 6: Add Finishing Touches to Your Party Invitation in Microsoft Word
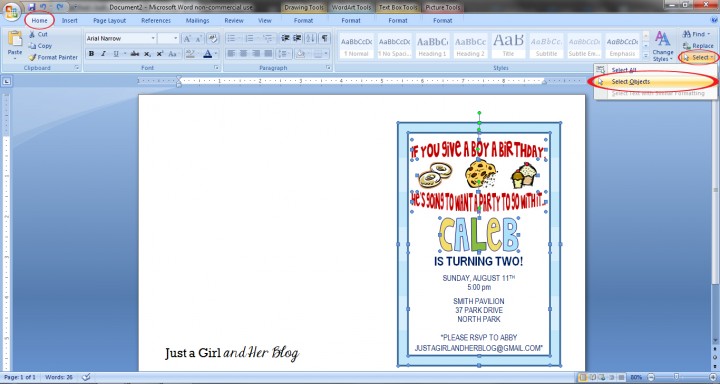
To finish it off, I like to make sure all of the elements of my invitation are centered and grouped together. To select all of my info, I go to the “Home” tab, click “Select” waaaaay over on the right side of the screen, and choose “Select Objects.” Draw a box around your whole invitation, and all of your elements should be selected.
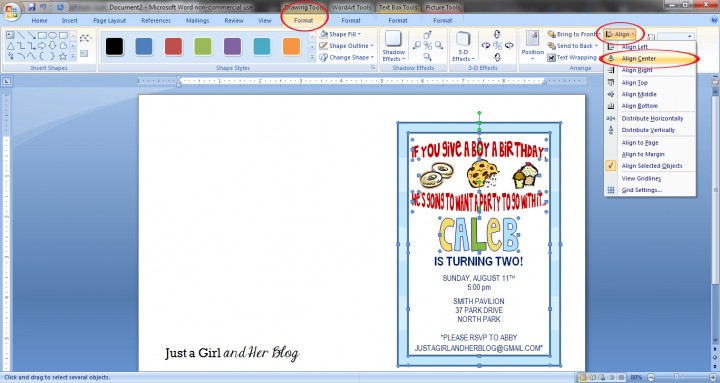
To make sure everything is centered, go to the “Drawing Tools” tab, click “Align,” and choose “Align Center.”
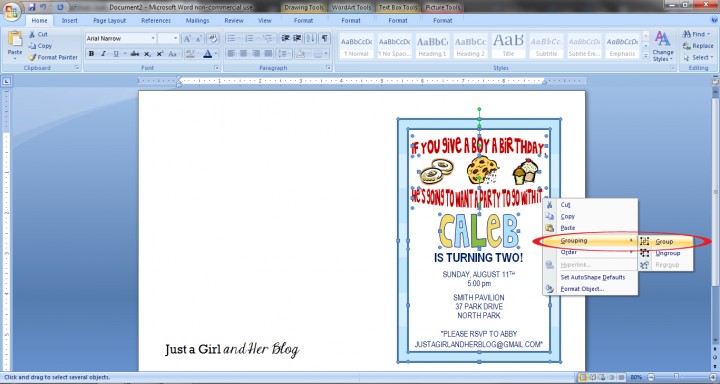
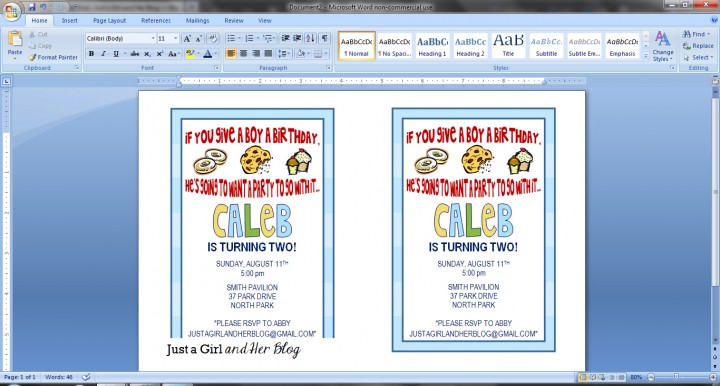
If you’re happy with the way it looks, with all of your elements still selected, right click within your invitation, scroll to the word “Grouping…” and click “Group.”
Now your invitation should be one object! You can copy (hit “Ctrl” and “c”) and paste it (press “Ctrl” and “v”) so that you have two per page. Print them, cut them out, and mail them to everyone who will be so incredibly impressed by your mad invitation-making skills!!!
party inspiration
- Anytime we host parties, we always use this party planning printable to keep things organized.
- Check out our birthday themed parties we’ve had in the past: Fireman & Police (plus the sand bucket favors) and a Superhero party for Connor when he turned 5.
- Play these Super Bowl Party Games, the next time you are hosting game day.
Think you can handle it?! I know you can! It really is easy to learn how to make your own party invitations.
And the beautiful thing is that once you have the skills, you have the ability to create whatever you want! You’ll no longer have to spend hours searching around for the perfect invitations AND you can save yourself some money! Yay for that!
DIY Party Invitations: Frequently Asked Questions
Want to save this post to revisit later? Be sure to pin the image below so you can find it easily!
Have you ever made your own invitations? Any tricks or tips to add?
Thank you so much for following along! Have a wonderful day!

This post contains affiliate links. For more information, see my disclosures here.
Love it!!! Buying invitations is expensive! This is awesome! Thank you Abby!
They can get pricey! I’m all about doing it myself whenever possible! I thought of you this week as hubby and I set up our budget-tracking program again (after slacking off for a few months) so we can use it in August. I thought you could be so proud, lol! 🙂
~Abby =)
Lol I am proud! 🙂 And don’t worry sometimes I slack too, after all its summertime!
Such a great tutorial! Thanks!
Wishing you a lovely day.
xoxo
Thank you, Jennifer! Hope your week is going well!!
~Abby =)
Really cute invitations and great tutorial! Thanks for sharing! 🙂
Thank you so much, Melinda! I hope you’re having a wonderful week!
~Abby =)
Great tutorial! I will keep this handy for my daughter’s birthday this Fall!
That is one of her favorite books too.
~Tiffany
Baby C is absolutely obsessed with them too! We read them over and over and over and over… 😉 Thanks so much for reading, Tiffany! Have a great week!
~Abby =)
this is great Abby, so much better than buying them and you can personalize them the way you want! thanks for the tutorial! 🙂
Thanks so much, Ingrid! You know I’m too cheap to buy anything I can make myself! 😉 Thank you for reading–hope you’re having a wonderful week!
~Abby =)
LOVE! I just helped my sis-in-law make invites for her little man’s first birthday. I was all “oh I’d love to help, you’ve done so much for us, it’s the least I can do,” but deep down, I secretly love making them. 🙂 haha.
I hear ya! I love figuring out the design and working in all of the elements. Hope you are doing well, friend! Thanks so much for stopping by!
~Abby =)
Thanks so much for sharing this. I saw it on domestic superhero.
Julie from julieslifestyle.blogspot.com
Thanks for hopping over from Domestic Superhero, Julie! I’m so glad you stopped by. Have a wonderful weekend!
~Abby =)
Love ur graphic design posts!! It’s amazing what u do with word!! Really inspiring thank you for sharing ur wisdom! Xo
Thank you, Ella! I always love figuring out new projects! Hope you’re having a wonderful week!
~Abby =)
I am so glad I found this tutorial! My 3 (almost 4) is obsessed with the color blue. Have you ever tried to find a blue invitation that wasn’t boyish? Impossible… so we will be making them this year for her Rainbow Dash, Cinderella, & Gio (from Umizoomi) birthday party ~ she has a horrible blue obsession! Thanks for the great tips 😀
Yay! I’m so glad I could help! Sounds like a great party! My kids are Umizoomi fans too. Every once in a while my two year old will just randomly shout, “SUPER SHAAAAPES!!” Lol. Such a crazy little man! Hope you’re having a wonderful weekend!
~Abby =)
thaks this is awesome!!!!!!!!!!!!
but some microsoft dont have format!!!!
Thanks, Tiffany! It’s true– the different versions of Word will vary. All of the options are still there, though, you may just have to look under a different tab. Hope you’re having a wonderful week!
~Abby =)
I know this post is from a few months ago, but I just wanted to tell you I love this! I never knew you could create everything in MS Word!! I just tried to make my first invitation and have a question: Any idea why my pictures on my invite disappear when I group everything together? They are in front of the text under “Text Wrapping”. Everything else works well, just not my pictures (they aren’t clip art– they are photos from my computer). Help please! Thanks again for your awesome graphic design tutorials!
Hi, Tiffany! Thank you so much for your sweet words! It’s hard to tell without looking at your computer, but I have a few ideas. That has happened to me before where it wouldn’t let me group pictures and shapes until I went under “Save As” and saved it as a Word 93-2007 .doc rather than the default .docx. For some reason that slightly different file type changes the “rules” a little bit and lets you group them together. So try saving it as a Word 97-2003 file, and if that doesn’t work, let me know, and I’ll try to think about it some more. Hope this helps! Have a great week!
~Abby =)
ANOTHER ONE! Thanks so much for being SO awesome Abby! I just finished my invite and copied & pasted it and my words–“Holy S****” Sorry I couldn’t help myself. This is amazing. I’m so excited! 🙂
Lol! So happy to help!
~Abby =)
Hi Abby,
I would absolutely LOVE to be able to create my own invitations using Microsoft Word instead of constantly having to use and pay for one using Evite or Paperlesspost. I’ve stumbled across your blog and have gone step by step attempting to create my own invitation using Word, but now I’m stuck. I’ve gone onto dafont.com to download my desired font and it downloaded the font into a zip file. Now I have no idea how to insert the font into the text box that I’ve already created using the WordArt. Am I doing this incorrectly?
Best,
Lauren
Hi, Lauren! It sounds like your font isn’t completely installed. If you’re on a PC, follow the first three steps of this post: https://justagirlandherblog.com/how-to-create-a-monogram-in-word/ . If you have a Mac, double click the file to unzip, and open the folder to find the .ttf file. In Finder, click “Macintosh HD” (your hard drive), choose “System”, then click “Library”, and select the “Fonts” folder. Drag the .ttf file into your “Fonts” folder (you may have to authenticate). Then restart your computer to use the font. Hope this helps!
~Abby =)
Thank you for posting this!!!!!
I just finished making my daughter’s invite following all the steps you listed here and it looks amazing!!! Thank you for sharing this with all of us for free!!!!!
Thank you soooo much for posting this tutorial! It was killing me to think about paying 15$ or more for a pdf invitation on etsy plus the printing of the invites! Now I have made my daughter the perfect pink horse themed invitation for her birthday in March (planning way ahead lol)! She was so excited that her invites had a horse on them. I had no idea how easy it was to make stuff like this. So within 2 hours I had her invites done and learned how to install fonts which had seemed so difficult to do in the past lol. I’m thinking of applying the same skills to make a paper banner for her party too! Thank you again!!!
Yay! Great job, Amanda! I’m so glad the post was helpful! I actually have a post on how to create a banner too if it would help: https://justagirlandherblog.com/bunting-banner-in-word-clip-art-tips-and-tricks/ . Happy early birthday to your daughter! I’m sure her party will be awesome!
~Abby =)
Love this! I am making invitations for my Mom and Dad’s surprise 40th anniversary party and i was able to follow these steps very easily. Any tips on printing to make them look professional? Can I just print them from my home computer or do they look better printing them at the UPS store? What about card stock? Are there different types of thickness that look better than others?
Thanks for your help!
Hi, Lauren! I have always preferred my own printer over the ones at FedEx Office or those types of places. I typically just print them on regular weight white card stock and use a paper trimmer to cut them out so the lines are crisp and clean. How sweet of you to throw your parents a surprise party! I’m sure they will love it!!
~Abby =)
I have wondered forever how to do some of the stuff you mentioned here. I am however still stuck on one. My word looks a little different then yours and I can’t find where you see the text in different formats, like stretched or shaped in an arch. Help! Lol
Thanks Jen
Came across this on Pinterest and it was so helpful! I had such a fun time designing my daughter’s party invitation and I didn’t even get frustrated like I normally do when I try something like this 🙂 Thank you so much!!
Thank you so much for the detailed, step by step tutorials. Although lots of my peers are on top of technology. I am not. This feels manageable and something that can actually be accomplished on my own. Thank you for actually providing a program tutorial that is not intimitating to someone like me.
Wow! Thank you SO MUCH for this! Your tutorial really gets the most out of Word, more than I ever thought possible!!! My invite has a professional and designer look :-)… When volunteering for non-profit organizations that don’t have a budget for design services, we now don’t have to sacrifice good design for price! I really appreciate your abilities, talent, and generous heart in sharing great tips! Best, Grace
I will be forever grateful for this tutorial!!! Thank you soo sooooo much! This is saving me a bunch of money on pre-made or printable invites!! As a single-mom that’s incredible that I can still have awesome looking invites made with things I already have in my home! Thank you again!!!
Thank you so much for this! I never knew you could do so much with Word and I use it all the time! My son’s Paw Patrol invite is so cute and made by Mom 🙂 Thanks again!
I’m so glad it was helpful to you Sheri! Have a wonderful day! ~Abby =)
This is such a great tutorial!Thank you so much! I’m having trouble getting all parts of the invitation to group. Everything groups except the picture. Any thoughts on what I can do to fix that? I can always just print one per page if it won’t work but I’d like to figure out what I’m doing wrong. Thanks again!
Hi, Lisa! So sorry I’m just seeing your question. It’s hard to troubleshoot from afar, but my best guess is that it is a text wrapping issue. Try clicking on the photo and going to Format > Wrap Text and choose “In Front of Text.” I hope this helps! Have a great day!
~Abby =)
YOU HAVE JUST SAVED MY WEDDING-INVITATION-CREATING LIFE!!! I am forever in your debt.
Aw, so glad the tutorial was helpful, Jaime! Hope you’re having a fabulous week!
~Abby =)
Thank you for this blog post… I just created an invitation that I LOVE!
What do you print the invitations onto?
Hi, Semetria! I usually print onto white card stock. I hope this helps! Have a great day!
~Abby =)
Thank you for the awesome info! Lots of things I didn’t you could do in word! I just made a super cute birthday invitation!!
Glad it was so helpful for you, Allison!
~Abby =)
Do you have an application you like for managing the invite list RSVPs? Most of the apps like evite and paperless post seem to have all sorts of UPLOAD your own designs but then you have to use their templates.
When I’ve had an extensive guest list, I’ve always just used an excel sheet to keep track. For a smaller list, I’m a pencil and paper girl!
~Abby =)
This was so helpful! I it felt so great to be able to create my babies 1st birthday invitations! Now I’m getting asked to create for others!! Thank you for the info and giving me confidence to take this on!! I wish I could you guys an invitation so you’ll see my hard work.
Thank you for this post! I started to pay for a design on Shutterfly and was inspired after reading your blog. I was able to successfully create a retirement invitation for a co-teacher of mine. We used a “camp retirement” theme and it turned out so awesome. The best part is it’s within our budget. Thank you for the steps! I learned so much.
Yay! So glad it was helpful for you, Jenn! I’m sure they turned out great! 🙂 Have a wonderful week!
~Abby =)
I cant find a template for invitations on word or google docs
Hi, Kim! I didn’t use an invitation template. I just made my own! 🙂 Hope you’re having a great day!
~Abby =)
My daughter is having a fashion show birthday party. We found different clip art online and want to use them on her invitations. Can we do that and how?
Thank you!
You should be able to just save the clipart as a .jpg or .png image to your computer and then in Word go to Insert > Picture from file. Have a great day!
~Abby =)
thank you for sharing! This was really helpful.
So glad it was helpful for you, Emily! Happy Monday! <3
~Abby =)
Thank you so much for this tutorial! Well explained and easy to follow!
So glad it was helpful, Stephanie! Have a great week!
~Abby =)
How do you cut them out? All I have are scissors. Which seems tedious. Any recommendations?
I like a paper trimmer for projects like this! (https://www.michaels.com/cricut-13in%C2%A0portable-trimmer/D385723S.html) They’re inexpensive and less tedious than scissors. 🙂