How to Install a Marble Hexagon Tile Backsplash
Learn the easiest way to cut and install a marble hexagon tile backsplash to add a beautiful backdrop to your space!

Welcome back to tile week! On Tuesday we kicked things off with our process for choosing our tile. Today we’re getting into the nitty gritty details of installation. Be prepared to find out everything you ever wanted to know about how to install a marble hexagon tile backsplash!
One thing you may not know about Donnie is that he is the son of an engineer. Because of that, he thinks like an engineer, he approaches projects like an engineer, and he is definitely uber-detailed like an engineer.
So when I asked him to write a little post about how he installed our tile backsplash in the kitchen, he came back with 4000 words on exactly how he did it! This post is a little lengthy. But our hope is that it will give you the information you need to tackle your own backsplash if and when the time comes! Here’s Donnie…
Installing a Marble Hexagon Tile Backsplash
A huge thanks to build.com for providing the backsplash tile for our kitchen renovation! Our favorable opinion of gorgeous, high-quality tile is 100% our own. 🙂 This post contains affiliate links. For more information, see my disclosures here.

I was more than a little intimidated when our boxes of hexagonal marble tile arrived at our door. The tile was absolutely stunning and way nicer than the ceramic tiles I’ve used in the past. But the thickness of the tile was a little scary. I know this means it’s a quality product, but I was nervous about cutting the tile.
After doing a little research online I concluded that the “score and snap” method of tile cutting does not work well with marble. Plus, the size of the little hexagons would make getting enough leverage to snap the tiles nearly impossible.
Choosing the Correct Saw to Cut Backsplash Tile
When I did our primary bathroom remodel I was able to borrow a massive wet saw. It had a heavy stand and water pump. It worked okay, but it wasn’t exactly user friendly.
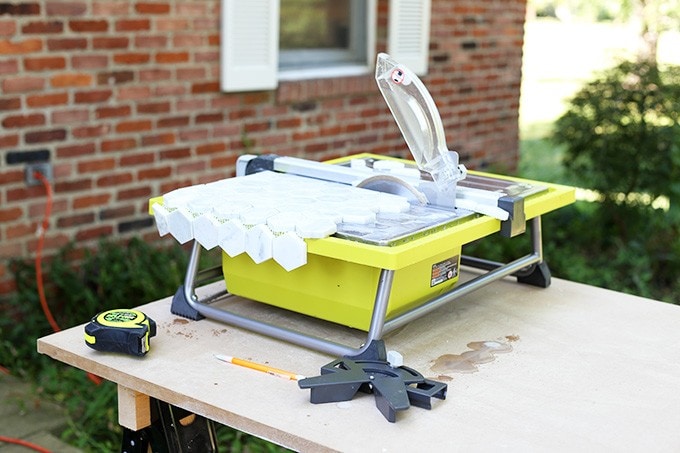
With this new project I thought it was time to invest in my own diamond bladed water saw. I went with a tabletop version of the water saw this time. And I was really impressed with how well it worked for the job!
Setup took just a few minutes. It’s so nice to have a little portable water saw that I can place on any work surface. The saw came with a diamond coated blade, but I purchased another one for $30 to have on hand should it start to dull.
I liked that the version I purchased lacked a pump — as the blade spins it’s immersed directly into a reservoir of water. There’s a max fill line in the reservoir, and even after a full day of tiling I only had to add a little more water one time. Not bad!
Tools I Used to Install a Marble Hexagon Tile Backsplash
How to Lay Marble Hexagon Tile Backsplash from Start to Finish
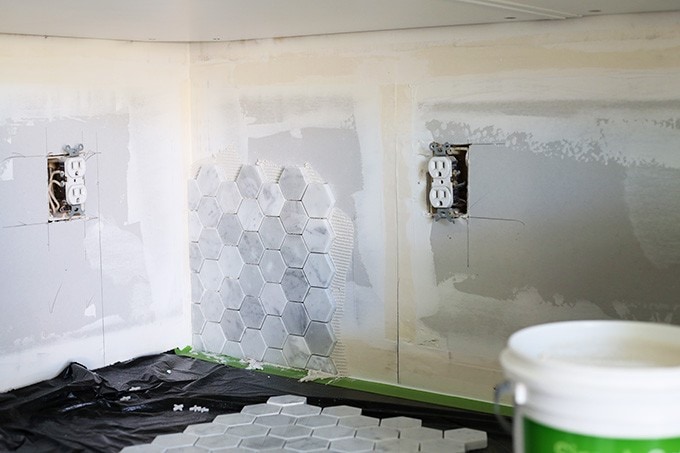
Prep the surface before backsplash installation.
During the kitchen demo process I absolutely destroyed our drywall when removing the old backsplash. In the end, I ended up replacing 90% with new drywall. It wasn’t what I originally planned, but it’s important to have a nice flat surface before you lay your first tile.
For a kitchen tile backsplash, it’s ok to tile directly onto the drywall. Unlike a shower enclosure that sees constant moisture, cement board or Hardibacker board is unnecessary for a kitchen backsplash.

Choose a tile layout.
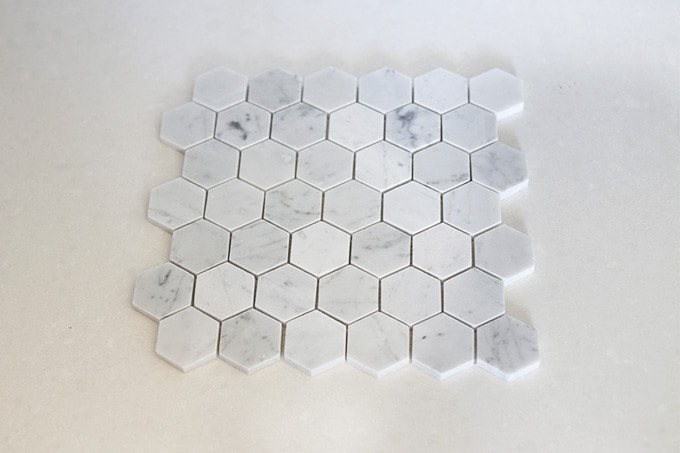
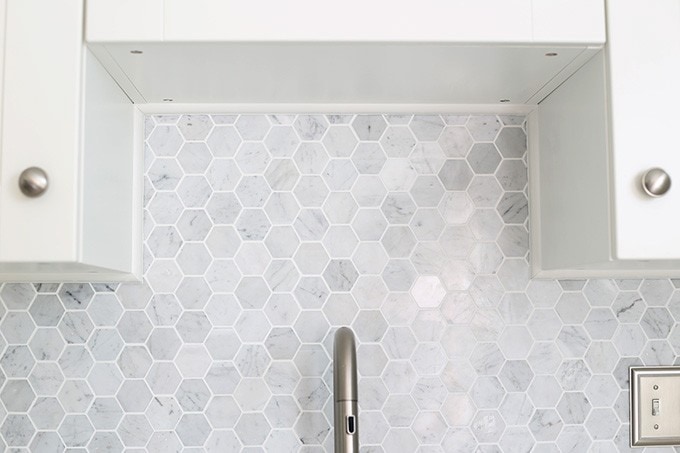
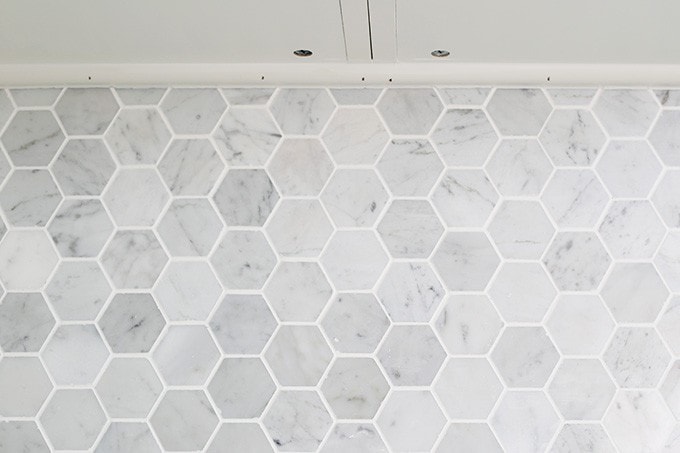
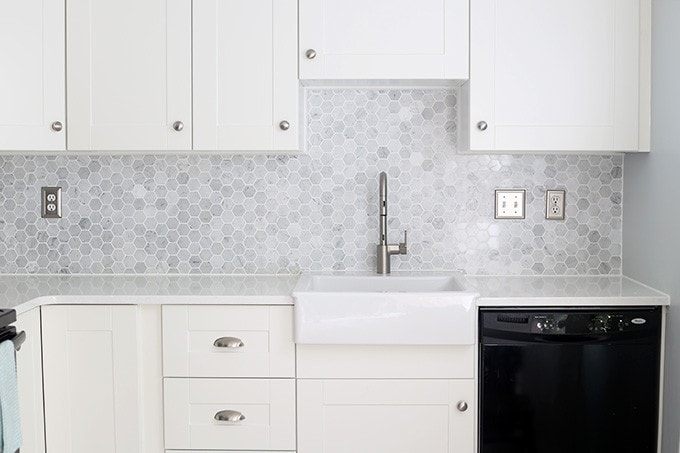
Before I placed the first sheet of hexagonal marble tile, I had to choose an orientation. When I held up a sheet to the wall I flipped it around both ways – flat side up, as well as pointy side up. To me, both orientations looked great. I asked Abby what she wanted, and without even looking she said “flat side up.” I guess it wasn’t really a tough decision for her! The pointy side up still looks nice in my opinion, but it’s more of a dramatic honeycomb look.
Once the tile orientation was determined, I took a few sheets of the marble tile out of the box and held them up against the wall to decide where I wanted to start tiling. We have a single corner with backsplash extending out in both directions. I decided to start there and work my way out. This allowed me to give the tiles an even “split” look in the corner.
I also started from the bottom and worked my way up. The countertop is perfectly level and was a good guide to work from.
My tile cutter has a really simple fence that made it easy to rip the entire left side of the very first tile sheet in order to butt it up against the bottom of the corner.
The first cut was fast and smooth with no chipping! This is a small victory if you’ve ever used a water saw to cut ceramic tile. I have to say that the thick marble seemed much less prone to cracking and chipping than standard ceramic tile. I much prefer working with this natural stone.
Pick a trowel (square or v-notch).
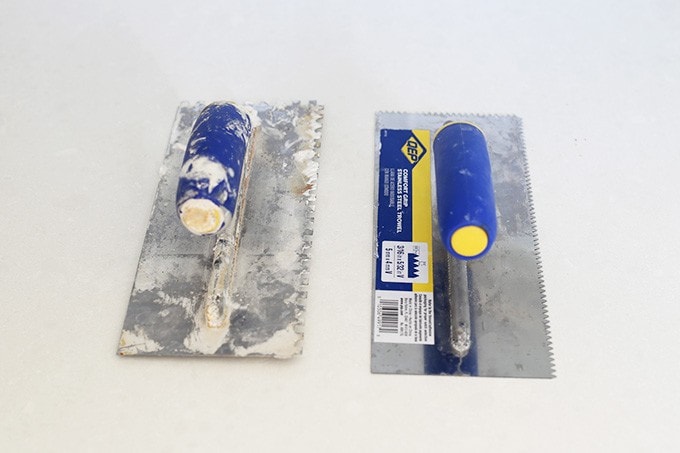
I had a hard time deciding what type and size trowel to use in spreading the mastic. I’m more familiar with the big 1/4” square notch trowels. When you think about it, the square notch allows for more mastic to be applied when compared to a “v-notch.” This makes a lot of sense when laying big 12”x12” or similar size tiles.
With the little marble hexagons I was working with, it seemed like a large square notch would leave so much mastic on the wall that when the sheet of tile was pressed firmly against the wall, I’d have to remove a lot of excess mastic that squishes out between all of the hexagons.
I chose a 3/16” v-notch trowel. This smaller notch is designed for small tiles. I debated this small size in my mind because in one sense I was working with tiny little tiles, but in another sense I was working with very large tiles when considering one full sheet.
The 3/16” v-notch trowel worked perfectly. This is a common size you can find at any hardware store. It didn’t leave too much mastic to ooze up between the tile, but it was plenty of material to get a nice solid hold.
Laying the First Sheet of Tile
For the first tile, I spread white mastic on the wall and then used my trowel to scrape off the excess and create horizontal ridges. I think horizontal lines better prevent sagging and drifting of the tiles as everything dries.
After the mastic was applied, I took my freshly cut tile sheet and stuck it to the wall. This first one was difficult. The mesh backing on the tile was still wet from the water saw. And as I pushed the sheet around to get everything lined up and spaced perfectly, some of the little hexagons came loose from the backing. Not good.
Eventually I was able to get everything lined up, but it took a while because of tiles moving around the wet mesh backing a little.
After that first tile I realized that I should no longer be installing tile sheets with a wet or even slightly damp backing. I had to adjust my strategy.
After cutting the next few sheets of tile, I placed them facedown outside in direct sunlight. This technique worked but was a little slow. In full sunlight, the backing still took over 15 minutes to dry out and firm up again.
About halfway through my first wall of tile I found a better solution…
A Quicker Strategy for Installing Hexagon Backsplash Tile
I was tired of waiting around for tile sheets to dry, so eventually I only left full tiles attached to the sheet. I would hold up a sheet to the wall and see if any cuts were necessary (wall, outlet, light switch, etc…).
If there were some non-full tiles required for the particular sheet, I would use a utility knife to cut the backing and completely separate the non-full tiles from the sheet. Using this strategy, I would cut tiles individually and would not have to wet the entire tile sheet. It was actually a little easier to cut tiles individually.
tile sheet tips
- Avoid installing with a wet or even slightly damp backing. The glue that holds the marble to the backing loosens a bit and everything slides around with even the slightest pressure.
- Only keep un-cut tiles attached to mesh backing.
Should I use spacers with hexagonal tile?
I like using sheets of tiles like our hexagon marble because I didn’t have to worry about spacing between each and every little tile. But because I opted to remove all partial tiles from the sheet and cut them individually, I had to be very careful about the spacing between these tiles.
Unfortunately, the spacing was not a standard number. I bought a variety of little tile spacers hoping to find the correct size — no luck. I had to eyeball it.
You may be thinking it’s crazy to install tiles without using any spacers. For square or rectangle tiles, you would be correct. The naked eye can immediately spot non-straight lines, but it wouldn’t catch the slight differences in spacing.
The way hexagon tiles fit together makes it easy for your eyes to spot incorrect spacing. Everything gets way out of kilter. So when placing my individual cut tiles onto the wall, it was easy to get the spacing correct and fit them into the pattern.
Correct spacing wasn’t issue for me, even without using spacers. The only place I used spacers was along the countertop line to ensure there was enough room for a bead of caulking once the tiling and grouting process was complete.
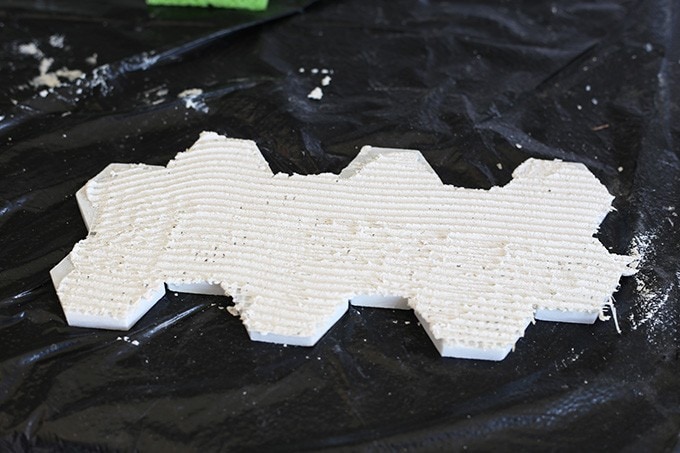
Should I put mastic on the wall or on the tiles for marble hexagon tile backsplash?
Every other time I’ve installed tile in our home (until this project!) I’ve spread tile mastic directly to the floor or wall and then placed the tile directly onto the mastic, pressing firmly and evenly to set the tile. That’s how I started this project.

The problem was that I was rarely able to spread enough mastic to apply multiple sheets of tile at the same time. There was always cutting and measuring that slowed me down.
To me, it made no sense to apply mastic to the wall, stick on a tile, and then scrape off all the remaining mastic from around the sides of the tile. This was even more difficult because of the shape.
For this project I converted to applying mastic directly to the tile, using the v-notch trowel to create the ridges, and then sticking the tile to the wall. This was a huge time saver, as I didn’t have to scrape excess mastic off the wall.
And let’s be honest, when applying all of the individual cut hexagons in and around my other full sheets, there’s no possible way I could get a trowel onto the wall to create the ridges.
Now, if I was tiling a floor would I use this same technique? Absolutely not. If you’re walking on a surface, you better be absolutely sure that the mastic is spread evenly with 100% coverage under the tile, lest you walk on an unsupported tile and crack it!
With our marble backsplash I was very careful to get 100% coverage on the back of each tile, and because no one would be walking on our backsplash, I felt comfortable with my technique.
If I was doing a subway tile backsplash or something more square, I would’ve stayed with the tried and true mastic-to-wall technique.
How long does it take to install a tile backsplash?
In our small kitchen, the tile cutting and installation process took about 10 hours. Professionals would do it half that time, and someone that’s never tiled before or used a water saw should add two or three hours to my time.
Pros and Cons of Installing Marble Hexagon Tile Backsplash
Going into the project I was worried about working with a natural stone like marble. It turns out that marble is wonderful to work with! Our tiles were nice and thick which made cracking while cutting almost non-existent.
Marble is much easier to work with on the saw than ceramic tile, which is more brittle, cracks more easily, and leaves little shards of ceramic all over the saw, making getting a smooth cut more difficult. The marble was a dream to work with!
The challenge of this installation was the shape of the tile. It was my first time working with hexagons, and it was a little tricky– definitely more time consuming than rectangles or big squares.
But don’t let the shape scare you away from doing a similar project. It may take a little longer, but the results are stunning!
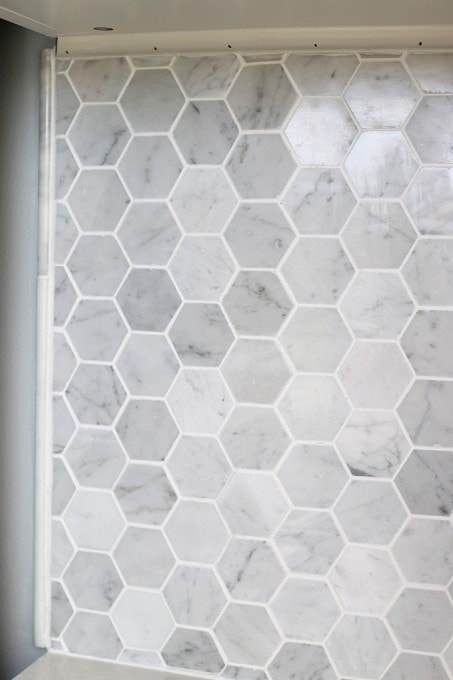
Creating Transitions with Marble Hexagon Tile Backsplash
When laying tile, it’s always hard for me to know what to do with transition areas. It was easy on one side of our backsplash — where two walls come together. It wasn’t so easy on the other side of the backsplash where the lower cabinets end mid-wall to make room for the refrigerator.
For this transition, I cut the tiles in a straight line to end right where the countertop ended and then weighed my options.
After some research, I found that for this type of transition, pencil tiles are the way to go. I made the mistake of not ordering the matching pencil tiles when I initially placed my tile order, so I had to go to our local home improvement store and see what options I could find. Fortunately, our gray and white polished marble is the most common marble variety, so I was able to find some marble pencil-tile trim pieces.
Once home, I held the pencil tiles up to the wall and realized that they were too thick to look good as the final transition piece of our backsplash. These are long, thin, and delicate little tiles, but I knew that if I could rip 1/4” of off the back of each pencil tile, it would be a perfect fit. I bought a few extra so I could afford to waste one or two trying.
It turns out that I was able to lay the marble pencil tiles on their side and easily rip the required depth off of the back with the diamond bladed tile saw! I did crack one of the tiles, but it was after the cutting was complete.
Pencil tiles are delicate to start but become even more so after slicing them in half. I think this solution looks pretty good!
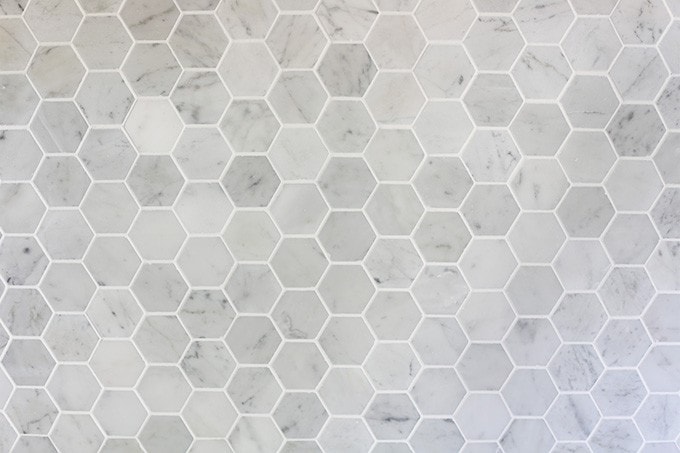
How to Grout a Marble Backsplash
After our tile was installed, Abby and I both thought that white grout would look the best. Early in the process, we considered gray because we thought it would hide stains better, but after the tiles were up, it was clear that white grout would really make the grayish marble stand out.
Deciding Between Sanded and Non-Sanded Grout
In all of my other tile installations, I would just buy any old sanded grout in the correct color. I’d only worked with ceramic in the past, so it wasn’t much of a worry. Polished marble is a different story. It’s a softer natural stone, so I wasn’t sure if sanded grout would scratch the tile.
Looking at sanded grout at the store, I saw that different grout companies used different types of sand. Some used silica sand and others used quartz sand. I’m not sure if those different types of sand would scratch the marble or not, but because the grout line on our sheets of hexagon tiles was less than 1/8”, I decided to use non-sanded grout for the first time.
Here’s the “bright white” non-sanded grout I bought from our local home improvement store.
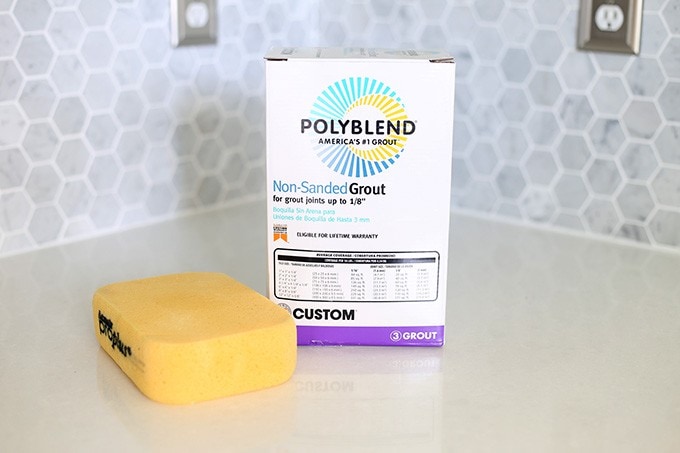
You will save a lot of money by purchasing unmixed grout from the store. A little bucket of pre-mixed grout can easily run you $45, while a box of un-mixed grout that equals the same amount will be around $15 or $20. The difference? Water.
Mixing the Grout Correctly
The box of grout I bought had the clearest instructions I had ever seen! I bought two boxes but only ended up using one. It’s always easier to buy too much and return the extra on your next trip to the store than it is to have to run out and purchase more while you’re covered in grout.
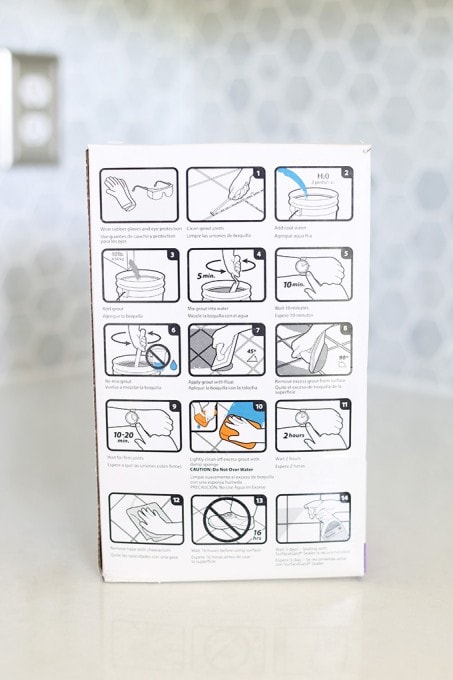
Anyone that has mixed grout before knows that using the precise amount of water is super important and also a little tricky. You can be mixing grout and it seems way to clumpy and dry. Then you add a teaspoon of water and it changes everything and the grout is perfect. I’m exaggerating a little, but once the grout is close to the correct consistency, be careful when adding more water. It’s really easy to go overboard and add too much.
I think most people have the tendency to mix the grout much too wet. Not only will the grout not cure as well, but it will fall off the wall as you’re spreading it. I mixed the grout to a consistency that it would easily stick to the wall and would not droop and run down the wall.
Applying the Grout to the Backsplash
I’m always nervous at first when spreading grout because in my mind it feels like a time-crunch, that if I don’t spread it fast enough everything will dry and the backsplash will be ruined! Fortunately, the grout is pretty forgiving. You can take your time, work grout into one area with the float, scrape off the excess, and then move on. No need to rush.
When it came time to wipe off the “grout haze” covering the tiles, I used a barely damp sponge to wipe everything down. It took a couple rounds of wiping and cleaning off the sponge to get the marble shining. It’s easy to go overboard with a sopping wet sponge.
Grouting (even hexagon marble tiles) will take a fraction of the time it takes to actually lay the tile. Taping everything off, mixing the grout, and getting my tools ready took about an hour. The actual grouting took about two hours.
How to Seal a Marble Backsplash
24 hours after grouting, it was time to seal the tile. This being the first time I’ve worked with a natural stone tile, I did a little bit of research. Should I seal my marble tile before or after grouting? What type of sealer should I use on a marble backsplash? I wasn’t sure.
I called our tile manufacturer, Daltile, to make sure I was sealing their tiles correctly. An expert picked up the phone right away. I told him what type of tile I was using and he recommend I seal the tile after the grouting was complete and to use any of the common brands of a penetrating natural stone sealer, as opposed to the sealers that leave a sheen right on the surface of the tile.
Marble is absorbent, so the idea is that you use a penetrating sealer to fill up the pores in the stone so that a stain has a harder time penetrating the surface of the marble.
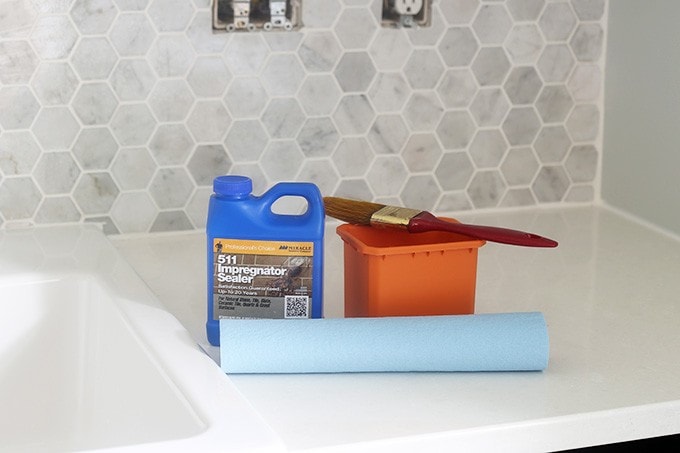
I applied two coats of this natural stone sealer. For polished marble, one tiny bottle is all you need. I brushed on the sealer with an old brush, waited 10 minutes, and then wiped any excess off with some heavy duty workshop paper towels.
I could tell the marble absorbed some of the sealer, as the tile is now every so slightly darker.
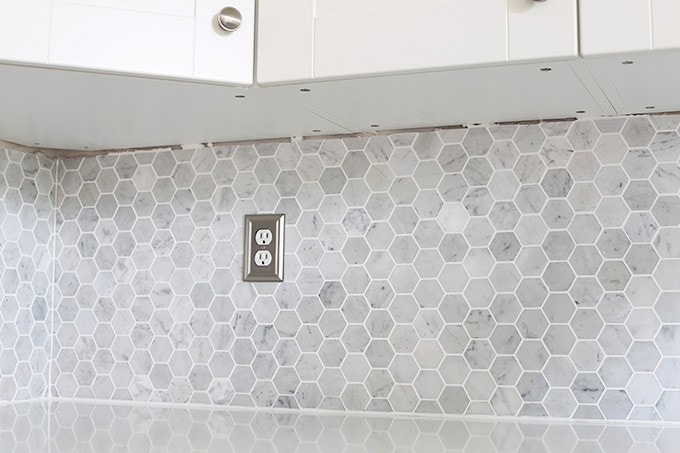
How to Install Trim Where the Backsplash Meets the Kitchen Cabinets
You can see in some of the photos that there is a small gap between the tile and the underside of the cabinets. It just didn’t feel right to tile and grout up against the cabinets, so I intentionally left about 1/4” gap all the way around. The final step of the tiling process involved trimming out the cabinets to cover the gap.
I looked online for pictures of similar projects where tile meets the underside of the cabinets. Some tile and grout right up to the cabinets, others use various trim tile pieces, and others cover the gap with some simple wood moulding. I chose the latter option.
I picked up some MDF shoe mould from the hardware store — not to be confused with quarter round. It’s more of a “quarter-oval.” I chose MDF because it’s inexpensive but is also straighter and truer than wood quarter round at the low price I was looking for. Also, MDF is less prone to splitting when attached with a nail gun.
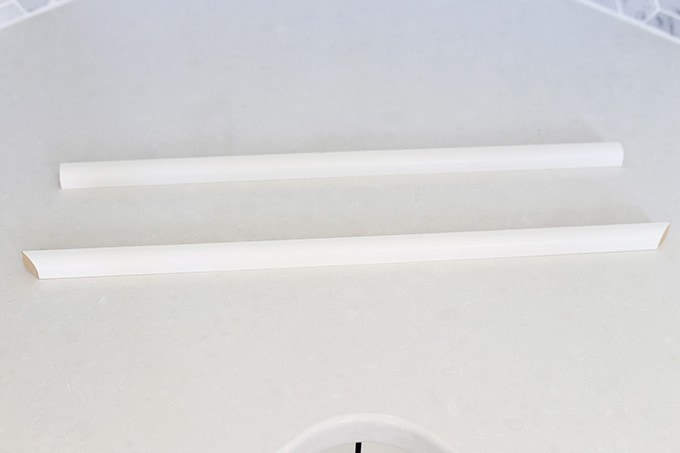
Cutting and installing the trim is a pretty simple process. All you need is the MDF shoe moulding, a saw capable of cutting 45 degree angles, tape measure, pencil, nail gun, and wood glue.
Attaching the Trim
One of the reasons I liked this part of the process is because it gave me another excuse to use my cordless brad nailer. It’s so nice not having to drag a compressor around with me to use a nail gun!
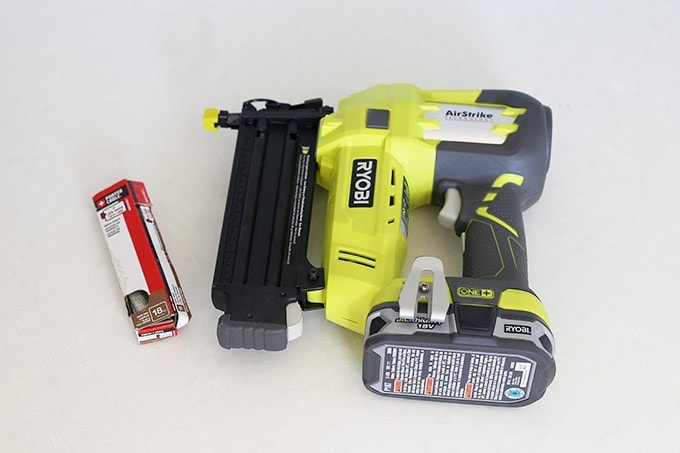
I used 1” brads. This seemed like the perfect length to drive through the shoe mould, but not so far into the underside of the cabinet frames to pop through on the inside.
As you attach the trim pieces, make sure you use wood glue for both inside and outside corners. With trim, those are the areas that tend to separate and get loose over time. Wood glue will prevent that. Cutting and attaching the trim only took about 30 minutes.
For filling the tiny little holes on this trim, spackling is a little easier to work with than wood putty. Just a press a little bit with your fingers into each nail hole. Everything will still look unfinished until you caulk the gaps where the trim meets the backsplash as wall as the underside of the cabinets.
An Easy Trick for Caulking the Gaps
It’s funny that what seems like a simple task (caulking) can be more frustrating to me than any other part of a job. I’m just not good at laying down a perfect bead, I end up making a mess, and it just never looks as nice as I would like.
Fortunately, I found a trick that makes an amateur like me look a little better — 5 oz. squeeze tubes. A big tube of caulking and a gun can get a little unwieldy and hard to manage. I feel like I can be much more precise and go slower with the squeeze tubes.
Marble Hexagon Tile Backsplash: Final Thoughts
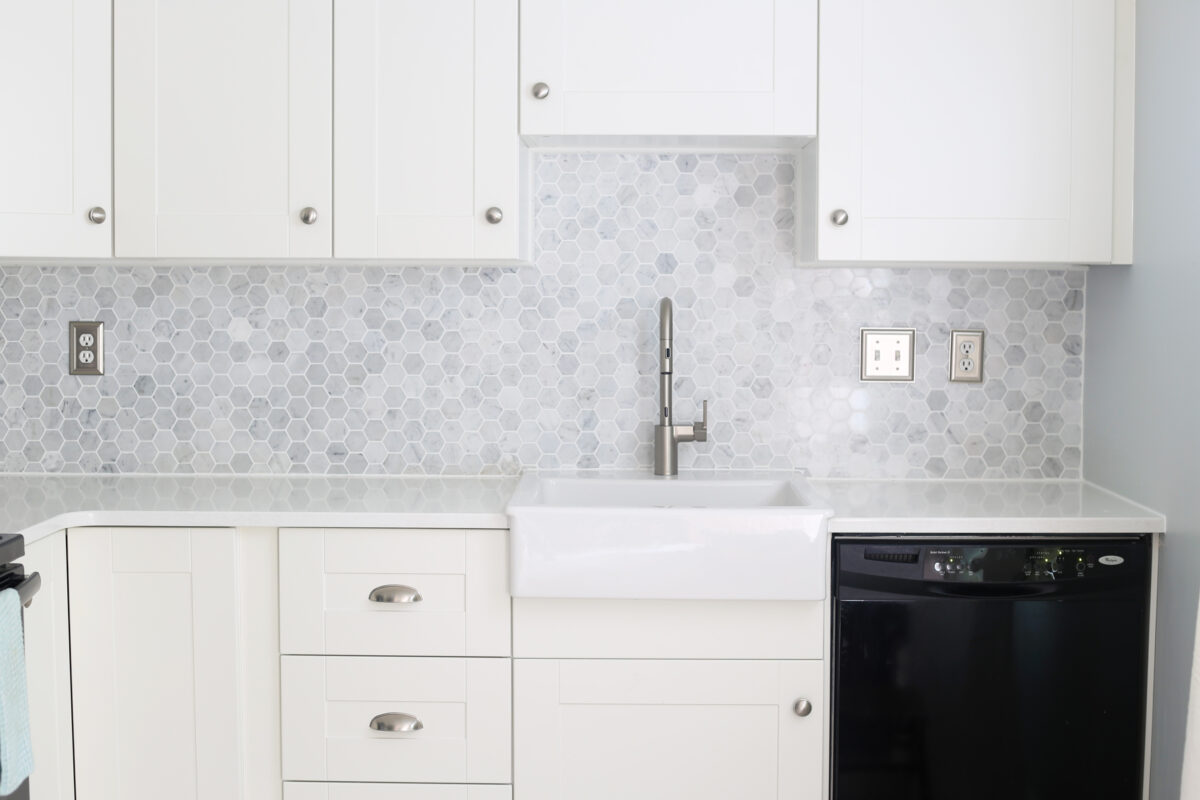
This project made such a dramatic difference in our newly installed kitchen. The marble hexagon tiles are now the focal point of the entire room.
Installing a tile backsplash is not an easy project, but it’s a project that anyone can do. Really. With two people you could knock out the entire project in a weekend.
And for those afraid of working with a natural stone like marble, don’t be! I much prefer the thick and forgiving marble to ceramic tile.
I was practically skipping around our house with glee while this whole project was going on. From the first day that Donnie started installing the marble hexagon tile backsplash, I knew it was going to be the perfect “wow” factor for our kitchen, and I could not be more thrilled with how it turned out!
Installing Marble Hexagon Tile Backsplash: Frequently Asked Questions
Thanks so much for following along! Have a wonderful day!

A huge thanks to build.com for providing the backsplash tile for our kitchen renovation! Our favorable opinion of gorgeous, high-quality tile is 100% our own. 🙂 This post contains affiliate links. For more information, see my disclosures here.
Looks amazing!! I would never have the patience for that.
Thank you, Nicole! Yes, I’m thankful that Donnie is an incredibly patient person! (Both with our kitchen and with me, lol!) Hope you’re having a wonderful week!
~Abby =)
The tiles are amazing! Thanks for sharing the whole process all you tips and tricks will come in handy if we are ever brave enoughto do this ourselves!
Thank you so much, Gilly!! You can do it! 🙂 Have a wonderful week!
~Abby =)
Your kitchen looks incredible! Wish I was brave enough to try it.
Thanks for the post, this was really helpful! I’m curious what you thought of the Ryobi tile cutter, did the blade dull quickly? We’re thinking of just buying one too instead of renting a tile saw.
Loved it! It was only the second wet saw I’ve used but this one was better than the massive industrial one I borrowed. I did a fair amount of research and then bought this Ryobi model for $129. I also bought an extra diamond coated blade to have on hand. By the end of the project I did notice that the blade was starting to get a little dull, but not even close to the point of needing to replace the blade. If I was a contractor using a saw every single day this probably isn’t the model I would choose but it’s fantastic for the price and perfect for my handful of tile projects each year. I definitely recommend this saw.
Thanks for the response Donnie! That’s great to know. This is our first time using a wet saw so we didn’t want to be rushed with having to return a rented saw.
I blogged about your post in my Friday Favourites a couple weeks ago! So helpful, thanks again!
https://www.housemakenice.com/#!Friday-Favourites-Week-37/cmbz/55f04f870cf24e84f7657a2d
Love the hexagons! It’s beautiful, Abby!
Wow! I love it and it looks amazing 🙂 This is a great tutorial post with great info, great work Donnie!
Lauren Baxter | Lovely Decor
xx
Gorgeous! We just bought a house and are doing a lot of the work ourselves so I can totally appreciate a good DIY post. This was an awesome step by step and when we put in our backsplash, will definitely use this for tips! We are going to have a white kitchen too. Love your posts on your kitchen reno. Thanks!
THANK YOU!! i have been looking for the trim around the cabinets like you did but no one else has done it! My husband and i just redid our kitchen with the carrera marble tiles (in rectangles) and i just keep looking at how it ends with the cabinet and was not in love. I want to “finish” our trim like you did! Great idea! the kitchen looks great 🙂
How did you get the tile to stay flat while cutting it with the wet saw? I have the same saw and when I went to cut the ends of the tile off it kept pushing the tiles up and wouldn’t cut.
Hi Sarah!
The saw has an adjustable blade guard that keeps water from spraying everywhere. You can also push it down right against the tile and that keeps the tile from lifting up as you cut.
Thank you guys! I’m just about to install the same tile in my kitchen and was a bit worried. You have given me confidence to get the project going, although the products here in Australia are a bit different I am now sure I got the correct ones 🙂
Thank you,
Anna
This is fantastic! You convinced me to do mine on my own instead of dropping $500 on installation!
Thank you, Marco! Happy tiling! 🙂
~Abby =)
LOVE this, thank you so much for sharing your experience. My husband and I are looking at similar tiles, and I have one question. Did you have any sides that didn’t butt up to a wall? We’d have two ends that would be exposed, wondering how to finish those off. If you have any thoughts, would really appreciate it. We’re total newbs at this. 🙂
We did! We added a bull nose piece to finish it off. I believe you can see it in this post right before we start talking about choosing grout. I hope this helps! Happy tiling!
~Abby =)
Excellent write up!!! Thank you for walking us through this project – we’re eyeing some green marble hexagon tile for our back-splash and are very happy to have found this post!
P.S. Your kitchen is gorgeous!!!
You’re too sweet, Bernadette! Thank you! So glad it was helpful for you. Have a wonderful week!
~Abby =)
Very nice kitchen! Going to have new IKEA kitchen too. I have a question, why don’t you install the tiles first before the cabinets?
Great question! Installing the backsplash first wouldn’t allow us to have our cabinets and countertop right up against the drywall. Definitely easier to do it afterwords and line the tiles up with the countertop.
How did you cut the tile where two walls meet in the middle? Or how did you do your I should say?
I have a Ryobi water saw that I use to cut tiles!
Love the info, as my husband and I are beginning our hexagon backsplash this weekend… after seeing this post..we decided to save the 800. and do it ourselves Husband likes using the new Ryobi saw…but time consuming and confusing with the shapes…will send photo when finished .. thank you so much!
Yay! Good luck! Looking forward to seeing how it turns out! <3
~Abby =)
Just had a semi professional install the same backsplash. On final inspection noticed that many of the tiles aren’t flush with each other. Do you know the method for correcting the unevenness.
Once they’re in, they’re in. You may want to talk tot he semi-professional.
Your photographs are so beautiful. We had the same tile installed but found that the installation had significant depth irregularities. Was your tile in any way uneven after you installed? I think we just had a bad installation 🙁
We don’t live in that house anymore, but I don’t remember them being uneven at all. So sorry I couldn’t be more help!
~Abby =)
So inspiring! Do you remember what mastic you used for this project?
I used pre-mixed gray mastic. When using gray it’s important to make sure that the mastic doesn’t sit on the front of the tile too long before wiping off or else it can stain. Especially soft tiles like marble.
Looks great! I’m about to do my first backsplash so this is very helpful. I am hoping to rent a wet saw. Is the one you used rentable? Also, I’m going back and forth between square (easier) and a herringbone (prettier!) but am scared that the herringbone will be too difficult for my first DIY Backsplash!
I used a very inexpensive Ryobi wetsaw. I actually like it much better than some very expensive wet saws that I’ve rented in the past.
The pattern you choose will make things more time consuming but I don’t think it will make it that much more difficult. Go with the pattern you love!
This turned out beautiful! So you have any tips on working around the outlets? are there spec depth outlet covers needed after tiling or anything weird like that?