How to Decorate Shelves in 5 Easy Steps
It can be a challenge to know how to decorate shelves, but this foolproof formula will teach you how to style shelves beautifully in no time!
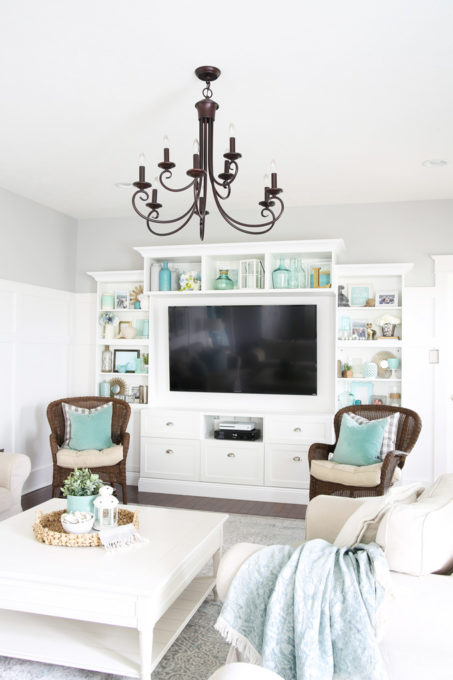
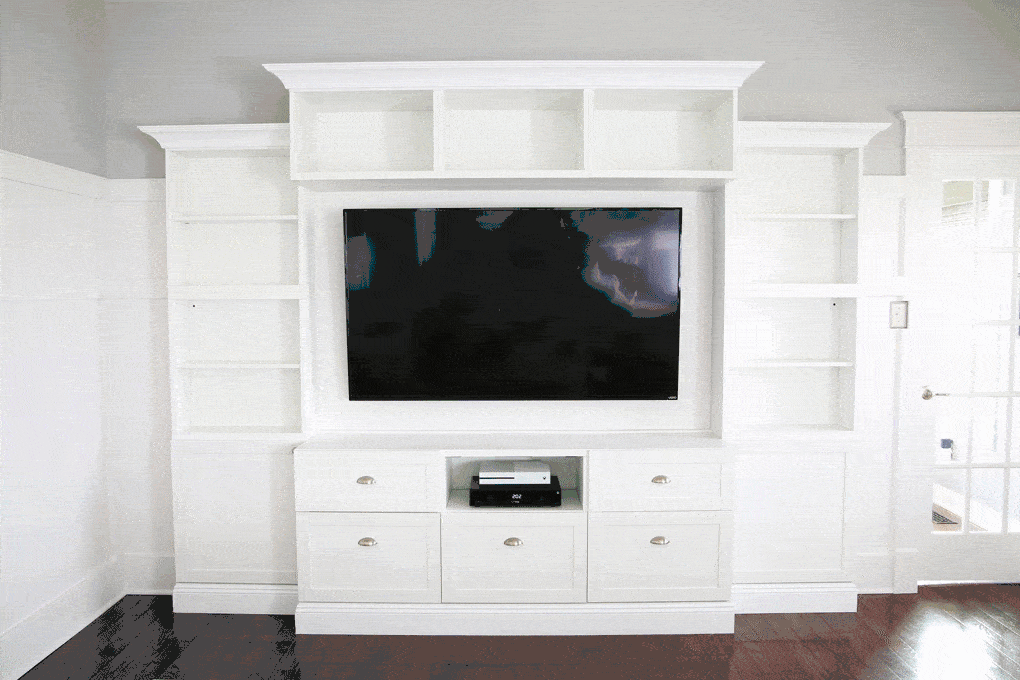
Not long after we moved into our house, we put in an entertainment unit (made with IKEA’s BESTA system) with a bunch of open shelving in our living room, and since then, almost every time I show a photo of it, someone asks, “Can you do a post about how you decorate shelves in your living room?”
Well, today is the day! Yippee!

When I re-styled my shelves for summer, I took photos of each step so I can break down the process and make it easy to replicate in your own home.
This same process would work for styling floating shelves, a bookcase (which would obviously end up with more books than mine!), the top of a buffet or basically any area where you’d like to create a little display in your home!
How to Decorate Shelves the Easy Way!
This post contains affiliate links. For more information, see my disclosures here.
1. Take Everything Off of the Shelves

I like to start with a blank slate, so even if I’m going to be using a similar color scheme, I always start by taking everything off of the shelves. This allows me to get a clearer overall picture of the space so I can decide what goes where.
2. Decide on a Color Scheme, Collect Items to Decorate Shelves
I want my shelves to look unified and polished, so the next thing I do is decide on a color scheme or theme for them. This doesn’t have to be super strict, but it is nice if there is a general overarching theme to tie the look together.
For my summer shelves, I decided to go with my favorite mint, aqua, and white combination for a beachy feel to go along with the summer season.
What should I put on my shelves?

Once I’ve decided on the look I’m going for, I go around my house and collect a bunch of items that would fit well in my vignette.
Some of the things that I use to fill my shelves include:
- Plants (mostly faux for me due to my black thumb 😉 )
- Books
- Vases, pitchers, bowls, baskets, and other vessels
- Vase fillers
- Picture frames
- Small mirrors
- Letters or monograms
- Candles
- Coasters and stands to add height
- Lanterns
- Demijohns
- Small sculptures
- Orbs
- Other decorative objects
I try to collect more items than I think I’ll actually need so that I have a lot of options to choose from.
3. Start by Placing Flat, Leaning Items on the Shelves (Frames, Mirrors, Etc.)
Once I’ve collected all of my items, it’s time to start refilling my shelves! I like to start with what I call “leaners,” flat-ish items like frames and mirrors that lean against the back of the shelves and create a background for my other objects. Layering is the key to making the shelves look interesting and giving them dimension, so these leaners form our very first layer.

As you can see, I tried to make it interesting by mixing in frames of different heights, shapes, sizes, and finishes, along with mirrors, letters, and monograms to create my background layer.
What should I put in picture frames?
One thing that can be a challenge when dealing with “leaners” is figuring out what to put in the picture frames! I might have frames that are the perfect size and shape to fill a space, but what do I put in them?! Here are some easy and inexpensive ideas:
- Wrapping paper
- Scrapbook paper
- Wallpaper scraps
- Gift bags (I have used Anthropologie bags in frames a few times!)
- Beautiful cards you’ve received
- Kids’ art
- Your original art
- Leaves or dried flowers
- Feathers
- Old book pages
- Antique documents like marriage or birth certificates from ancestors that may have been passed down
- Free printables (Search on Pinterest– there are a ton!)
- Purchased printables (I usually look on Creative Market and Etsy.)
- Meaningful photographs (of course!)
4. Add Tall Objects on the Ends of the Shelves
This is probably somewhat of a personal preference thing, but after my leaners are in place, I like to add tall objects on the ends of my shelves. Having taller objects on the ends helps to visually “frame in” each shelf and make it look more intentional and complete. I don’t put a tall object on every single end, but I add them in on most shelves.

I’ll usually have to adjust my leaners as I’m putting the tall objects into place, and that’s okay! It’s all about trying things out and seeing what works where!
Quick Tip!
If I have an item that I want to use but it’s not quite tall enough on its own, I will use a few coasters, books, or a little cupcake stand (you can find them for $1 at the Target Dollar Spot!) to add some extra height like I did with the blue mason jar, faux flowers, and mint bowl in the image below.

5. Fill in the Gaps on the Shelves
This is where the process becomes a little more “art” than “science.” After I place my leaners and my tall items on the ends, I use the decorative items I have left to fill in the middle areas of the shelves and create more layers.

While a lot of this is just trial and error– putting things in place and seeing if I like how they look– there are a few general guidelines that I keep in mind:
Variety is key when decorating shelves.
I try to vary the size, shape, and height of objects on any one shelf so that each shelf looks more “collected” and interesting, rather than just having a bunch of objects that are similar placed together.
The eye likes odd numbers.
For some reason, our eyes tend to like groupings of odd numbers, so I tend to create groups of 3 or 5 or even 7 objects when I’m decorating my shelves.
On each of the shelves below, there are 5 objects (with the lidded container + cupcake stand counting as a single unit) of varying shapes, sizes, and heights to add depth and interest to the shelves.

Add “repeaters” to unify the shelves.
I try to have a few kinds of objects that I repeat throughout my display to add consistency and pull the look together.
In this shelf display, for example, I have a lot of blue glass, touches of gold, white frames, faux florals, and even rope/twine that repeats on several of the shelves.

As they say, “Rules were meant to be broken,” so these are certainly not hard and fast rules, but they are good guidelines to come back to, particularly if you’re feeling stuck or if a shelf doesn’t look quite right but you can’t figure out why.

Where to Find Items to Decorate Shelves
My collection of decorative items has grown over time. At this point I’ll typically be able to fill my shelves without buying anything new, but if I do need a few extra pieces to fill in the gaps, my go-to places for finding pretty items are usually:
- Hobby Lobby
- Michael’s
- HomeGoods/ TJ Maxx
- Target (The Dollar Spot typically has cute and inexpensive “filler” pieces, and they usually have some fun options for vase fillers as well.)
- IKEA (I especially love their frames and fake plants.)
- Amazon
So that’s my process! I hope that breaking it down step-by-step made it easy to follow and repeat in your own home! I think styling shelves is also one of those things that comes with practice, too– the longer I do it, the more I realize what I like and don’t like on my own shelves.
How to Decorate Shelves: Frequently Asked Questions
The ideal number of items to place on each shelf will vary by preference. I like a more full, collected look to my shelves. Others may prefer a more minimal style.
No matter which style you prefer, adding layers of items, varying objects’ heights, and grouping items in odd numbers will help make your display look intentional and ordered rather than cluttered and haphazard.
To give bookshelves more of a polished, decorative look, break up the solid line of books with pretty tchotchkes, using them as bookends or as grounding pieces on top of a stack of books.
Store books both horizontally and vertically to get some variation and add interest. You can also play around with grouping books by color for an aesthetically pleasing display

Add some baskets or bins! Pretty baskets are a great way to add some texture and interest to open shelves while also concealing items you may not want to see all the time.

What are your favorite shelf styling tips? I’d love to hear them in the comments below!
If you’re looking for even more tips for styling different areas of your home, the posts below may be helpful:
Have a wonderful day!

This post contains affiliate links. For more information, see my disclosures here.


This is a great guide to decorating shelves. I think I’m gonna go redo mine tonight now that I’m feeling a bit more educated. Thanks girl!
Woohoo! You go girl! 🙂
~Abby =)
Your shelves are gorgeous Abby, and I love how you have broken down the process! The pops of soft aqua throughout are right up my alley. So glad you could be part of this series, friend!
Aw, you’re too sweet! Thank YOU for hosting! <3
~Abby =)
So pretty, Abby! I love the blues and greens. And great tips!
Thank you so much! I’m so glad they were helpful! <3
~Abby =)
Love the breakdown. It makes it seem so easy when you look at it step by step.
Yay! So glad it was helpful! <3
~Abby =)
So very beautiful! I love the colors you used.
Thank you, Amelie! Hope you’re having a wonderful week!
~Abby =)
This turned out so lovely! Great tips and ideas – I would never think to use antique documents but they do add such character!
I think so, too! Thanks so much, Jen! Have a great week!
~Abby =)
Hi Abby – this looks so cute! You tied in the colors for the room – white, cream, teal and brown with the pieces to style the bookcase. They all blend so nicely for the summer feeling you were trying to create. Your go-to spots have some of the cutest items at a great price! In my opinion, both Home Goods and Ikea tie for best “faux” plants, and their pricing is always reasonable. I can’t wait to see what else is coming with the Summer Series!
Aw, thank you so much, Tamara! I agree… Home Goods and Ikea both have great faux plants!
~Abby =)
Oh, Abby!! I love love love this post and how you decorated your shelves. I’m a sucker for anything blue-teal-aqua and they look so pretty in your living room.
Thank you, Norma! Have a wonderful week! <3
~Abby =)
Abby I’m giving you the Queen of Shelf Styling award. Perfection and so kind of you to share the process. Maybe you can swing by my place sometime 😉
LOL! You are too sweet! Thank you, Jaime!! <3
~Abby =)
So pretty, Abby! I love the step by step process. Bookshelf styling can be sooo difficult! I love this quick reference. I wish I had this years ago 😉
Hugs, Jamie
Thank you, Jamie! So glad it was helpful! 🙂
~Abby =)
This is amazing! Love how you break it down, and the panel that overlays all the steps.
Question: do you remember where you got that darling gold ram? One of my sons is Year of the Ram (Chinese zodiac) and I have been looking for something like that!
It was from Target! I got it a few years ago, so I’m not sure if they still have it, but they will sometimes bring back items like that, so it’s worth taking a look! Hope you’re having a great week!
~Abby =)
This tutorial is so very helpful; I appreciate the step-by-step process you took us through. I ESPECIALLY liked the last photo – where the picture changed in a rotation to show the various stages. Very impressive!!!
So glad it was helpful, Kristine! Have a wonderful week! <3
~Abby =)
This is so helpful! Shelves and then coffee tables are things I struggle with the most in terms of decor – this breaks it down into simple steps. Love the pops of aqua.
So glad it was helpful for you, Katie! Have an awesome week! <3
~Abby =)
I struggle the most with decorating my shelves. Love your step by step tutorial! Aqua is also my favorite color. 🙂 I just wish we had Target here in Canada!
Such a bummer that there’s no Target! Maybe some day! 🙂
~Abby =)
Love, love, loved this post. Your design esthetixc is awesome! Thanks so much for the step-by-step breakdown. It will go a long way towards helping me to get similar results.
Yay! So glad it was helpful for you, Lisa! Have a wonderful week! <3
~Abby =)
thanks so much for this, I’ve never seen it explained this way before. But one question — what about books? in the bookshelf? I have a lot of great art books, how would you go about adding them to the bookshelf?
Hi, Kathleen! I just sprinkle them in, either horizontally (usually with a bowl or something on top) or vertically, varying the heights of the books. We don’t use these particular shelves for books; they’re more decorative. This post by my friend Kelly specifically talks about bookshelves if that would be helpful: https://www.viewalongtheway.com/2014/07/save-books-style-bookshelf-actual-book-storage/ . Have a great weekend!
~Abby =)
Thanks for suggesting that we tie the shelf together by repeating themes like color, material, and theme of the objects. My son just moved into his first apartment, so I’ve been helping him organize and decorate. He has a few empty shelves that need decorating, so we’ll definitely use some of the ideas you suggested here!
So glad it was helpful for you, Amy! Have a wonderful week!
~Abby =)
Hi Abby. Great tutorial, helpful and inspiring me to get up and restyle my shelves. Thank you for that! I love your entertainment center, where did you get it?
Hi, Ann! It is IKEA’s BESTA system that we added our own trim work to.
Hope you’re having a great week!
~Abby =)
I recently just bought 3 new shelfs and I have no clue how to organise them. Thank you so much! This was sooo helpful and thanks for the great tips! 😁
So glad it was helpful! Have a wonderful weekend, Georgina!
Abby – this was so helpful! I do love styling shelves and bookcases, and I THOUGHT I had a pretty good handle on it. But with this very specific and detailed breakdown – now I have a road map to be successful styling shelves. Thank you for sharing your knowledge with us! It’s always a joy to read your posts.