30+ Brilliant Office Organization Ideas that Will Boost Your Productivity
Boost your productivity with these 30+ brilliant office organization ideas that will help you get more done in less time!

Our surroundings can have a big impact on our productivity. When my home office is a scattered mess, it’s hard to find things, it’s tough to focus, and I’m easily distracted by the clutter and mess.
But when my space is organized, it’s so much easier to be more efficient and use my time well. Since I’ve realized that this connection between office organization and productivity is so important, I’ve spent a lot of time over the years putting strategies into place to help keep my office neat and tidy.
In this post, I rounded up my most favorite office organization strategies! If you’re trying to organize your own office to boost productivity, I hope these ideas will be helpful for you!
How to Organize Your Office and Increase Your Productivity
This post contains affiliate links. For more information, see my disclosures here.
1. Declutter like crazy.
No matter which room I’m working on, the very best thing I can do to get my space organized is to declutter as much as possible. Anything I no longer love or use often can be donated or sold to someone who will get much more use out of it!
The less stuff I’m keeping around, the more open and uncluttered my space will feel. And that’s the goal, right?

I know it can be a challenge to let go of things. It may take time, and that’s okay. But I always try to remember that I can have the stuff or I can have the space. I can’t have both. And freeing up some extra room so things don’t feel as cluttered or messy is well worth giving up things I never even use anymore!
2. Only keep the office supplies you absolutely need.
I love, love, LOVE office supplies! Walking down the office supply aisles at Target makes me absolutely giddy. But I’ve learned that even as fun as office supplies are, it’s definitely possible to have too much of a good thing.

I used to have all sorts of different types of pens, paper clips, washi tape, and just about every other office supply you can think of taking up a bunch of different drawers in my office. It was hard to find exactly what I was looking for in my desk because I had supplies in so many places!
I took a hard look at everything I had and narrowed down my collection to the items I actually needed. My office organization improved. I wasted less time looking around and had some extra drawer space too!
3. Take inventory first, then decide on storage pieces.
We all know that the fun part of the project is going out and buying all sorts of cute bins, right?! So it’s always tempting to go do that first. Resist!
Our organizing strategy will be much more effective if we figure out what we need to store first. And then choose bins that will fit those items. (You may even find that you already have some that will work in your house!)

When we take inventory first, we can choose the best storage vessel to fit the items we’re storing. This makes our office organization way easier than if we’re trying to fit the things we need to store in bins that really weren’t made to hold them.
4. Keep like items together in zones.
Keeping like items together will help to streamline our office organization and make everything easier to find.
I used to have all of the supplies for my craft cutters spread out in a few different cabinets. I got sick of always having to look around for a while to find the right kind of vinyl. So I created a “cutting machine zone” and organized all of my machines + my vinyl stash in the same place. It is now so much quicker to execute my projects!

5. Go paperless.
One of the biggest questions I get when I talk about office organization is, “What do you do with all of the paperwork?!” You won’t find a filing cabinet in my office (or any of the rooms in our home) because our family has been “paperless” for more than a decade!

We use Evernote as our “digital filing cabinet.” This gets rid of all of the physical paper clutter in our house. And it also allows us to have all of our important documents at our fingertips at any time. It really is a win-win.
You can learn more about our paperless strategy in this post.
6. Have a designated inbox.
You might be thinking, “But wait! I thought you just said you were paperless! Why do you need an inbox?!”
While we do receive as many mailings and documents as possible digitally, there are just some things that are going to come to us in paper form. For any of these items that come in and can be dealt with in two minutes or less, we try to scan them in right away and then recycle the paper document.
If something is an action item that will take longer than two minutes, we put it in a physical inbox to be dealt with later. Then we set aside a few designated times per week to process the items in our inbox and take it back down to empty.

7. Consider a motorized desk.
It’s hard to be productive when you’re uncomfortable, so creating a work environment that allows for comfort is key!
Donnie found that he liked to have the option of sitting down or standing while he worked. In our last house, he had two desks– a sitting desk and a standing desk. That was great for giving him options, but it also took up a ton of space!
When we moved into our new house, he chose a motorized desk for his new office. This gave him the option of sitting…

…or standing…
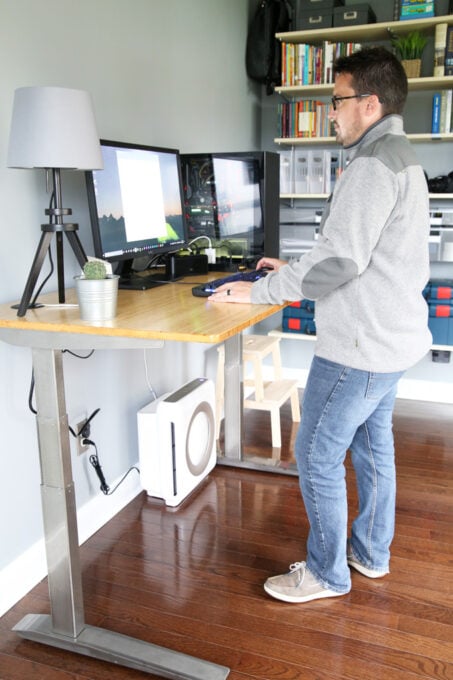
…and he only needed one desk to do both things! The model he has allows him to create presets. So he can move the desk to his preferred sitting or standing height with just the touch of a button. If for some reason he needs the desk to be at a different place than one of his preset heights, he can also move it around manually.
8. Keep the desktop as clear as possible.
It can be hard to strike a balance between wanting to have all of our important items close at hand and wanting to have a clear space to work!
There is definitely some personal preference involved here. But I found I wasn’t using my desk very often because the surface was so small. And with a bunch of items on top of it, I hardly had any working space left.

I liked how it looked, but I needed it to be more functional. So recently I made some tweaks, adding some storage pieces to the wall to hold a few essentials. This allowed me to have a perfectly clear desktop. And I find myself using my desk space so much more often. Office organization win!

9. Divide up drawers with smaller bins.
Drawers are fantastic, but they can easily become a messy catch-all, with everything sliding around and getting all mixed up. To remedy this, I like to add smaller bins to my drawers so that every item has a specific “home.”

In this desk drawer, I mixed and matched small, medium, and large bins to get the exact configuration I needed to store the items I wanted to have on hand.
10. Keep drawer items from sliding around.
Once my drawers were divided up with bins, I wanted to make sure they stayed in place. My favorite way to do that is with Museum Gel. I just stick a small dot of the clear substance on each corner of the bin. Then I press down on the bin, and the gel keeps it in place in the drawer. No sliding around!

11. No desk drawers? Bring in a separate unit!
In my office in our last house, I was working with a drawer-less IKEA desk. I didn’t really have the budget to go out and buy a new one with built-in storage.
So I found this simple drawer unit at Michael’s that I could tuck neatly under my desk to add some storage without breaking the bank. (I think I even had a coupon when I purchased it. So it was a really inexpensive fix!)

12. Add labels!
I may know where everything goes in my office, but the other members of my household usually do not. (Or at least they tell me they don’t… 😏😂) So that they have no excuse to not put things back where they go, I like to clearly label the different areas in my office.

I used my Cricut Joy cutting machine + adhesive vinyl to create these picture labels for my desk drawer. I love how they turned out! (You can see the labeling tutorial in this post.)
Another labeling strategy I like to use is to put down a piece of washi tape. Then I use my label maker with clear labeling tape + black ink. This allows me to customize my labels and make them a little prettier than standard label maker labels!

13. Install a closet system to maximize space.
I had a decent sized closet in my townhouse office. But with just one bar and shelf, I certainly wasn’t maximizing my storage space to the best of its ability!

Yikes! To remedy this situation, we tore out the old system and replaced it with IKEA’s ALGOT system (now called BOAXEL) for more storage. This system is so easy to customize so you can make the most of whatever size closet you maybe working with!

14. No closet? Install a wall-mounted shelving system.
But some offices– like Donnie’s office in our current house– don’t have a closet at all! How do we add storage then?
In Donnie’s office, we decided to create a wall of storage with pieces from The Container Store’s Elfa system. (We could have used BOAXEL again, but he liked the look and additional options available with Elfa.)

Again, we took inventory of everything Donnie needed to store and created a customized solution to fit his needs. He’s had this setup for nearly five years now, and it is still working perfectly for him!
Or maybe you prefer an enclosed closet substitute? My current office didn’t have a closet either. So we created one with pieces from IKEA’s PAX system. We added our own trim work to give it a more built-in look.

You can see how I organized the inside of the PAX storage unit in this post.
15. Create your perfect storage unit.
When I was organizing my office, I searched high and low for a storage unit that met my exact specifications and couldn’t find one. So I decided to make one myself– IKEA to the rescue again!
We used pieces from IKEA’s BESTA system to make a unit that was the exact shape and size I needed. We chose glass doors. But there are also opaque options that would neatly hide whatever you’d want to put behind them.
Again, to make it look a little more custom and built-in, we added our own trim work.
16. Use a cube unit to divide up your items.
If I’m storing a bunch of smaller items, one of my favorite ways to break everything into neat zones is to use a cubed storage unit. They look nice and create a clear separation between items.
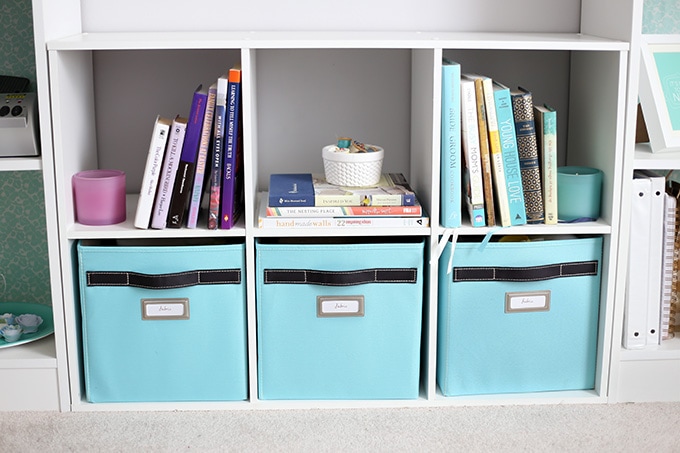
IKEA’s KALLAX cube units even have inserts you can use to create drawers, cabinets, or bins, depending on what you need to store.
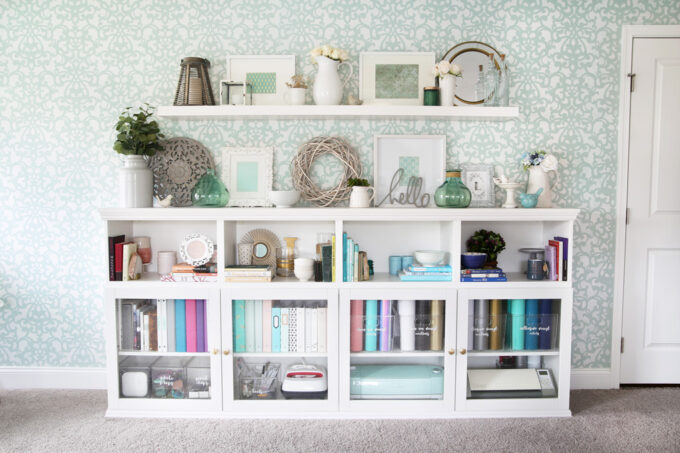
17. Combine open shelving + opaque bins and boxes.
There have been several examples of this in the images I’ve already shared. But one of my favorite organization strategies is to combine open shelving with opaque bins.
Open shelving is great because I can clearly see what I have and can grab what I need quickly. It can get messy though. So when I add opaque bins, I can also corral some of my smaller items to keep the space from looking cluttered and unruly.
In my townhouse office I used open bookshelves + baskets to achieve a balance of convenience and tidiness in my office organization…

And in my current office, an etagere does the trick to store things like ink, envelopes, paper, and more. I use baskets and bins to keep items tucked out of sight.

18. Use floating shelves to add storage.
I kind of have a thing for floating shelves. They’re so pretty and fun to style. I like to work them into a design whenever I can.
Along with looking pretty, they are also incredibly functional. This floating shelf above my desk stores my planner and notebooks I use often, along with my Cricut Joy so I can grab it for quick labeling anytime!
19. Use the walls to house productivity tools.
When we lived in our little townhouse, I quickly learned to make the most of my vertical space by using the walls for storage, but also for productivity.
When I was designing the home office in my current house, I intentionally worked in a big white board that I use for brainstorming ideas and organizing my thoughts. Since it is in the middle of my workspace, I use it to remind me of all of the things that I want to accomplish.

I also recently added an acrylic weekly wall calendar so I can see my week at a glance. This helps me stay focused and on track when I’m clear on what I need to get done each day.

20. Hang a pegboard for tons of added functionality.
This was one of my favorite storage pieces in my townhouse office! I found this pegboard for free in an old building that my parents were clearing out. I cleaned it up, painted it, and added a few storage pieces. Not only did it become the perfect place to hold some of my craft supplies, but it looked pretty too!

21. Add even more storage with hooks.
One of my top organizing rules is “Make things easy to put away.” Hooks do just that. It is so easy to sling things over a hook as we walk into a room, and it keeps the floor from getting messy and surfaces from getting cluttered.
Donnie keeps this simple hook unit (similar) right inside the door of his office to hold the items he uses frequently.

We added some hooks to his Elfa unit as well to give him some extra storage space. (Thats a fishing rod in that cylindrical container– not everything in our office is all business! 🙂 )

22. Use bins inside of bins.
Whenever I’m storing smaller items especially, I like to use bins inside of bins to break up the space and give everything a designated spot.
If I just would have thrown all of these items straight into this bin, they quickly would have turned into a cluttered mess. But by separating each type of item in its own container, I can quickly look into the bin and grab whatever I need.

23. Store office supplies in vases, jars, or other decorative objects.
I always want my storage to be very functional, but it’s an added bonus if it can be beautiful as well!

I’ve used all sorts of different things as storage vessels over the years– mason jars in different sizes, vases, bowls, pails, pitchers, and more!

It’s fun to get creative and make it look nice (as long as it still functions well too).

24. Hide the cords.
One of my pet peeves is having messy cords sticking out everywhere, so I always do what I can to hide them! My favorite system is this sticky tab + zip tie combo that allows us to weave the cord in whatever direction we need it to go.

These velcro strips are helpful too, especially if we’re working with multiple cords.
25. Keep extra cables neat and tidy.
The more devices we have, the more cables we seem to accumulate! It can be hard to keep them straight, so we use a cord organizer pouch like this one. This stores everything neatly in one place so we can always find the exact cable we need whenever we need it.

26. Keep clipboards handy.
I use clipboards daily! I do a lot of projects around the house and don’t always have a hard surface available, so clipboards are like my traveling desk. There are at least two in my desk drawer at all times for easy access.

27. Create a cozy corner.
Sometimes I’m just not in the mood to sit at my desk, so I make sure I have some cozy options as well! I actually have two arm chairs in my office and one in my bedroom, and I use them all to work in from time to time. Sometimes a change of scenery can be really helpful for productivity!

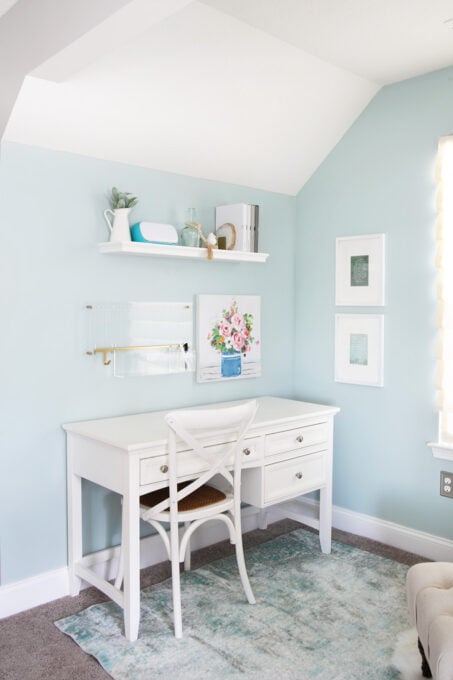
28. Choose your color scheme wisely.
No, I’m not saying that everyone has to paint their office aqua! But I do think that the colors we choose for a room can really affect how we feel when we’re in that space.
I tend to run a bit on the anxious side, so I like to use aqua, white, and other light colors because they feel soothing and calming to me. (The aqua paint color is Sherwin Williams Rainwashed.)

If you want a space that energizes you and gets you excited for the day, maybe brighter colors would be your best bet. And if you want a more serious space that helps to put you in work mode, maybe neutrals are the way to go for you.
Ask yourself how you’d like to feel when you’re spending time in your office space, and choose your color scheme accordingly.
29. Leave yourself some extra space.
I have made this mistake so many times. I work hard to get a space all neat and organized and it looks great… for about a week. And then inevitably I acquire something new and my space is already full, so I have nowhere to put it. And then that organizing system that I worked so hard on is shot because I can no longer fit everything I need to store.
So now whenever I do an organizing project, I try to leave some extra open space for when I need to store additional items. For example, I know that it is likely that I will purchase more throw pillows (I may have a bit of an obsession… 😉 ), so I left a little bit of extra room on my shelves to fit them.

However, I also try to limit myself with the amount of space I allow. Once these two shelves are full, I know it’s time to either cut myself off from buying more pillows or donate some of the pillows I no longer use to make room for any new ones I may want to acquire.
30. Train yourself to put things back where they go.
This is the BIG one, and it is applicable to every single space in our homes! We spend so much time setting up these beautiful, perfect organizing systems, but they will only stay that way for the long haul if we train ourselves to put things back where they go.

I know this is easier said than done. I am naturally scatterbrained, and my tendency is to leave a trail of half finished projects in my wake.
But over the years, I’ve worked really hard to train myself to “close the loop”– to finish a project to completion, including cleanup– before moving on to the next thing. Because I know that maintaining my neat and tidy space is key to helping me continue to be productive and make the most of my time.
Training ourselves to put things back where they go (and holding others in our household accountable for putting things back where they go) is definitely not the easiest part of office organization. But it is absolutely crucial if we want to keep our spaces organized for the long haul. It is definitely worth the time and effort it takes to work on cultivating this particular habit!
I hope this post was helpful and gave you some ideas for your own office organization! If you could use even more home office inspiration, these posts can help with that:
How to Create an Organized Desk
If you’d like to save this post to come back to later, be sure to pin this image so you can find it easily:

What is your favorite office organization strategy? I’d love to hear about it in the comments below!
Thank you so much for following along! Have a wonderful day!

This post contains affiliate links. For more information, see my disclosures here.