DIY Ribbon Wreath (with no-sew fabric flowers)

This post should be subtitled “I’m in love with my hot glue gun” because that’s how I feel about it right now. IN LOVE!
I may have mentioned a time or two about my sewing phobia. Ahem. I can sew in teensy weensy little bits, but the whole process kind of stresses me out, so I choose not sewing over sewing whenever possible. And boy was it possible with this sweet little spring wreath!
I used the following items to put this wreath together:
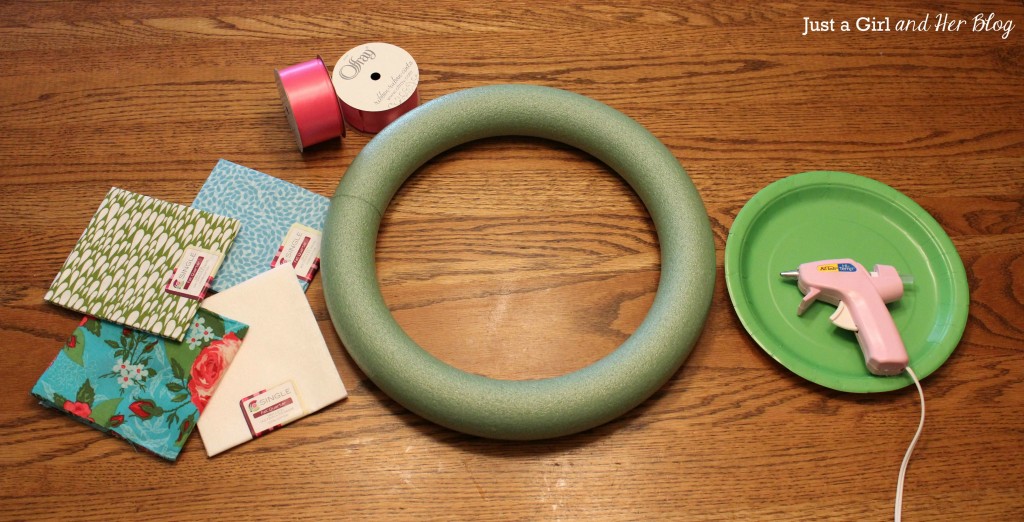
- Fabric
- Ribbon
- Wreath Form {I really wanted to use my $1 pool noodle trick again, but apparently no one goes swimming in Pittsburgh in April…who knew?}
- Hot Glue Gun, aka the new love of my life {sorry, honey ;)}
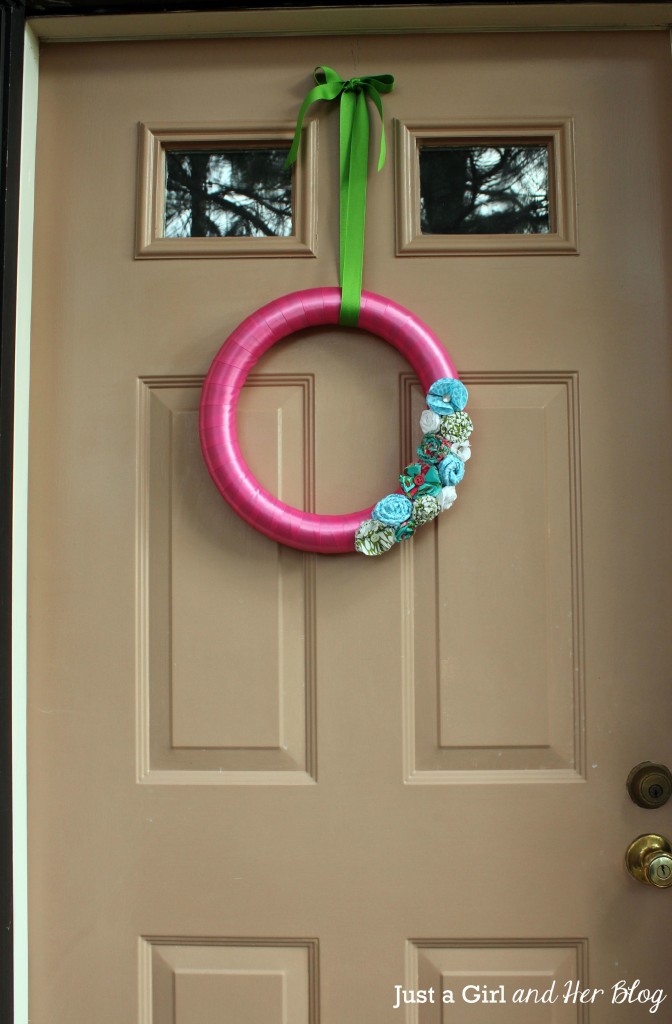
Wreath
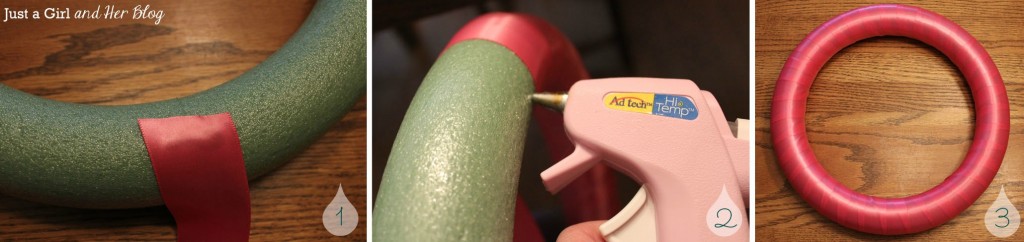
I started by wrapping my ribbon around my wreath form which, by the way, is about a bajillion times faster than using yarn. Why have I been using yarn all these years? {Okay, it is really cute so maybe it’s worth it.}
I just hot glued the start of the ribbon to the back of my wreath form {1} and started wrapping.
Every 3 or 4 wraps around I would use a little dab of hot glue to attach my ribbon to the wreath form {2}.
When I got to the end I just snipped off the ribbon and secured it to the back of my wreath with hot glue, and I was done {3}!
My ribbon spools held 3.6 meters of ribbon and I ended up using about 1 1/3 spools for my 16″ wreath form.
Flowers
Now on to the flowers! I used three types of no-sew flowers for this wreath, all of which were pretty simple.
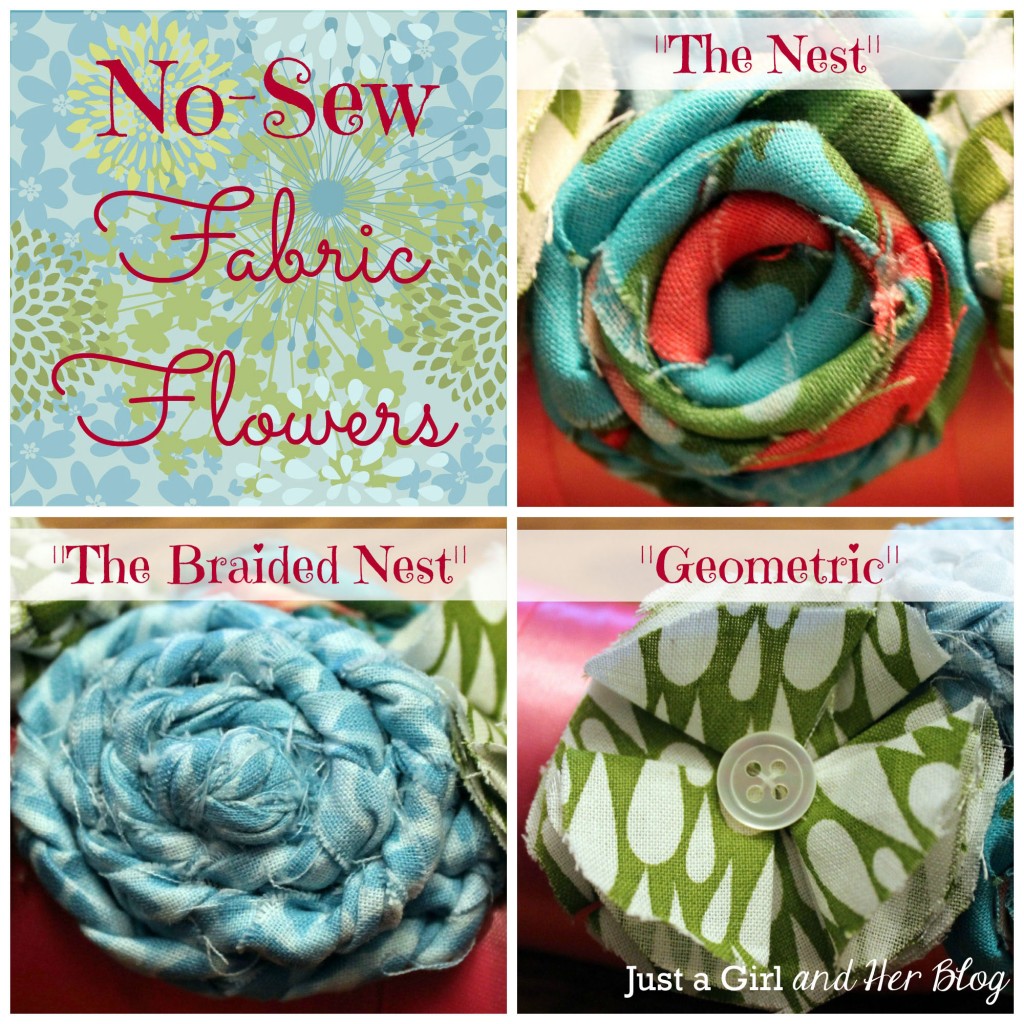
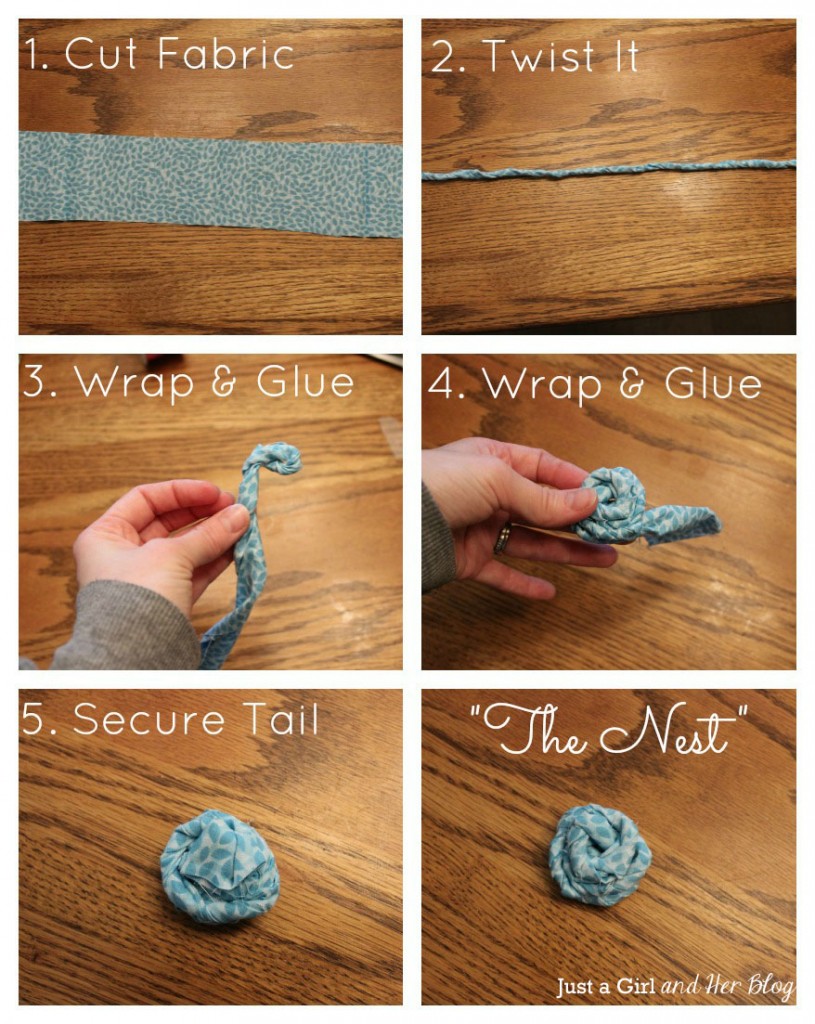
#1- The Nest
To make “The Nest,” I cut a piece of fabric 2-3″ wide and 21″ long {1}.
The wider/longer your fabric, the bigger your flower will be. I then twisted it {2} and began wrapping it around itself, securing it with hot glue {3}.
I continued to wrap and wrap and wrap, adding a dot of hot glue every inch or two {4}.
Finally, I secured the end of the fabric, the tail, to the back of the flower using hot glue {5}. Quick and easy!
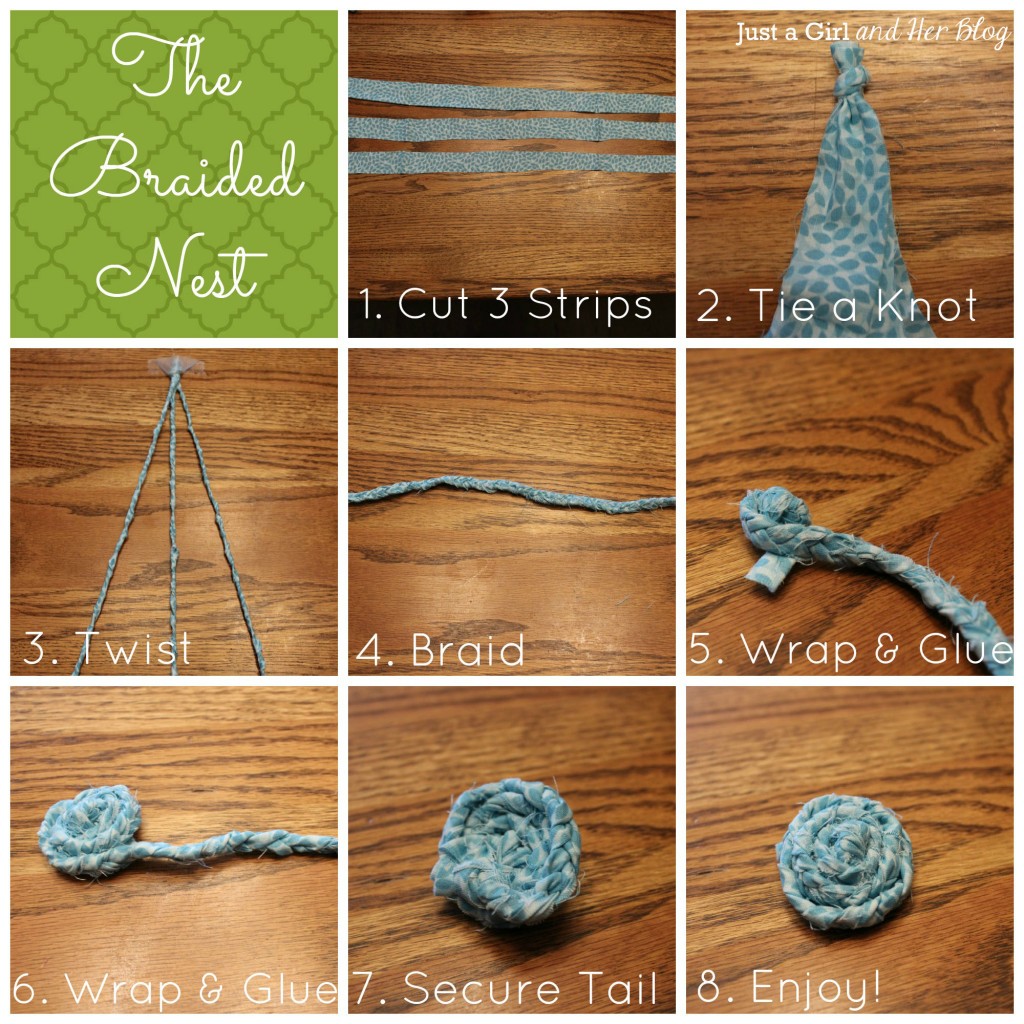
#2- The Braided Nest
The Braided Nest follows a very similar process. I started with three strips that were about 3/4″ wide and 21″ long {1}.
Again, the wider/longer your fabric, the bigger your flower will be. Tie the three strips together with a knot {2}.
Twist all three strips of fabric {3}. They will come undone somewhat as you braid, but if you twist them first, it will be easier to incorporate them into the braid.
Braid the three strands together and secure the end with a knot {4}.
As with The Nest, begin wrapping your fabric around itself, securing it with hot glue {5}.
Continue to wrap the braid, using a dab of glue ever inch or two to hold the flower together {6}.
Secure the tail at the back of the flower using hot glue {7}.
Enjoy your beautiful braided flower {8}!
#3- Geometric
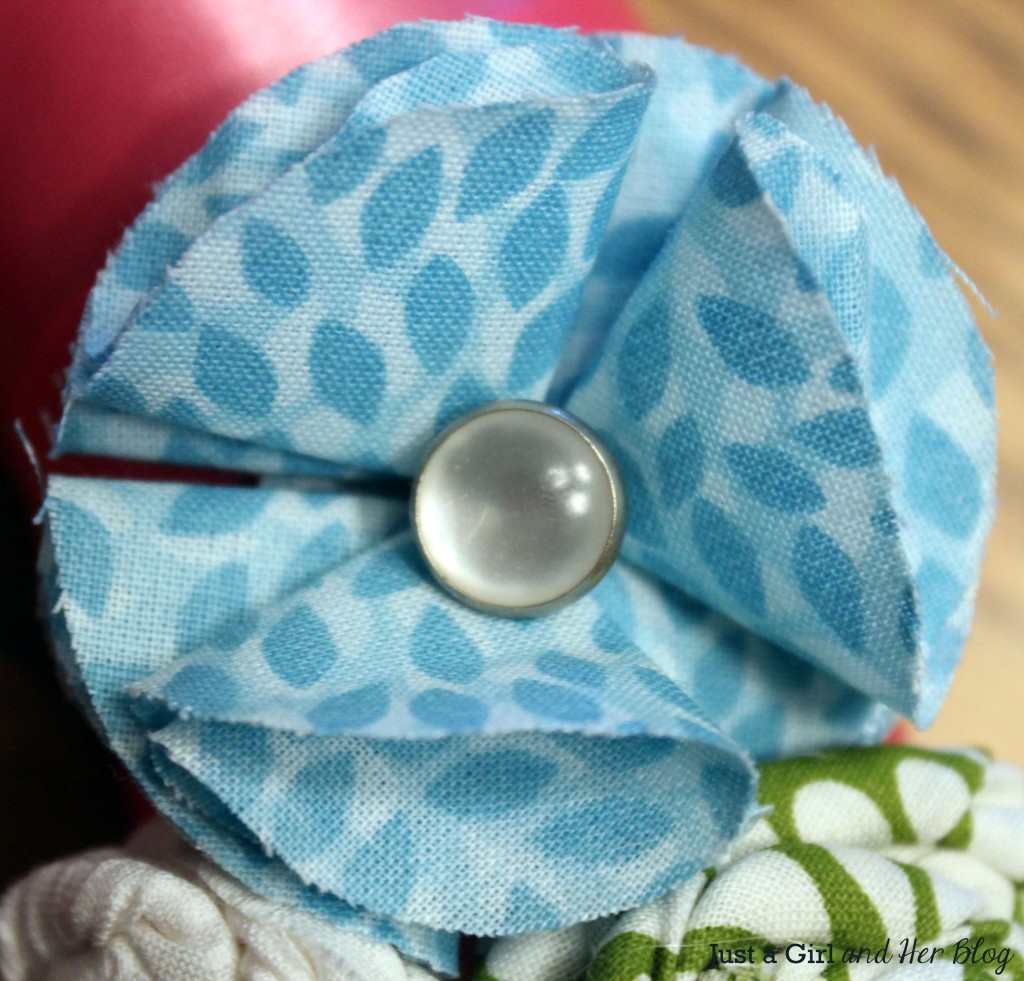
I shared the simple no-sew tutorial for this final type of flower a few months ago. You can find it here.
Put It All Together
After I had completed my wreath and all of my flowers, I used my trusty hot glue gun to attach the flowers, and I was done! Our front door sure is looking a lot happier these days!
What’s your favorite way to decorate for spring?

This is super cute!
Thanks, Elise! Hope you’re having a great day!
~Abby =)
Very pretty! I love how colorful it is. 🙂
Thanks so much, Megan! 🙂
~Abby =)
Your wreath is darling! ~~Angela
Thank you, Angela! 🙂
~Abby =)
This is so cute. I love your fabric flowers. I also have anxiety with the sewing machine. Glues guns I love. 😉 Visiting from Give Me the Goods. Have a great week!
Thanks, Wanda! I’m glad someone can commiserate with me on the sewing machine anxiety! 😉 Thanks for popping over to my blog!
~Abby =)
Oh! I really like it Abby and the color is perfect for spring too! 🙂 Adding those flowers was a great idea! thanks for the tutorial on the flowers, you make it look so easy but I don’t know if mine would look like that! I will still give it a try! 🙂 Beautiful wreath (love that there’s no sewing in love!) Wish you a great week!
Thank you so much, Ingrid! I’m sure yours will turn out great! Have a great week!
~Abby =)
Super cute! and Yes Glue Gun is the new love to a lot of us lol haha!! Thanks!
Thanks, Arlena! Love that glue gun! 😉 Have a great week!
~Abby =)
What could be prettier on a door to welcome one and all but your gorgeous wreath? Love it so much and the flowers are so pretty, cheerful. Makes a person smile just looking at it. Great tutorial also
. I tried to make the twisted strip flower last year, lets just say it was pretty sad, had more glue on it that showed, not too pretty. I will try again tho since your excellent tutorial is more clear than directions I had before. The braiding flower will have to attempt that one again also. Since I’ve gotten older I can’t seem to braid, I get mixed up which one I did before or last or whichever, lol. Ah the fun of getting to be a senior. Luckily you have much time before you have to deal with that nonsense.
The last flower I’ve done and was able to make it look decent even. So glad I found your blog and so enjoy seeing your posts. Happy Days to you and yours.
Your boys are adorable, so sweet.
Thank you so much, Jane Ellen! You are so sweet! Good luck with your fabric flowers! Have a wonderful week!
~Abby =)
Your wreath is soooo pretty Abby! I would love for you to share it at the Pretty Things Party (live now)!!
xo, Tanya
https://twelveoeight.blogspot.com/2013/04/pretty-things-16-link-party-and.html
Thank you so much, Tanya! I linked up! Have a great week!
~Abby =)
So cute! I know a little girl who would love for me to do this 😉 I have tried doing similar flowers, but they don’t turn out quite as pretty as yours, I guess I’m too inpatient. This year, I am making it my mission to decorate my door with homemade wreaths, that echo the season, it would surely help if I shared on my blog. Thanks for stopping by and saying hi, hope you have a great week.
Thank you so much for popping over to my blog, Kristel! Good luck on your wreath mission! Have a great week!
~Abby =)
I love those colors! The rosettes are so cute. I’m planning a baby shower and plan to have a head band making table. These flowers would be perfect to make!
Thanks, Heather! Yes, they are super easy, so people who haven’t done things like this before should have no problem picking it up. What a great idea for a shower! Have a great day!
~Abby =)
So adorable! LOVE the colors you chose! Would love it if you would link this up to Give Me The Goods Monday: 1 Party, 5 Blogs! https://www.rainonatinroof.com/2013/04/give-me-goods-monday-link-party-4.html
Jenna @ Rain on a Tin Roof
Thanks, Jenna! Linked up! Have a great week!
~Abby =)
I love how you used ribbon to wrap the wreath… it makes it stand out really well. I do fabric wrapped wreaths, but maybe I need to try a ribbon wrapped one, too! Thanks for sharing! (Linked on Lil’ Luna)
Thanks, Krissy! I’ll have to try fabric, too–we’ll swap! 😉 Thank you for popping over!
~Abby =)
Love it! Thanks for the fabulous flower tutorials!
Krista
Thanks, Krista! Hope you’re having a wonderful day!
~Abby =)
The wreath is so pretty Abby! I love it..those flowers are great. Thanks so much for sharing it at the Project Inspire{d} party this week. 🙂
xo
Nancy
Thank you, Nancy! I saw your awesome sideboard today! Love it so much!
~Abby =)
LOVE it!! Fabulous job! 😉
Thanks so much, Brenda! Have a great day!
~Abby =)
This is sooo pretty.. I just love the fun and festive colors you chose and the no sew flowers are awesome!
Thank you, Amie! Thanks for popping over to my blog!
~Abby =)
You know I love this wreath! Just wanted to say thanks for linking up to Give Me The Goods Monday! Can’t wait to see what goods you bring next week! Jenna @ Rain on a Tin Roof
Such a beautiful wreath, and I love the one-stop-shop for all the different kinds of fabric flowers too! Yay, spring! 🙂
Thank you, Kelly! I am just seeing you everywhere these days–Practically Functional, Joss & Main coming up…you are one popular lady! 🙂 Hope you have a wonderful weekend!
~Abby =)
What a great spring wreath! I love the cheery colors! Thanks for sharing this at my link party! Hope to see you back!
Thank you! Thanks for hosting!
~Abby =)
Cute wreath! I love the nest and braided nest flowers. I’m going to pin this!
Navy Wifey Peters @ Submarine Sunday Link Party
https://usscrafty.blogspot.com/2013/04/submarine-sunday-28.html
Thank you so much, T’onna! Hope you had a great weekend!
~Abby =)
So… I totally want the wreath!! Great job!!
Thanks for partying with me last week! Can’t wait to party with you again tomorrow evening at The DIY Dreamer… From Dream To Reality!
Lol…thanks so much, Christine! “See” you tomorrow!
~Abby =)
This is sooo pretty.. I just love the fun and festive colors you chose and the no sew flowers are awesome!
Thanks so much! Have a great week! <3
~Abby =)