DIY Charging Station in a Nightstand
Learn how to create a DIY charging station in your nightstand to hide ugly cords and keep your devices charged at all times!

Most of the projects we do around our house come about because something starts bugging me. Something is inconvenient or in the way. It’s hard to get to or just plain ugly. And eventually it bothers me enough that I can’t help but do something about it!
This exact scenario played out recently with my nightstand.

I was storing all of the devices that I use often in one of the drawers– my eReader, AirPods, and FitBit, plus I would park my phone there at night. But I was getting frustrated because my devices never seemed to be charged when I needed them.

I didn’t have enough outlets to charge everything at once. Some of the devices were sharing one charging cord, so if they were both out of battery I had no way to charge them both. And the chargers I had were plugged into an extension cord that laid on the floor looking messy.

I finally decided that I’d had enough and recruited Donnie to help me turn the top drawer of my nightstand into a DIY charging station for all of my devices.
How to Create a DIY Nightstand Charging Station
This post contains affiliate links. For more information, see my disclosures here.
Step 1- Gather your charging station supplies.
Supplies you’ll need
For our DIY charging station, we used…
Step 2- Drill holes for the power strip cord.
After clearing out the top drawer of my nightstand, we had to create a way for the cord of the power strip to be able to exit out the back of the nightstand.
Some nightstands may come with a hole already created in the back of the drawer for something like this. If that’s the case for you, great! You get to skip this step.
If your nightstand is like mine, though, and doesn’t have a way for the cord to exit the back of the nightstand, it’s time to break out the drill!
We used a cordless drill with a spade drill bit to create a hole in the drawer that was big enough for our cord to get through. (Ours was a 1 3/8″ bit.)

Since our nightstand drawer was not easily removable, we just left it in place as we drilled the hole. If removing the drawer is an option for you, it will definitely be easier to maneuver the drill if you take it out!

We were able to approximate the placement of the hole in the drawer and created a hole of the same size on the back of the nightstand itself so that the holes lined up. Again, we used a spade drill bit to create the hole.

Step 3- Attach the power strip to the drawer.
Once I had a way to get the cord where I needed it, I was able to attach the power strip to the back of my drawer.
I used two sets of Scotch velcro fasteners on the back of the power strip to adhere it to the nightstand drawer.


I was then able to thread the cord through the holes we had created and plug in the power strip to an extension cord, which plugged into the wall.

All of the cords fell behind the nightstand, staying neatly tucked out of sight– yippee!
Note: You’ll want to make sure your cords are long enough to have a little give. This will allow them to move back and forth when you open and close the drawer.
Step 4- Plug in your devices in your charging station!
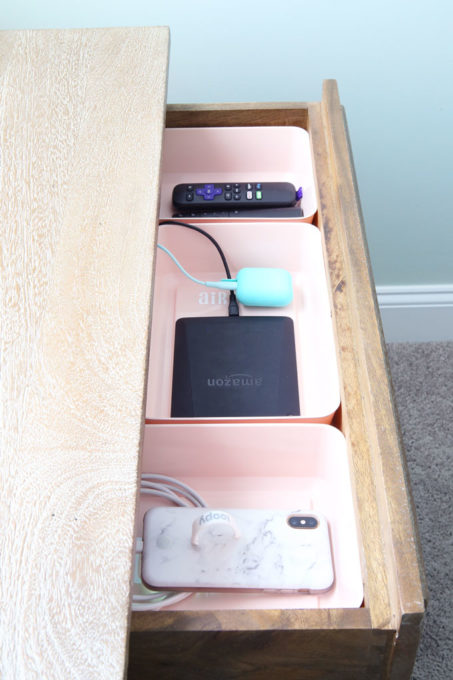
Once my power strip was attached to the drawer and ready to go, it was time to plug in my devices. I played around with the placement a little bit until I found an arrangement that worked best for me.

I ended up putting my phone closest to the bed so I could easily reach it. For my phone, I used a 6′ cable because often by the end of the day, it is low on battery, so I will keep it plugged in while I’m using it. The longer cord allows the phone to be easily reachable from the bed while it is plugged in. When the phone is sitting in the drawer, I just coil up the cord and everything sits neatly.
I used shorter cords for the other devices so they wouldn’t get all tangled up and messy.
Step 5- Add bins or trays if desired.
To keep my devices and cords neat and tidy, I decided to use small bins to divide up the drawer and give each device a designated home. The bins also helped to hide the cords a little more so the drawer has a neater appearance overall.


I used my Cricut cutting machine + adhesive vinyl to create labels for each bin. You can learn how to create adhesive vinyl labels in this post.

(I also added an adhesive drawer liner to each of my nightstand drawers to protect the drawers and add a pretty pop of pattern!)
Step 6- Enjoy your new DIY charging station!
I have LOVED being able to charge all of my devices in one spot, tucked away neatly without ugly cords everywhere. This was a simple project, but it solved a problem that had been bugging me for months!
All of my devices are now charged up and ready to go whenever I need them, which allows me to use them all more often.
DIY Nightstand Charging Station: Frequently Asked Questions
More Inspiration for Bedroom Organization
Thinking of adding a DIY charging station to your nightstand? Be sure to pin the image below so you can come back to this post and reference it later!

[Psssttt… You can also find ideas for organizing every single room of the house in this post!]
How do you keep your devices organized and charged? I’d love to hear about your favorite methods in the comments below!
Thank you so much for following along! Have a great day!

This post contains affiliate links. For more information, see my disclosures here.


Oh thank you for this! I tried attaching a power strip to the back of and underside of my nightstand, but it didn’t work. I just used command picture hangers and cord clips. The power strip is now sitting on the floor underneath my nightstand, and the wires come up the back and are clipped just at the top of the nightstand. But all my electronics are still on the nightstand, which is driving me crazy! I don’t mind the baby monitor or my phone (since my phone is my alarm), but everything else needs to be corralled and this is an amazing way to do it!
So thank you for sharing! I think I’ll be doing this as soon as I finish up my hall bathroom. (I’m so close to being done and if I start another “project” now, I’ll never finish. Just sanding some spackle and painting left.)
Yay! So glad it will be a great solution for you, Jennifer! Hope you’re having an awesome week! <3
~Abby =)
I love how clean and organized it is! Such a good trick with the power strip
Thanks so much, Ashley! Hope you’re having a great week, friend! <3
~Abby =)
This is great! My toddler tried to chew on my phone cord this morning, so I was just trying to figure out a better way to wrangle all those cords when I saw this post. Looks like my husband has another project 🙂
Yay! So glad it will be helpful for you, Brianne! Hope you’re having a great week!
~Abby =)
Beautiful! I might try to make my nightstand a charge station also! Thanks for the tutorial!
So glad it was helpful for you, Sheila! Have a great weekend! <3
~Abby =)
I love this!! This solution is perfect for me! Where can I purchase the trays?
They’re from Target! You can find them here: https://www.target.com/p/2pk-large-storage-trays-feather-peach-room-essentials-8482/-/A-77339440?clkid=c0be67eeN8eff11ea8e4642010a246e0b&lnm=81938&afid=rewardStyle&ref=tgt_adv_xasd0002
Have a great week!
~Abby =)
Oh my gosh! This is so clever! Thank you for sharing. I have really struggled with so many chords and power strips that it was so ugly. Thank you for sharing!
So glad it was helpful for you, Jennifer! <3
~Abby =)
This looks great! I’ve never done this myself but have thought about creating a charging station somewhere in our home so we don’t have cords all over the place! Thanks for the tutorial 🙂
Thanks Ashley! So glad it was helpful! Have a great week! <3
~Abby =)
I love this idea! I am in the process of rearranging rooms and moving my home office, I definately need to include a charging station/hiding place for the kids’ kindles. Thank you!
Thanks so much, Lizzy! Glad it was helpful for you. Have an awesome weekend! <3
~Abby =)
Thanks for the great idea, Abby! I never thought about drilling a hole in the back of the drawer!! I already have dividers in my nightstand drawer so the remaining steps will be easy the follow.
DT
So glad it will be helpful! Have a wonderful week!