How to Create a Monogram in Word
Learn how to create a monogram in Microsoft Word with a free font so you can personalize just about anything!
I love monograms. I think it’s safe to say I’m pretty much obsessed with them. Maybe it’s because my last name starts with “L,” and cursive “Ls” are kind of pretty.
Maybe it’s because it makes me feel like I’m an official person or something. “I have a monogram, so I must be significant, right?” And maybe it’s just because they’re swirly and beautiful and girly looking, and let’s be honest, who doesn’t love that?
I guess I could go out and buy a monogram at the store, but I almost always make them myself because A- It’s cheaper! And B- I can make exactly what I want.
Here’s what I did:
How to Make Free Monograms Using Microsoft Word
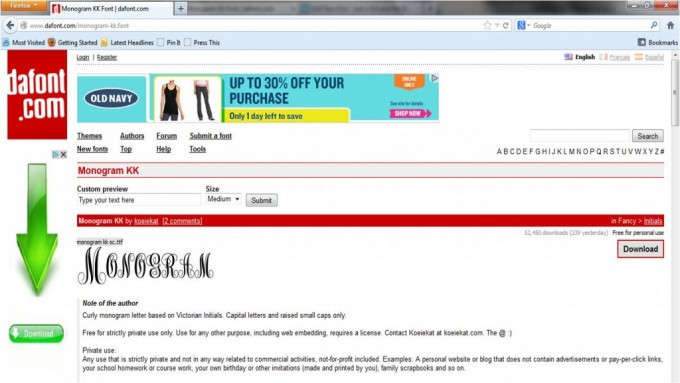
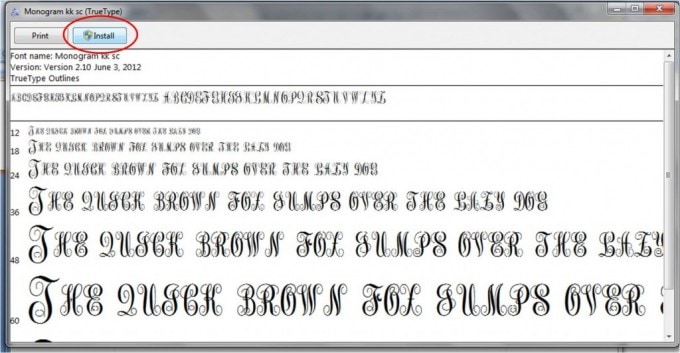
1. Install the Monogram KK font.
I wandered on over to dafont.com and downloaded monogram kk font.
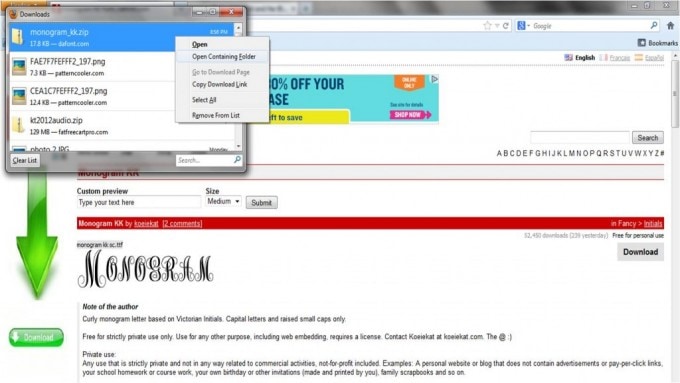
Then I installed it on my computer. On my PC, a dialogue box popped up, and I chose to save the file. I then right-clicked on the file in the download box and selected “Open Containing Folder.”
I opened the monogram kk folder, then clicked on the monogram kk file:
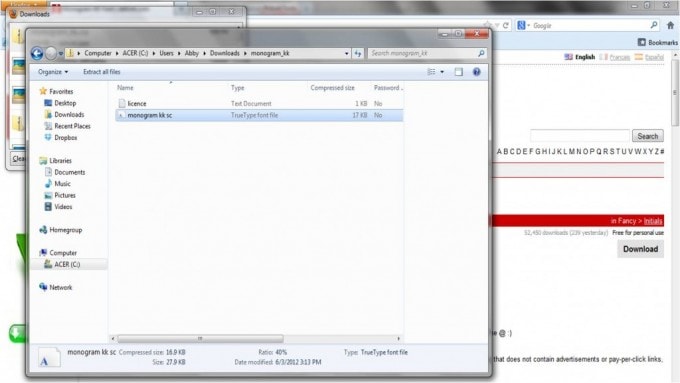
Once opened, I simply clicked “Install,” and the font showed up in my font dropdown list.
how to install the font on a mac
Simply download the font. Double click on the zip file. Then double click on the font you want to install. If Word is already open, close it out and reopen so the new font shows up in your library.
2. Choose a background color for your monogram.
Now that I had the font installed, it was time for the fun part! I chose a background color by selecting “Page Color” under the “Page Layout” tab.

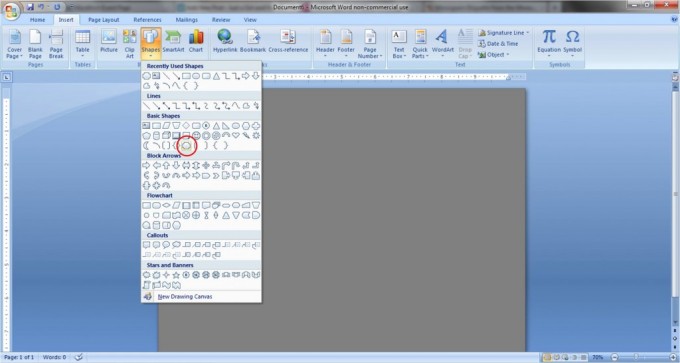
3. Insert a shape.
I wanted to add an extra splash of color to my monogram, so I added a border using the “Shapes” tool.
Under the “Insert” tab, pick “Shapes,” and choose the outline shape you would like. I chose the “Plaque” shape under the “Basic Shapes” heading.
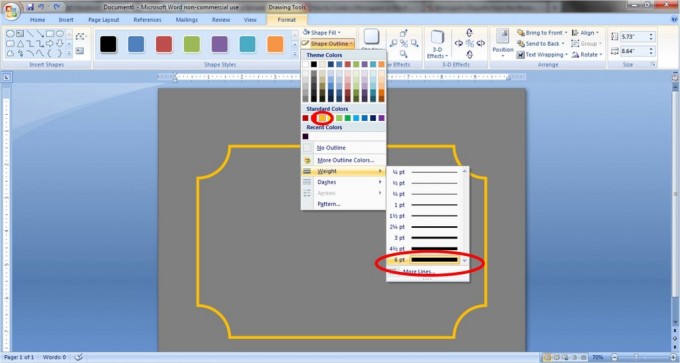
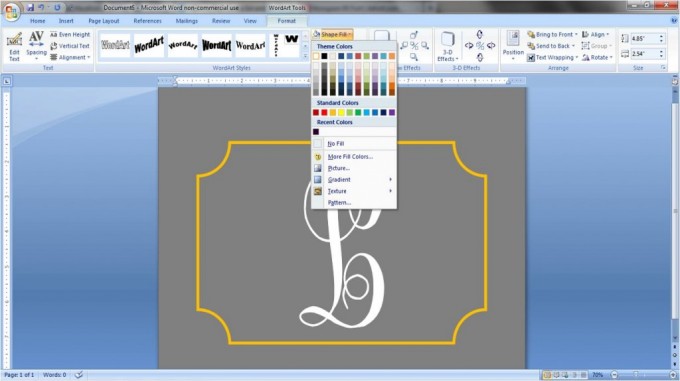
4. Pick the fill color and outline.
Draw your shape to the size you want and place it in the desired position on the page. Then select your outline and fill colors from the “Drawing Tools” tab. I chose “No Fill” as the fill color and a dark yellow, 6 pt weight for the outline.
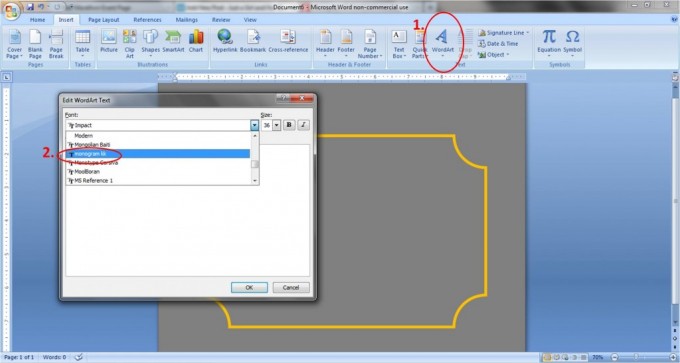
5. Insert word art.
Now it’s monogram time! Click the “Insert” tab and select “Word Art.” You can pick any style of Word Art to start. You’ll change the shape and color later.
I like to start with the initial for the last name, which will be in the middle of the monogram. Type the letter and select “monogram kk” from the font drop down menu.
6. Create the letters of your monogram in Word.
You will now want to change the shape, size, and color of the letter.
First, with the Word Art letter selected, click “Text Wrapping” under the “Word Art Tools” tab, and choose “In Front of Text.” This allows you to move the letter around the page more freely.

Next, change the shape by choosing “Change Shape” under the “Word Art” tab and selecting the straight line titled “Plain Text.”

Move the letter to the middle of your page, resize it to your liking, and change the outline and fill colors under the “Word Art” tab.
7. Repeat steps 5 & 6 to add the other two initials.
If you are creating a monogram of just one person’s initials, their first initial goes first, followed by their (larger) surname initial, then their middle initial. So Jane Elizabeth Doe would have the monogram J D E.
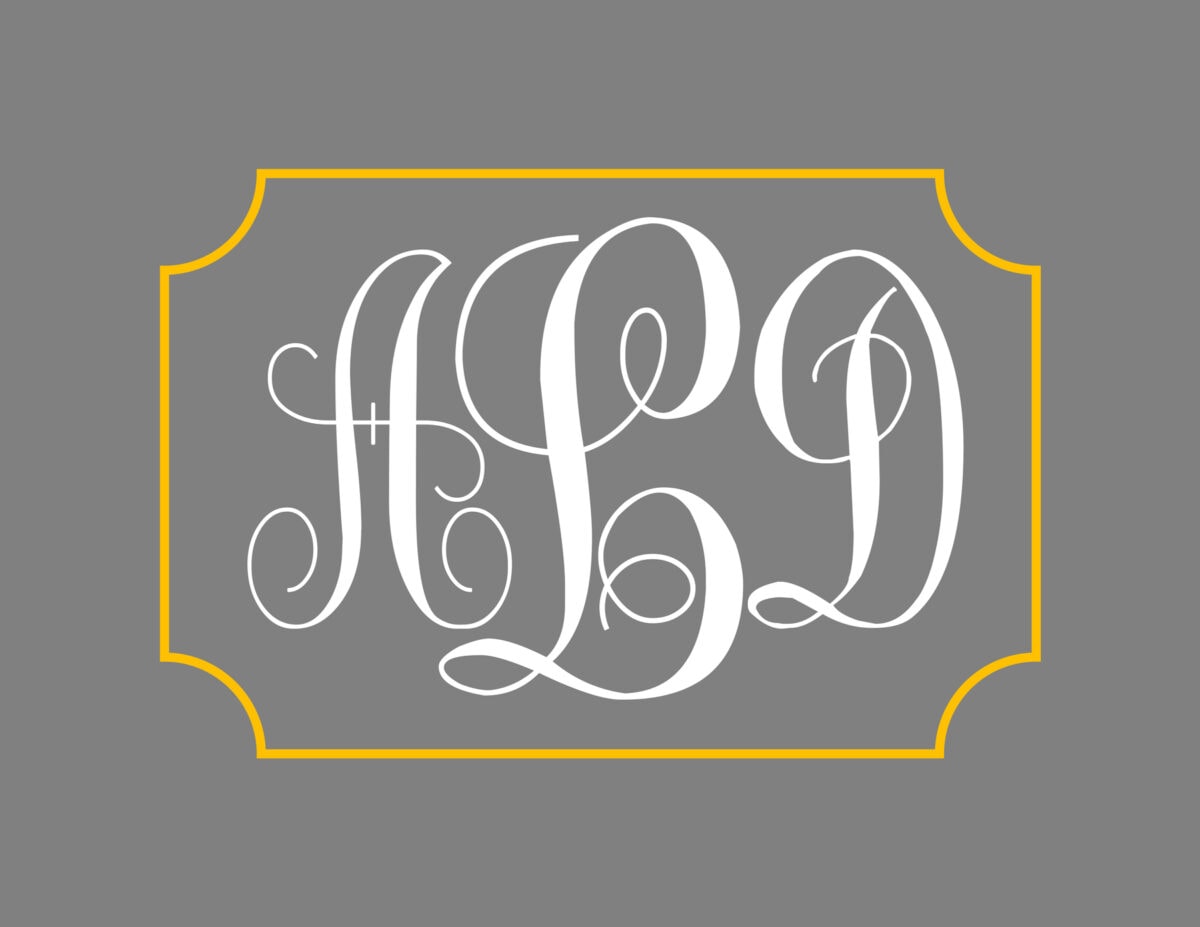
If you are making a monogram for a couple, the wife’s initial goes first, followed by the initial of the couple’s last name and finally the husband’s initial. For example, my name is Abby, my husband is Donnie, and our last name is Lawson, so our monogram is A L D.
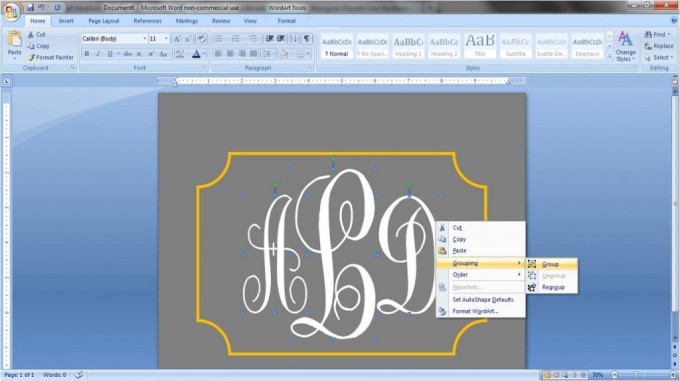
8. Group the letters.
Once you have the letters arranged together, it may help to group them so that you can move them around the page as one unit instead of one at a time. To do this, select all three letters by holding down the “Shift” key while clicking each letter. When you have all three highlighted, right click within the selected letters, and under “Grouping” choose “Group.”
update for grouping
Marlene from Live and Learn (and Teach too…) recently left me this helpful tip for grouping objects more easily: “Under the ‘HOME’ tab, way over to the right choose ‘select,’ then ‘select object,’ then using your mouse drag the dashed line around all the objects you want to group. Then ‘group’ ‘em!” So simple! Love it! Thanks, Marlene!
And…voila!
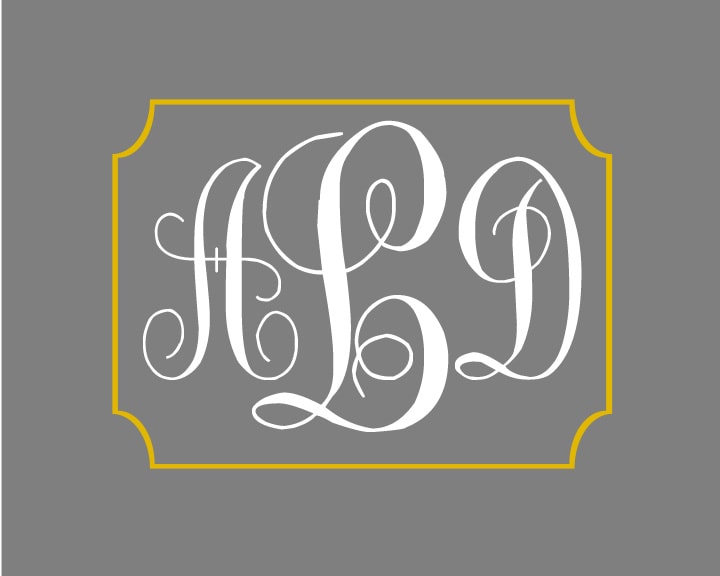
That may have seemed like a lot of steps, but it is actually a simple process; the more you play around with it, the easier it will get. I’m warning you, though, pretty soon you will be as obsessed as I am and will be sticking monograms on everything in sight! Yay! Happy monogramming!
How To Make a Monogram in Microsoft Word

Learn how to create monograms using Microsoft Word and a free font to personalize just about anything!
Materials
Instructions
- Download and install the monogram KK font. Then open a new document in Microsoft Word.
- Choose the background by selecting “Page Color” under the “Page Layout” tab.
- Insert a shape. I chose the plague under the “Basic Shapes” heading.
- Draw the shape and change the outline and fill colors by going to the "Drawing Tools" tab.
- Click Insert > Word Art. Choose any style, the shape and color will be chosen later.
- Type the letter of the last name, select “monogram kk” from the font drop down menu.
- Adjust the shape and size to your liking. First, with the Word Art letter selected, click “Text Wrapping” under the “Word Art Tools” tab, and choose “In Front of Text.”
- Change the shape by choosing “Change Shape” under the “Word Out” tab and selecting the straight line titled “Plain Text.”
- Move the letter to the middle of your page, resize it to your liking, and change the outline and fill colors under the “Word Art” tab.
- Repeat steps 5-7 for the remaining initials.
Making Monograms: Frequently Asked Questions
What are your favorite things to monogram?
Thanks so much for following along! Have a wonderful day!


Abby I love monogramming also..do you use vinyl or contact paper??? Your instructions were GREAT!!!!
Thanks, Pam! I actually just printed this one on card stock and framed it! Easy peasy! Thank you for stopping by the blog!
~Abby =)
Hi Abby
I got through all of your steps for momograming but when I got to the final step, I couldn’t find the change shape under word out tab. I’m assuming my word program is outdated and doesn’t have this? Can you help?
It may be that this tutorial is just outdated! I wrote it in 2013, which was about 3 computers ago for me, lol. I usually use text boxes to place my letters now. I hope this helps!
~Abby =)
SUPER!!! LOVE IT!!!
Thanks, Bernice!!
~Abby =)
This is so cute — I never would have thought to do this!! I will be printing this on cute cardstock 🙂
Thanks so much! That will be adorable!
~Abby =)
Hi Abby I had to print out all 3 of your excellent tutorials so I can see how confused I can make myself, lol. I get pretty confused at the littlest thing so it will be very interesting how I comprehend your tutorial. Believe me it’s not your tutorials’ fault, it’s” mrs. digitally challenged” here.
Love all the screens and how you show what you have to do. I don’t even know what to do with free fonts people offer, told ya, lol
Are you using a particular version of Word? I don’t know what version I have, I bought my pc a year ago Black Friday, it’s Windows 7 HP. I’ll have to try to find out what I have. Is that important to know? Thanks for all your hard work putting all the tutorials together.
Happy Weekend.
Hi, Jane Ellen! I am using Word 2007. If you have a different version, the buttons may be in slightly different places, but they should still be close. If you have questions, let me know and I will try my best to answer them! Thanks so much for reading!
~Abby =)
I created my monogram and I LOOOOOOVE IT!!! Can you give me instructions on how to save just the logo?? I guess… how do I crop it?? and then save it as an image file??
Nevermind.. I figured it out =)
Yay! Glad you figured it out! I usually use PowerPoint to save graphics as a .jgp {explained in my “Create Your Own Graphics” post here: https://wp.me/p32Hzy-jY}, but there are probably other ways to do it too! Thanks so much for stopping by the blog! Have a great weekend!
~Abby =)
I have only RC. How do I design it?
Hm…I’m not familiar with RC. What type of program is it? If you let me know what it is more specifically, I’d be happy to try to figure it out! Thanks for stopping by, Rachel!
~Abby =)
I meant I have only two letters and I don’t know how to design a monogram with two annitials..
I’m sorry! I totally misunderstood what you were asking! The sources I have come across have said that if you don’t have a middle initial, you can do a two-letter monogram and just keep both letters the same size, rather than making your surname initial bigger. {https://goo.gl/yoW5p and https://goo.gl/Idl7L} You could always use a single letter monogram as well {either first or last works!} if you like that better. Hope this helps!
~Abby =)
Thank you! my brother started laughing at me and telling me to change my name so.. THANK YOU! He was pretty annoying 😉
i cant wait to make my first monogram! 😀
Oh, brothers! Well, you’ll show him when you make your beautiful two-letter monogram! 😉 Hope you are having a wonderful week!
~Abby =)
I love how you did this! For some reason my word saved the monogram under my fonts not under word art, do you know how to get it to save under word art?
Hi, Heather! That is strange! Whenever I download the font, it comes up in my list of regular fonts and Word Art fonts. Maybe try closing out of Word and opening it up again? Or maybe read down the whole list of fonts and see if it put it in a weird spot or at the end of the list or something. That’s happened to me before too. Hope this helps!
~Abby =)
I am having the same problem. I’m Not sure if it is a problem with my Apple computer but the font does not appear under fonts or word art 🙁
Have you restarted your computer? If you’ve dragged the file into the font folder and restarted your computer, it will show up. Sometimes they’re named differently, so be sure to look through the whole font list. Hope this helps!
~Abby =)
I LOVE this!!! While reading this, I stopped at the part about how you do a monogram with a couple. I am getting married soon and a wedding director told me that before you get married, the woman’s name goes first, then last name, then man’s name. My name is Erin, our last name is McCloud, and my future husband’s name is Greg, so it would be EMG. BUT, after you’re married, the man’s name goes first, so it would be GME. Not sure on who’s correct! 🙂 But I still love a monogram! Thanks for your tutorial!
That’s so interesting! I did some checking online while I was writing this tutorial just to make sure I wasn’t leading people astray, and none of the websites I visited mentioned the switch. {https://goo.gl/GDg9o and https://goo.gl/zbwm6 were just a few!} Whatever the rule, I say it’s your monogram and your day, so do what YOU love! Congratulations on your engagement and good luck with all of your planning! Thanks for visiting the blog!
~Abby =)
Thanks! I followed the tutorial step by step, I even did the same colors you did and it only printed out the yellow border and everything else was white. So now I have a white piece of paper with a yellow plaque border. How do I get it all to print?
That is so odd! I didn’t have that issue. I’m wondering if your printer isn’t recognizing the “page color” as a background color. Here’s a quick fix. Go to the “Insert” Tab, click “Shape” and choose the rectangle. Draw a rectangle that’s the size of your whole page and use the “Drawing Tools” toolbar to change it to the color you want. Then, also in the “Drawing Tools” toolbar, click “Send to Back.” It should now be behind your monogram and plaque border and I bet that since your printer recognized the plaque, it will recognize the rectangle as well, and it should look exactly the same as mine. Let me know if this doesn’t work and I’ll try to look into it further. Hope this helps!
~Abby =)
It worked! Thank you so much! 🙂
Yay! So glad it worked!
~Abby =)
Thank you for sharing!
Thanks so much for stopping by, Madalyn! Hope you’re having a wonderful Monday!
~Abby =)
This Is great!! I’ve been wanting a monogram for a while but didn’t want to shell out the bucks to have it made, so awesome thanks!!
Thanks so much, Stacey! I’m so happy you stopped by! Have a wonderful Monday!
~Abby =)
I’m visiting from DIY Dreamer. What a great idea! I hope to use it soon.
Karen @ annumography
Thank you so much, Karen! I’m so glad you stopped by! Have a great week!
~Abby =)
Oh my….your blog is AMAZING!! I just found it through Madigan Made today, and I have to say, I may be on here for hours later this evening! I see so much I want to just click on and pin…and click on and pin….you get the point 🙂 I love this post and you have given me a new dangerous addiction! Yay!! – I see some printed fabric pillows in my future done with these…
Thank you so much, Natasha! You are so sweet! Thank you so much for popping over to my blog! Heading over to yours now! Have a wonderful evening!
~Abby =)
Abby! Thank you! I love me some monograms and did not know how to make one in word! Thanks, girl! Pinning! Thanks for sharing at Give Me The Goods Monday! Can’t wait to see what you bring next week! Jenna @ Rain on a Tin Roof
Thank you so much, Jenna! You’re so sweet! Hope you’re having a great week!
~Abby =)
These are so beautiful and you’ve provided a wonderful tutorial. Pinned this. I think my MOPS friends would love this! Join us for Family Fun Friday. Share your posts with 100+ bloggers and 400+ readers. If you have time, please link this at:
https://happyandblessedhome.com/category/family-fun/
Thanks!
Monica
Thanks for the invite, Monica! I linked up! Have a wonderful weekend!
~Abby =)
Wow, what a great tutorial Abby!! So detailed!! Thanks for sharing it at Project Inspire{d} 🙂 Pinning!
Nancy
Thank you, Nancy!! Hope you have a wonderful weekend!
~Abby =)
Thank you for the tutorial! So much fun! And, thank you for linking up at Family Fun Friday on HappyAndBlessedHome.com! Blessings!
Thanks so much for stopping by, Diane! Have a wonderful weekend!
~Abby =)
Ohhh,, so glad I found your tutorial. My head is spinning with all the possibilities! Thanks so much for sharing this. I’m visiting from It’s Overflowing.
Thanks for popping over, Christy! I know what you mean…I love monograms on everything! 🙂 Hope you’re having a wonderful weekend!
~Abby =)
I love monograms!
Ooh me too! I think I am subconsciously working my way into having one in each room. They’re just so fun! Have a wonderful weekend, Jeni! Thanks for stopping by!
~Abby =)
Wow, great tips. I had no idea you would create all that in word!
We would love it if you would link up at our linky party:
Two Girls and a Party
Live every Wednesday to Sunday. Hosted by:
Dana @ This Silly Girl’s Life
Parrish @ Life with the Crust Cut Off
We hope to see you there!
Thanks so much for the invite, Dana! Have a wonderful weekend!
~Abby =)
Oh..what a great tutorial! Love this! I am always amazed at what you can do with these programs. Thanks for sharing at Monday Funday! Pinning! Bonnie @ Uncommon Designs
Thanks so much, Bonnie! And thank YOU for hosting! Have a wonderful week!
~Abby =)
What a great tutorial Abby! It will come in useful for soooo many people!
Thanks for linking up at The DIY Dreamer last week! Can’t wait to see what you link up tomorrow evening!
Thank you, Christine! I’m so glad you stopped by! Have a wonderful week!
~Abby =)
This is great! Thanks for the step by step.
I’m visiting you today from Sundae Scoop. I co-host a Linky Party Tuesday (open thru Sat) and I’d love for you to link up! I hope you get a chance to stop by, link up and leave a comment, too!
~ Megin of VMG206
Join me each Tuesday for Brag About It Link Up Party
Thank you so much for the invite, Megin! Hope you’re having a great week!
~Abby =)
Would love for you to share this at my link up where we pin all those you join to our party board
https://myfashionforwardblog.com/2013/05/30/all-things-pretty-10/
Thanks so much for the invite, Leslie! Hope you’re having a wonderful week!
~Abby =)
Featured you tonight at Monday Funday!
Thank you so much! You totally made my day! Hope you have a wonderful week!
~Abby =)
FOund this post at Monday Funday Link! I am pinning it (with direct link back to your blog) this is an awesome tutorial! I can’t wait to try it!
Here’s my link from teh party, if you get a chance!
https://shabbybrocante.blogspot.com/2013/06/pretty-in-pink.html
Karen
Thank you so much, Karen! I’m headed over to your place now! Hope you have a wonderful week!
~Abby =)
Love this! Going to be featuring it tomorrow on my link party!! Thanks for sharing!
Thank you so much, Allyson! You totally made my day! “See” you at the party tomorrow!
~Abby =)
My computer doesn’t give me the option to install. Help!
Hmmm…After you downloaded it, did you go to the folder with the zip file and double click the folder? If a dialogue box doesn’t pop up after you download, there should be a down arrow to the right of your navigation bar next to the little house icon (if you are using Firefox). If you click the arrow, you should be able to click on the zip folder. Inside that folder is a file called “monogram kk sc” and when you double click that, that’s when you should get the option to install. Hope this helps!
~Abby =)
I tried downloading the font, but it is not working. Im using a Macbook Pro and I have Windows office on here too. Do you have any tips for Mac people?
Hi, Anja! Thanks for checking out my tutorial! Fortunately, my husband also has a Macbook Pro, so I was able to do some investigating. When you click “download” at dafont.com, it puts a zip file on your desktop. Double click the file to unzip, and open the folder to find the .ttf file. In Finder, click “Macintosh HD” (your hard drive), choose “System”, then click “Library”, and select the “Fonts” folder. Drag the .ttf file into your “Fonts” folder (you may have to authenticate). Then restart your computer to use the font. I hope this works for you! I just did the whole process on his Mac, and it worked like a charm, so it should be fine. Hope you’re having a great week!
~Abby =)
Hi i just got a macbook pro and wanted to know if you had any suggestions on how i can get the bunting banner done on this thing. My son is going to turn 3 this August and i wanted to make a mickeymouse pirate themed bunting banner.
Hi, Cyndi! What a fun party theme! If you have Microsoft Office on your Mac, the steps should be pretty similar. {If you get stuck at any, let me know, and I can look at it on my hubby’s Mac.} If you don’t have Office, I would recommend picmonkey.com. You would just open a picture, use the “Overlays” to draw a big white box over it to make your canvas, and then use both the overlays {you can add your own overlays if you have specific graphics you want to use} and text features to create the banner. You would have to make one triangle at a time, but they will save as a .jpg and you can open it in whichever program you choose on your computer. Hope this helps! Have a wonderful week!
~Abby =)
This tutorial was so easy to do and the end product turned out great! I want to upload this to my iPhone but when I try do so I cant see anything. I think it is because there is no actual text, only word art and shapes. Do you know how to view it on an iPhone so I can make it my home screen. Again, great tutorial!!!!
Thanks, Kristen! I think the easiest way to view it on your phone I would be to save it as a pdf. It should show up when you do that. If that doesn’t work, saving it as a .jpg (picture file) definitely will. Here’s how to do that: If you changed the page color of your document for your background, you will need to do it with a shape instead. Insert>Shape>Choose the rectangle, draw it the size of the whole screen, change the color to what you want, right click it and under “Order” choose “Send to back” to get it behind your monogram letters. Then you’ll want to “group” all of your pieces and save it as a picture by copying and pasting it into PowerPoint. My “Create Your Own Graphics in Word” tutorial gives detailed instructions on how to do that here (see steps 5 & 6): https://justagirlandherblog.com/create-graphics-in-microsoft-word/ . Hope this helps! If you have any more questions feel free to ask away! Have a wonderful Sunday!
~Abby =)
Thank you for the tutorials. They were very easy to follow! If you haven’t received this tip (or maybe you already know it), I found an easier way to “select” and “group”. Under the “HOME” tab, way over to the right choose “select”; then “select object”; then using your mouse drag the dashed line around all the objects you want to group. Then “group” ’em!
That is a brilliant tip, Marlene! I didn’t know that one! Thank you so much for sharing your wisdom! I updated the tutorial to include your tip and credited you with a link to your blog! Thanks again!
~Abby =)
When you make the monogram, do you print it on 8.5×11 paper/letter size? How do you find a frame to fit it since frames are either 11×14 with 8×10 matting or 8×10 and then parts get cut off?
Just wondering the best way to print this and frame….
Hi, Kelly! I had the monogram I made for my bathroom printed on card stock and I put it in an 11 x 14 frame, so there was plenty of room behind the mat for my extra inches, and my design was in the middle with room to spare, so it wasn’t cut off at all. If you just make sure your design is within the 8.5 x 11 limits, you can do what I did for an 11 x 14 or trim down the edges to fit it in an 8 x 10 frame. You could also use a document frame which is sized to fit letter-sized paper. Hope this helps!
~Abby =)
Thank you for this posting, it was super easy to follow and turned out great! You rock!
Yay! I’m so glad you tried it and let me know! Thanks so much for reading, Stacy!
~Abby =)
Great tutorial! Easy to follow and understand . . . you did a great job! Thank you for your willingness to share your talent.
Thank you so much, Mary Jo! I’m glad it was helpful!
~Abby =)
Thank you so much for this tutorial! I was looking on the entire web about how to install monograms on a mac computer without success and I just found the answer for this on your comments. It works perfect! thank you again! 🙂
Yay! So glad it worked! Thanks so much for stopping by, Patricia!
~Abby =)
Hi Abby! I am also a “Monogram Freak”! I really enjoyed this project! Thanks!
So nice to meet another monogram enthusiast! 😀 Happy monogramming!
~Abby =)
hi
i just wanted to ask how you made your website 🙂 do you pay for it because it is a .com domain?:)
I love your blog :))))
xoxo
Thanks, Isy! It is a self-hosted WordPress blog, so I pay for to register the domain and for hosting with Media Temple. I use the Genesis framework with Delightful child theme. Hope you’re having a great week!
~Abby =)
i made the monogram all thanks to u! Awesome tutorial! but how do i print it ? and make multiple copies too ? 😮 😡
Yay! I’m glad the tutorial was helpful! You can print it just like you would any other Word document. Go to the “File” menu and choose “Print.” You can select the number of copies you want from there. If you don’t want to print it at home, I had FedEx Office print mine for a little over a dollar! Hope this helps!
~Abby =)
Thank you SO much for this! Great instructions & so simple! I have already made one thing and will be making more. Thanks again!
Yay! I’m so glad the tutorial was helpful! Happy monogramming!! 😀
~Abby =)
What word year are you using? Because when I went to do this it showed up in my font box and not the Word Art?
also i read a comment someone else had similar to mine and i exited out of word and still nothing but i downloaded it through google chrome.
Hi, Gabi! Are you on a Mac by any chance? This tutorial was done on Word 2007 on a PC. For Macs, the font download process is a little different. (And maybe on newer versions of PCs. I’m not sure, as I switched to a Mac shortly after writing this tutorial.) When you click “download” at dafont.com, it puts a zip file on your desktop. Double click the file to unzip, and open the folder to find the .ttf file. In Finder, click “Macintosh HD” (your hard drive), choose “System”, then click “Library”, and select the “Fonts” folder. Drag the .ttf file into your “Fonts” folder (you may have to authenticate). Then restart your computer to use the font. I hope this helps! It is with questions like this that I wish I could be looking at your computer, because it is hard to troubleshoot without seeing what is going on! Thanks so much for visiting my blog! Have a wonderful week!
~Abby =)
Love this!! I’m great with Adobe programs but pretty clueless when it comes to word. Thank you for the tutorial!
Girl, we need to swap! I need serious Adobe help, lol! Thanks so much for stopping by my blog! Have a great week!
~Abby =)
Too funny. From the look of your blog you seem to be doing ok! Like my facebook page or note my email though I’d be happy to help you anyway I can!
Hi Abby,
Thank you so much for the tutorial! Just wanted to let you know I found an amazing way to do the monogram so it will appear in the background with text over it…. I used the watermark feature in the newer version of word!! It blew my mind how easy it was and think it will be the way to incorporate it into the invitation I am creating!
Thank you!
Ooh that is a great tip, Margret! Thanks so much for sharing! Have a wonderful week!
~Abby =)
girl, you are the best!!!…I love your instructions!
So glad they were helpful, Elio!
~Abby =)
I have Word 2013 and I can’t find the “Plaque” shape. Any recommendations on there to find one?
So glad I found this blogpost! I searched and searched to find a tutorial like this and I am so glad that I came across this one. It was quick and so easy to follow. Thank you!
Glad it was so helpful! Have an awesome week! ~Abby =)
Wow this is so much easier than I thought! Awesome tutorial, I’ll definitely be making some of these. Now everything in my apartment will have monograms! Haha
Hello there, first I would like to Thank You so much for your post. OMG you would NOT believe how long I’ve been looking for a step by step way of doing this in Word. You are a Lifesaver. I purchased a Cricut machine in Nov.2015, thinking “Yea, I’m about to go to town on me some monograms” NOT haha. I mean the Cricut Is Awesome, don’t get me wrong, but for some reason with this font it doesn’t cut out as good as others because of the squigly lines. So I was going to ask you if there is an easy way to thicken the sguigly lines so that it would not cut out just a tiny, thin line? I’ve tried it as Bold which does make it thicker but still doesn’t look as nice as it is regular.
Sorry if I’m babbling, but I hope you understand what I’m asking. I’m just loving your easier ways of doing things and newer things I’ve learned All from you….
After I’ve watched about 50 YouTube videos and googled info about that Blew my Mind. I had to take a vacation and I’m retired, haha.
Hope you can get something out of my jabber jaws. Thanks again
Hi, Regina! I’m a Silhouette girl so I haven’t worked with a Cricut, but I’m guessing the process for thickening the lines on a thin font would be similar. My friend Melissa has a great tutorial on it here: https://www.silhouetteschoolblog.com/2014/04/trick-to-cutting-thin-fonts-on.html . I hope this helps!
~Abby =)
I have a maybe somewhat simple question, but it seems complex to me. If I want to keep the border of the frame, how can I perfectly cut around the outline without cutting off the border (yellow) itself? Do I just have to cut a few inches away from the border and leave some of the background on the monogram (outside of the plague framework)?
Hi, Dee! I framed mine, so I didn’t do any cutting, but if you’d like to cut yours out, I would do exactly as you described. Just cut an inch or so away from the edge of the border. Have a great day!
~Abby =)
If i create a monogram through word and save it, can i use it to upload on my embroidery machine?
I’ve never used an embroidery machine, so I’m not sure. It’s worth a try!
~Abby =)
Great steps for using Monograms on Microsoft Word. I will say, just be sure that any font you use — if used on an item to be sold — is 100% free. Otherwise, contact the author regarding use of it for resale. Most authors tag on the Font “free for personal use.” For businesses, cover yourself legally by paying for Monograms which the Font Author issues a charge for the use of it.
Yes! Great reminder, Barbi! Hope you’re having a wonderful week!
~Abby =)
I googled and found an answer there. You have to save it to Paint, can save as JPG. Then you can save pull it over into the scan n cut. Thanks the tutorial, it is a money save., because everyone knows this addiction can be very expensive. Thanks.
this tutorial helped me so much!
I’m so glad! Have a great day!
~Abby =)