How to Photograph Printables
Hi, sweet friends! I realize that a photography post is a little different than what I typically share here on Just a Girl and Her Blog, so bear with me today. 🙂
I posted a photo of my process for photographing printables both in the Building a Framework Facebook group and on Instagram last week and received a lot of questions, so I thought I would take the time to explain the process I use to photograph printables in case it would be helpful for other bloggers, Etsy shop owners, or just anyone who is frustrated with photography!
(And if you’re not a blogger or photographer, I think it’s fun to see “behind the scenes” a little bit sometimes, so I hope you’ll enjoy this sneak peek too!)
This post contains affiliate links. For more information, see my disclosures here.
If you are in that last “frustrated with photography” group, I totally hear you! I am not a professional photographer by any stretch of the imagination.
Learn how to start a blog!
Get your new blog set up in a few short minutes with our easy-to-follow guide, and start growing your site today!
I had never even picked up a DSLR camera before I started blogging. It certainly has been a learning process over the past few years, and though I still have many improvements that I’d like to make, I’ve come a long way from some of my first printable photos, which looked like this:
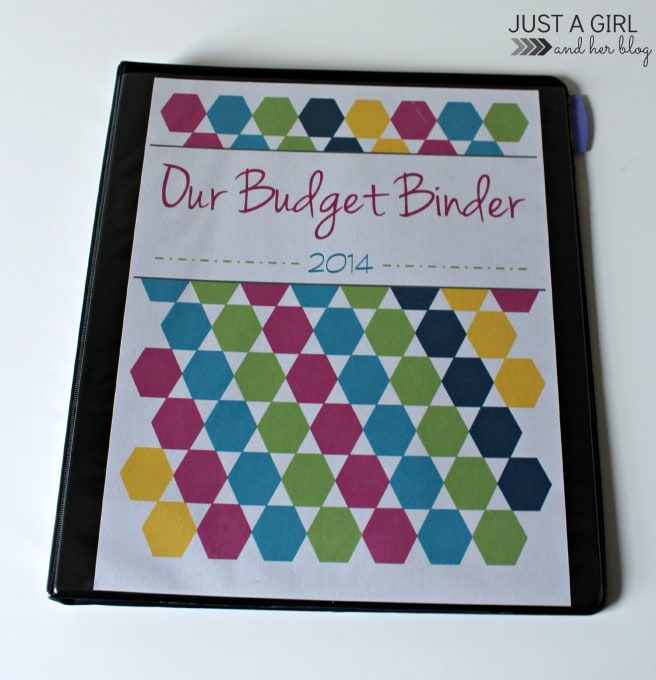
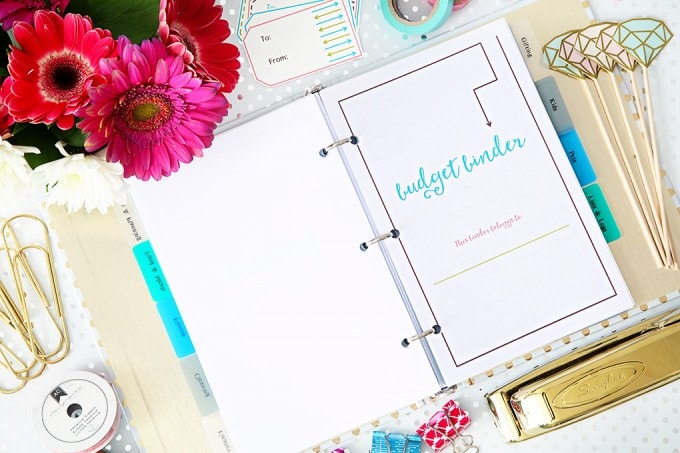
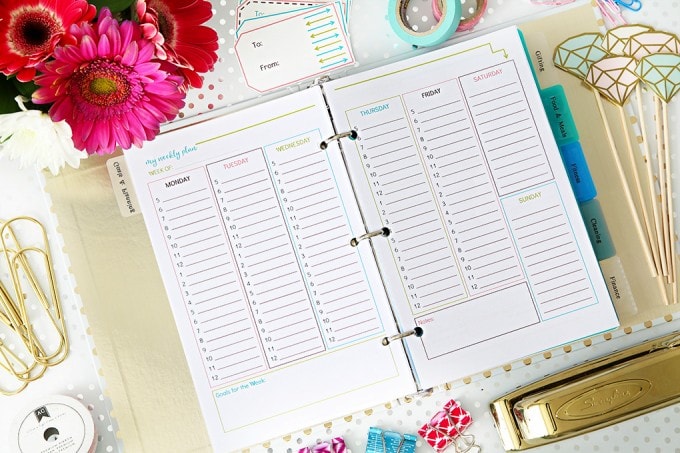
Yikes. While photography in general can be a challenge, I’ve found that photographing printables is especially tough. It’s hard to get the words to look clear, the colors vibrant, and the photo bright without being blown out. But after lots and lots of trial and error, I’ve come up with a system that works for me, and my printable photos now look like this:
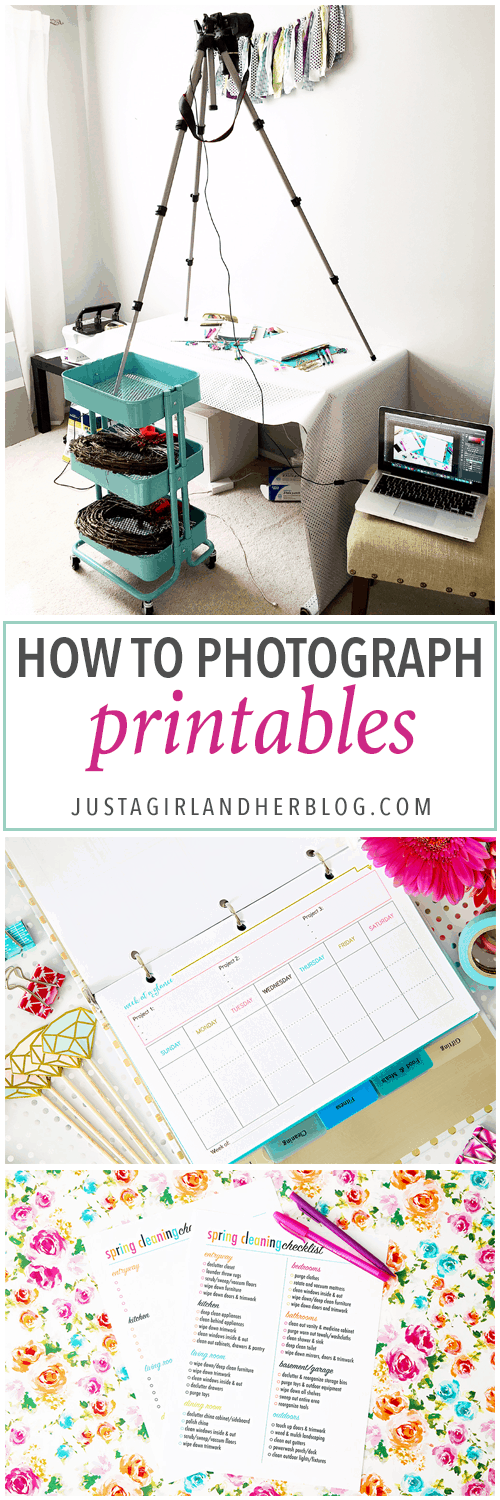
To explain my process, it would probably be helpful to show you the photo that started all of the questions in the first place. This is the setup I use to photograph printables:
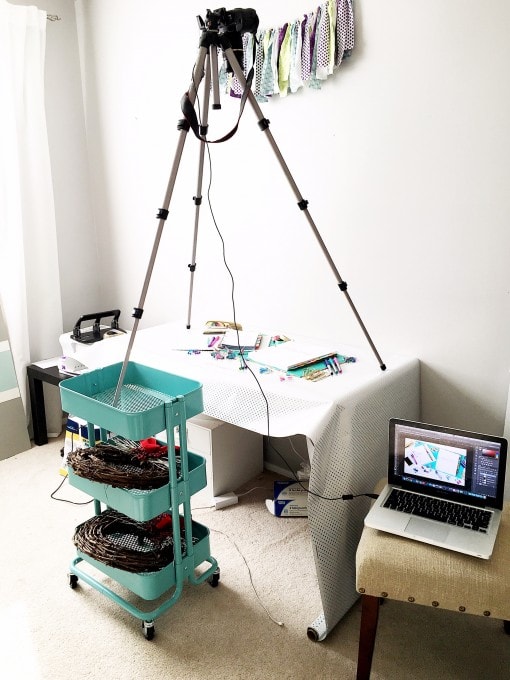
Kind of crazy that it takes all of that to photograph a simple piece of paper, right?! Eeek! So here’s what you’re seeing…
1. Find the spot in the house that gets the best light.
This might take some trial and error. After trying to photograph in just about every place in our house, I’ve found that I get the best light in my office at desk height. The only window in this room is to the left of the photograph, and I don’t use artificial lights at all.
For me, the best days to photograph printables seem to be ones where there is sun, but there are also clouds so the sun is less harsh. I have lightweight white curtains in my office on purpose so that if the light is too harsh, I can close the curtains to diffuse the harshness a bit while still letting in enough light.
2. Gather your equipment.
You will need:
- Camera with the cable- I currently use a Canon 6D and love it. The cable I use is the one that comes with the camera and is the same one I use to transfer photos from the camera to my computer.
- Lens- My favorite lens at the moment is the Tamron 28-75mm f/2.8.
- Tripod- I have this tripod by Manfrotto.
- Computer- Mine is a MacBook Pro.
- Desk and/or cart if necessary- I have this desktop with these legs and this cart, all from IKEA.
- Backgrounds and accessories- I typically use wrapping paper as the background when I’m photographing printables because it comes in all different colors and patterns, is inexpensive, and it’s easy to store. I also have this faux wood photo backdrop and love it. As far as accessories go, I use mostly office supplies, and Target is my go-to source for finding cute supplies!
3. Set up your shot.
I arrange my printable and accessories on the desk, then put my camera on the tripod and position it over top of the subject so that the lens is pointing straight down. I then tether the camera to my computer so that I can change the settings and take the actual photograph from the computer. This saves me from trying to climb up and down to adjust things from the camera itself, and it also ensures that I don’t move the camera at all while I’m pressing the button (because I press the button on the computer), which would result in a blurry shot.
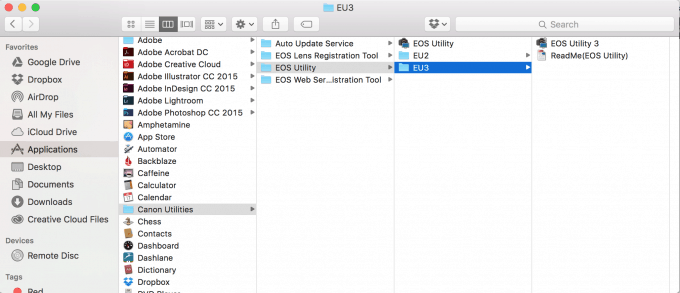
Tethering sounds complicated, but it is actually really simple. I just use the cord that came with the camera (the same one you would use to transfer photos), and plug it in to the camera and to my computer. Then I turn on the camera and open up the Canon EOS Utility, the software that came with my camera. (I have never used a Nikon, but I assume they have something similar.)
On my computer I go to Applications > Canon Utilities > EOS Utility > EU3 > EOS Utility 3.
From there, this screen opens and I select “Remote shooting.”
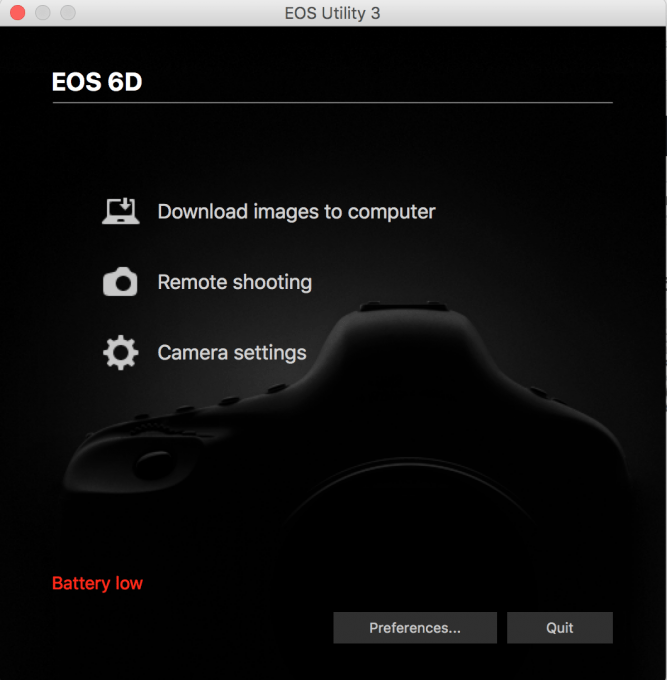
That will open up the settings pane, which looks like this:
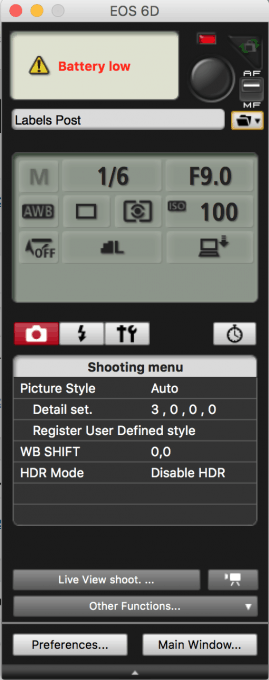
Here I can change the f-stop, ISO, shutter speed, and other settings on my camera. I can also take the actual photograph by clicking the round button at the top of the pane. If I want to see what all is in the shot without having to look through the camera’s viewfinder, I can click the “Live View shoot” button near the bottom of the panel.
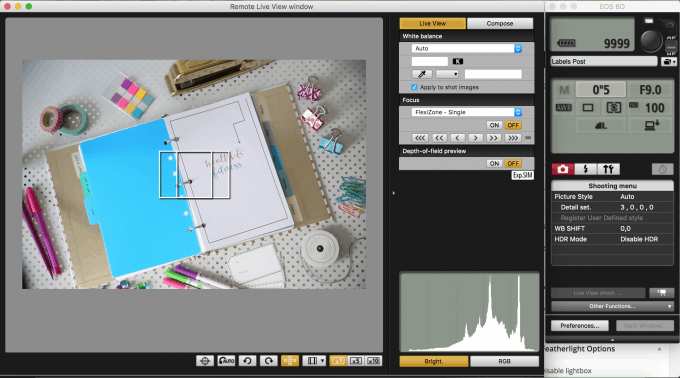
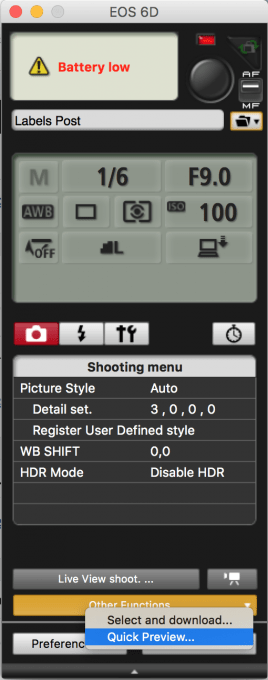
Another advantage of tethering and taking the photograph from the computer is that I can see a nice, big preview of my shot, rather than just the small one on the back of the camera. This allows me to catch details that I may have missed otherwise. To do this, I click the “Other Functions…” button at the bottom of the pane and choose “Quick Preview.”
Then after I take my shot, the preview pops up on my screen:
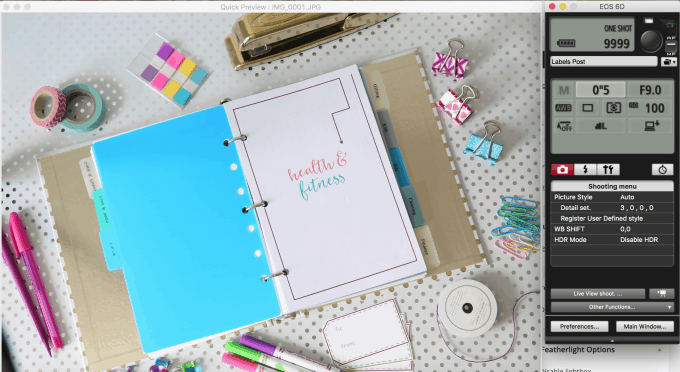
Before I was tethering my camera to the computer, I would take a round of photos, then have to upload them to the computer to look at them clearly. If I realized that something was out of place or they weren’t crisp enough, I would have to go re-shoot the whole thing. Now that I can see the large photo right away, I can make my tweaks after each shot, and I know I’m getting the exact photos I want.
4. Adjust your camera settings.
In the past year or so I’ve started taking almost all of my interior photos at a low ISO + long shutter speed using a tripod. This combination ensures that the photos will be really crisp and clear while still being nice and bright.
For photos of printables, I keep my ISO at 100, put my f-stop around 9 or 10 so the whole printable is in focus, and then adjust the shutter speed to get the brightness I want. On the day I took the screenshots above, it was pretty bright out, so I only needed a shutter speed of 0″5 to make the photo bright enough.
On darker days, my shutter speed can be much longer. I’ve even gone up to 10 to 15 second shutter speeds to get bright photos in certain areas of my house! The tripod and tethering makes this possible because you don’t have to worry about bumping or moving the camera and getting a blurry shot.
5. Make your edits.
I edit almost all of my photos in Photoshop, and I thought a quick video might be the easiest way to demonstrate my editing process rather than trying to take screenshots of everything, so you can watch below.
Easy enough, right?! Learning the basics of Photoshop really has helped improve my photos a lot, and you can get access to Photoshop and Lightroom through Adobe Creative Cloud for only $10 a month, so it’s not very expensive.
As I mentioned in the video, I use the actions that Rachel talks about in this post over at Maison de Pax. It really is worth going through her whole photography series. She is AWESOME!
So that’s my process! Kind of hard to believe it takes all of that to photograph one little printable, but now that I have my system down, it really doesn’t take much time at all. This process has saved me tons of time and frustration, and I’m more inclined to make printables because I know I’ll be able to get great shots of them!
I hope this post was somewhat helpful. I know that photography is hard, and it is more of an “art” than a “science,” so practicing and trying different things has helped me learn a ton and get better a little bit at a time.
You can get even more blog photography tips in these posts:
Interior Photography Tips for Bloggers
Best Photo and Video Equipment for Bloggers
Do you have any tips to add for photographing printables? Leave them in the comments so that we can all help each other!
Have a wonderful day, friends!
We’re sharing ALL of the tools we’ve used to grow our blog!
Stop the guessing game! Get our list of 100+ proven tips, tools, and resources that can take your blog/online business to the next level!

This post contains affiliate links. For more information, see my disclosures here.
This was such an incredible guide to photography, even general, aside from photographing printables! Thank you so much!
Thank you so much for this information – I am new to blogging and taking blog-worthy pictures. I really appreciate the step-by-step instructions!
Thank you so much for going through this process for us! I am a new blogger and I’m trying to figure out how to take blog worthy pictures. I have the camera, but I still have a lot of playing around to do! This post will really help me figure some stuff out!
I have an Etsy shop and have been thinking recently that I should try to up my photo game. I’ll be sticking with my old point-and-shoot camera for now but this post has motivated me to check out some wrapping paper to use for the background and to experiment with lighting in my place! Do you have a certain time of day that you like to shoot?
Hi, Shannon! I’ve found that the light in my room generally tends to be best around 9 am, but that will change based on the location of your shoot and time of year. Best of luck with your shop!
~Abby =)
You’ve got it down girl! Thanks for sharing! I was trying to take pictures of printables recently and they all came out looking awful, can’t wait to try your process!
Abby!! That was so helpful!! You have no idea! Thank you so much for taking the time to write down your whole process. Excited to try all your tips.
Great article! I learned so much about remote shooting that I didn’t have a clue about!
Abby, before reading your post, I was wondering if you really had to climb up and down to take the pictures. I didn’t know you can take the actual photograph from the computer. Amazing technology. Photography is never my thing and no wonder many of my pictures look horrible. Time to learn more! Thanks for sharing the detailed process and it’s really fun to see something behind the scenes 🙂
Wow- I never knew you could connect a camera to a computer for taking pictures and adjusting settings… Wow!
WOW! So much good information, thank you for sharing your trial and errors and your fabulous use of what you’ve got to make it work! Good job and great blog!!
Oh my goodness! This is a game changer. Thanks Abby for the post! My photos are already looking better thanks to you. Just FYI for anyone out there who uses Photoshop Elements like me, Abby’s tutorial works just the same. I had already been using these Pioneer Woman’s actions, but I didn’t know about inverting the layer and using a brush. Amazing! Thanks again. You and Donnie are inspiring!
So glad it was helpful for you, Heather! Hope you’re having a wonderful week!
~Abby =)
I had no idea you could tether a camera to a laptop and do all of that!! I am going to check and see if my hubby’s camera has that capability!! Thanks for the tips!!
You are always sooooo helpful, thank you so much! I am in the process of starting my first blog and I really thought photography, albeit super important for blogging, is too much hassle / technical and complicated but you did an amazing job explaining it all! And your photos are always so perfect and vibrant. Thank you again for your help
Aw, you are too sweet Mija! I’m so glad it was helpful for you! Have a wonderful day!
~Abby =)
Thanks for sharing your process. This post was great! I have a running list of skills I need to develop or improve on and photography is definitely one of them. I can hardly wait to have the tools to dive into this.
Awww… I just found this shout out! Thank you so much, my friend!! xx
Paying for Adobe Creative Cloud access is not very expensive at $10 a month – IF you use it every month or even more often. It is too expensive if you only use it a couple times a year, because you’d be paying that $10 each and every month whether you use the access or not.
Therefore, I have kept my photo editing to Corel Paintshop Pro, for which I only pay when/if I upgrade to the next version of the program… which I only do about once every 3 to 5 years. That keeps my cost very low, and keeps my photos more secure, since they are not accessed through the cloud.
For as long as I can avoid doing so, I’ll not pay a monthly fee for using programs on an intermittent basis. I’ll also avoid using the cloud for data storage as long as possible.
Wow, thank you so much for sharing these tips! I”ve only been using a DSLR for about 5 months and it can be really frustrating at times. Thanks for showing your “behind the scenes”, I wish it was light out right now so I could go practice!
Ok am I losing my mind? I’m attempting to take the cover picture for my ebook tomorrow (love Book Boss!) and I’ve figured out the tethered shots but for the life of me can’t figure out how to actually take the picture. My EOS Utility system looks exactly like yours to adjust settings and live preview. What button do you press to actually take the picture?
Hi, Amanda! It’s the round one in the top right corner of the EOS Utility toolbar. I hope this helps!
~Abby =)
Hi Abby! I went to reply this morning but didn’t see my comment. Thanks! I realized I had an outdated version of the program so the button didn’t work last night. Seriously, the tethered shooting is an absolute game changer!!! I’ve spent all day photographing for my ebook and can’t wait to sit down to go through them all.
It appears the tripod you mention is no longer available. Are there any others that you like? Thanks!
So sorry about that! Mine is similar to this one: https://www.amazon.com/Manfrotto-MKCOMPACTLT-BK-Compact-Tripod-Black/dp/B00L6CBKAK/ref=sr_1_6?s=photo&ie=UTF8&qid=1481901875&sr=1-6&keywords=manfrotto+tripod . Hope you have a wonderful weekend!
~Abby =)
Thanks Abby for sharing these tips and the video on the editing the pics. 🙂
So glad they were helpful! <3
~Abby =)
So thankful that you shared your “tricks”. I really appreciate you sharing your wealth of knowledge. Do you feel that your Cannon camera was easy to figure out? I’m starting my blog currently and I’ve enjoyed your photos–wondering if you’d share your opinion?
Hi, Danielle! I started out on the Canon Rebel, and while there’s always a learning curve, I thought it was a great camera to learn on. I took a basic photography class when I first got the camera and that helped too. The class I took isn’t around anymore, but Shoot Fly Shoot has a great beginner class if you’re looking for one. Have a great weekend!
~Abby =)
This is SO HELPFUL! I don’t know why I didn’t think of setting up my tripod and setting my shutter to stay open a long time. Nor did I think about taking it from above like that. So thank you for tips.
I just re-took a photo of my first printable and the difference is amazing!
Yay! So glad it was helpful for you! <3
~Abby =)
I was trying to edit my photo in Photoshop but for some reason the brush tool only gives me a plush sign. Did I skip step and what is this called so I can look it up for more details? This is exactly what I’m trying to do with my photos but not sure why that brush tool isn’t working the same. I just updated to 2018…Thanks for so many great tips!
Hi, Alison! Is your caps lock on? Mine became a plus sign the other day when my caps lock was on but fixed itself when I turned off caps. It also may be that your brush size is really large or really small, so try playing around with that too. I hope this helps!
~Abby =)
I love love love this! You’ve simplified everything and made it so simple! Time to dig my tripod out, put the cellphone away, and tackle learning my DSLR
Thanks Abby!!
Woohoo! You go girl! 🙂
~Abby =)
Thank you for this tutorial Abby! This will be so helpful! Do you have a class you recommend to learn how to use Photoshop?
I would start with this post from my friend Rachel at Maison de Pax: https://www.maisondepax.com/photography-tips-editing-in-photoshop/ . Her whole photography series is brilliant! I haven’t taken a course that is all completely photoshop, but I learned a ton about it from the photo editing section of Minimalist Baker’s photography course: https://foodphotographyschool.com/?nav#the-essentials-course . (Clearly I am not a food blogger, but this was still probably the most helpful photography course I’ve ever taken. It was so good I binged the whole thing in one weekend, lol.) I hope this helps!
~Abby =)