No-Sew Pillow Covers {decorated with Sharpies!}
This post is part of a social shopper marketing insight campaign with Pollinate Media Group™ and Sharpie, but all my opinions are my own. #pmedia #StaplesSharpie https://cmp.ly/3/8vNxcO.
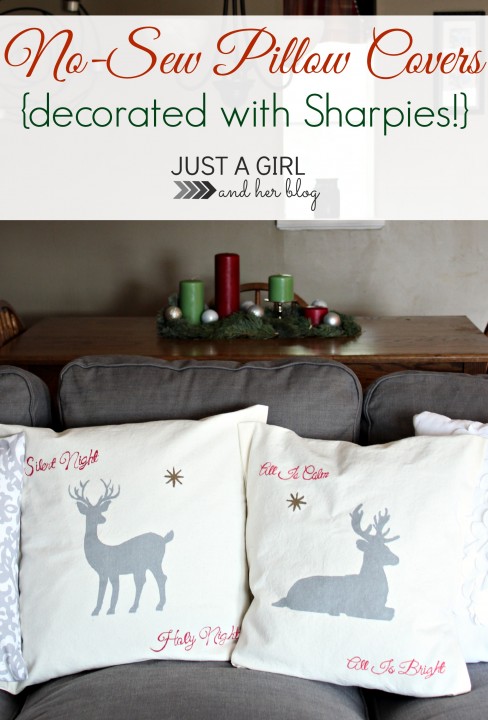
As I promised yesterday, I’m back to share all of my pillow-making secrets! I know what you’re thinking: “Abby, why in the world would you try pillows again? Don’t you remember what happened last time?” Yes, so my appliqued accent pillows may win the award for the most frustrating project ever attempted, but hey, I needed Christmas-y pillows, so I had to get back on the horse, know what I’m saying? In today’s tutorial, though, hem tape will be playing the role of the sewing machine and Sharpie markers will be headlining as the applique. Yay! No sewing AND I get to play with Sharpies AND I come out with two adorable Christmas pillows at the end?! #winning 😀
Here’s what I used to complete this project:
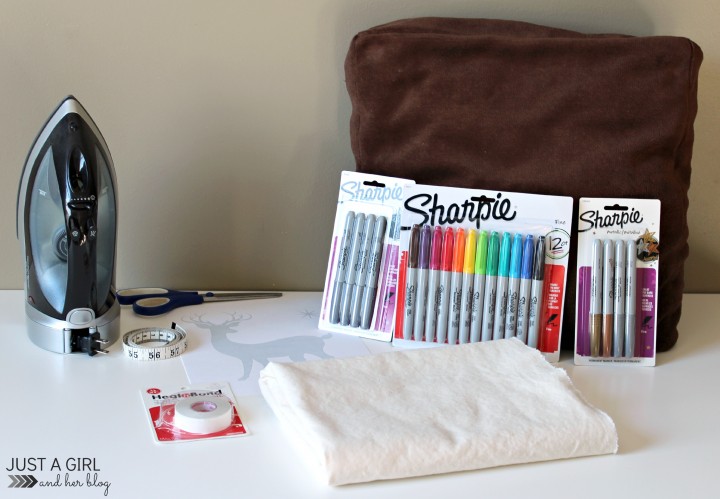
- Iron
- Scissors
- Measuring Tape
- Hem Tape
- Desired Design, Printed on Cardstock
- Fabric (I bought 2 yards for 2 16″ square pillows and had a little bit left over.)
- Ugly Pillow
- Sharpies in Desired Colors {I desired all of the colors, so I bought the 4 pack of metallic silver, the 12 pack of assorted colors, and the 4 pack of assorted metallics. :-D}
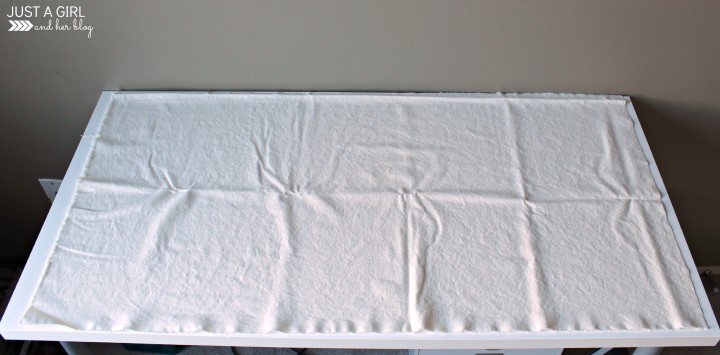
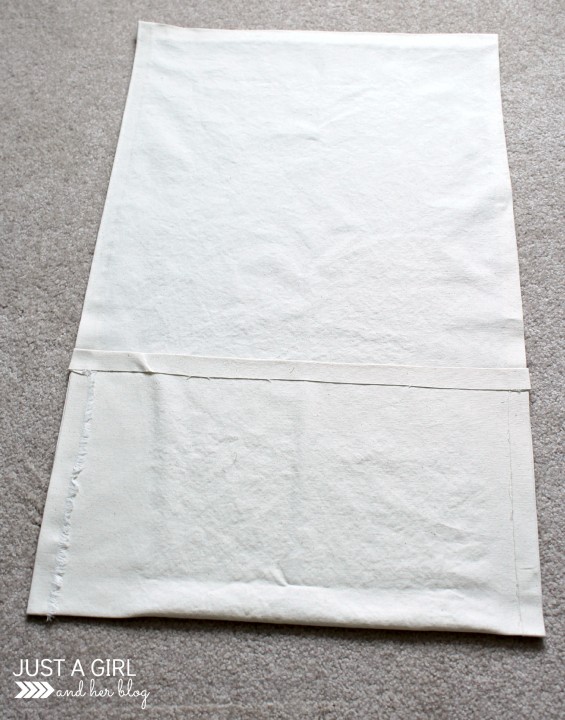
Step 1- Measure, Mark, and Cut Your Fabric
I wanted an envelope pillow, and I knew I could make that happen with just one piece of fabric. I measured around my pillow and added about 4 inches for overlap and another inch on each end for hemming, giving me a desired length of 42″ for my 16″ pillow. I also measured the width, leaving enough room for the fabric to come up the side of the pillow and, again, an inch on each side for hemming, giving me a fabric width of 20″. {All pillows vary in “puffiness,” so be sure to measure yours to get the exact numbers for your project.} I simply measured out my fabric, marked it, and cut it to create the large rectangle that I needed.
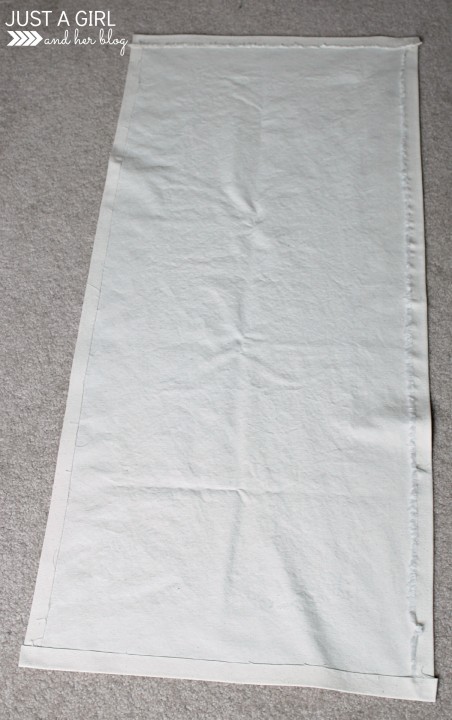
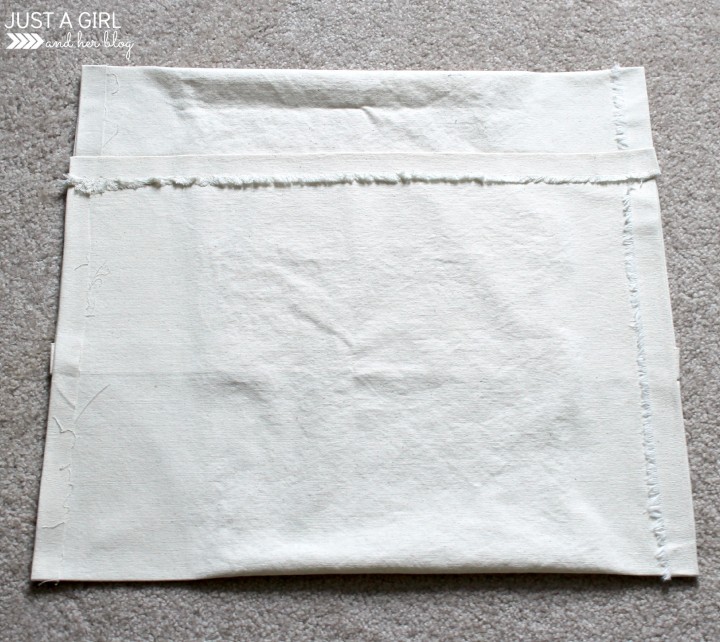
Step 2- Hem All Four Sides Using Hem Tape
I recommend starting with the long sides followed by the shorter sides because I think it gives a cleaner look. If you’ve never used hem tape before, it is incredibly easy to use. Measure out the length you need, line it up on the edge of your fabric {on the back side}, and iron it in place, holding for about two seconds on each part of the tape.

Once it has cooled, remove the paper backing, fold over the fabric, and iron each section for about 8 seconds (longer for thicker fabric). Repeat the process on all four edges of the fabric, and it should look like this:
Step 3- Form Your Envelope
Fold your fabric over your pillow with the back side facing out, and line up your overlap the way you would like it to appear when the pillow is finished.
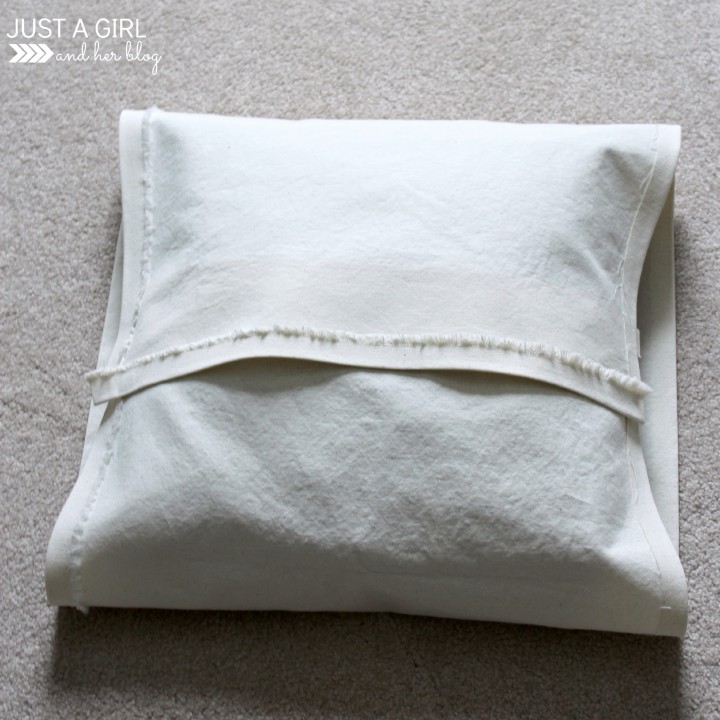
Once you know how far to fold each flap, remove the pillow. Use hem tape to secure both sides of the lower flap, making a pocket.
Repeat the process with the upper flap: fold it over to the correct length to fit your pillow, and secure both sides with hem tape.
Now all you need to do is flip it right-side-out, and you’re ready for the fun part…
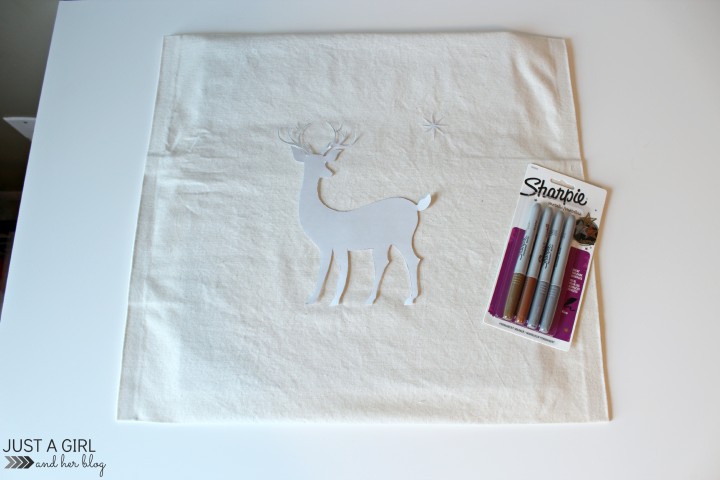
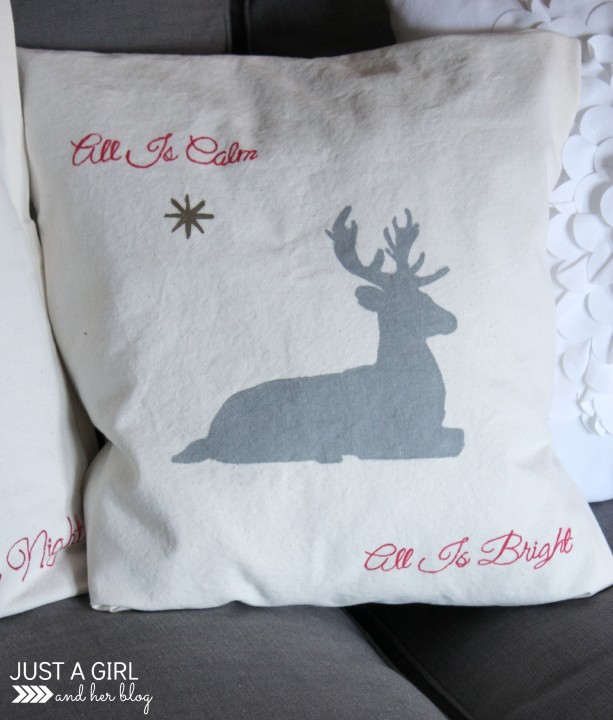
Step 4- Decorating!!!
Bust out your design and your Sharpies and get to work! I put a piece of cardboard inside my pillow cover to prevent bleed-through while I worked on my design.
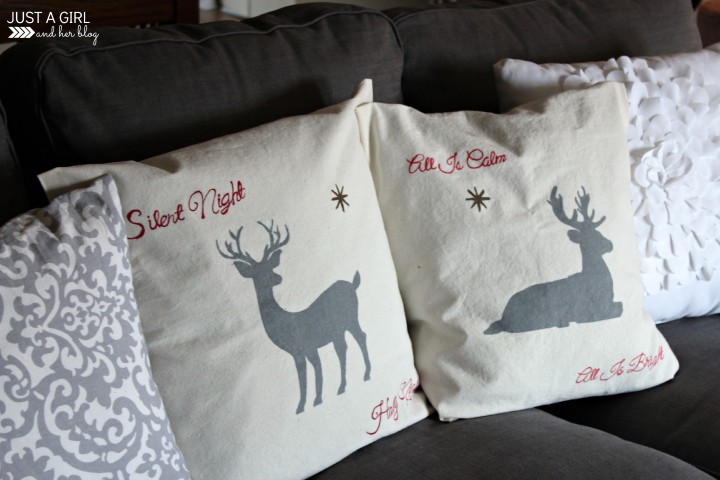
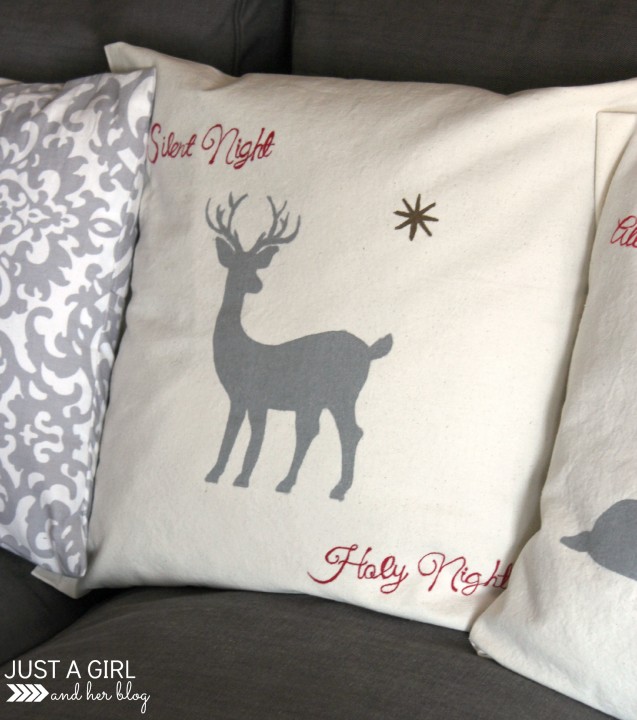
To apply my deer, I simply cut it out, used a piece of painter’s tape to secure it to the fabric, and traced around it with my silver Sharpie. I used the gold Sharpie to trace the star. So simple, right?!
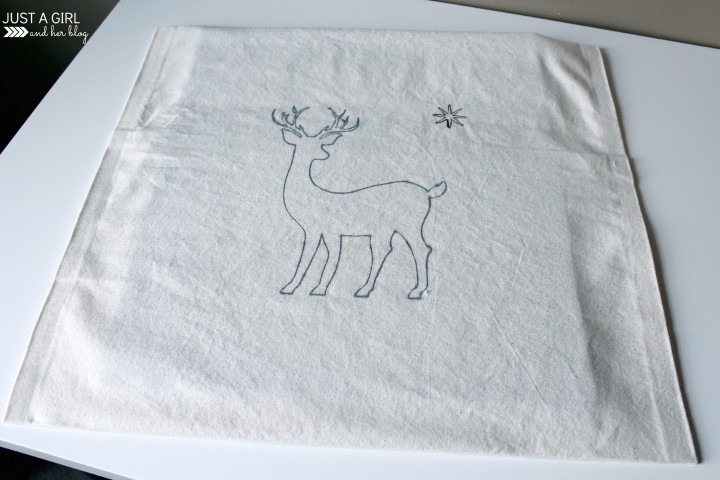
I loved how it was coming along, but I needed some color, so I decided to add some words in red.

The wording was a little thin to cut out, so I used my chalk transfer method to create an outline and filled it in with a red Sharpie. I repeated the process on my second pillow cover, popped the pillows in, and…
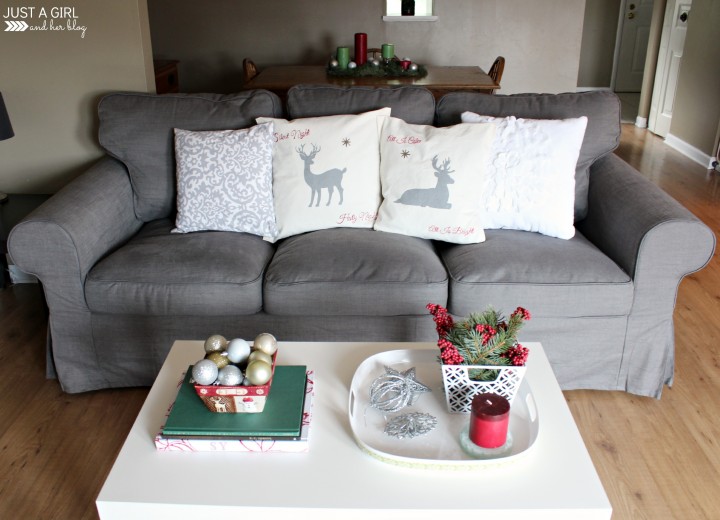
Hooray! Custom Christmas pillows for our holiday decor!
I was so ecstatic that I was able to get such a beautiful, custom no-sew pillow using Sharpie markers instead of appliques! Come to think of it, I think every room in my house is currently in need of custom pillows, so Sharpies, get ready! 😉
I purchased the extra set of silver metallic Sharpies because I knew I’d need a lot of ink for my design, and I wasn’t sure if the tip would get all fuzzy and matted when using it on the fabric, but I didn’t have any issues with that at all. In fact, I used the same silver marker for both pillows and it is still going strong!
Have you created anything cool with Sharpies lately?
*This post is part of a social shopper marketing insight campaign with Pollinate Media Group™ and Sharpie, but all my opinions are my own. For more information, see my disclosures here.*
Abby, these came out absolutely darling and what a fabulous tutorial! They look so wonderful on your sofa. I know I won’t have time to try this for the holidays, but this is going on my must-try list for the new year! Thank you so much for sharing – pinned and sharing! Hope you have a wonderful and happy day!
Thank you so much, Cindy! I just took your home tour and was totally blown away! So gorgeous! Hope you have a great weekend!
~Abby =)
These came out really cool, I LOVE them!!
Thank you so much, Alaina! Have a wonderful weekend!
~Abby =)
I would never be able to make these look so fantastic! Great job!
You could totally do it! Easy peasy! Have a great weekend, Renee!
~Abby =)
Adorable!! Can’t believe those are sharpie! They look great Abby! And thanks for the tip on the sharpies, I do need some for another project – off to staples I go!
Thank you so much, Denise! Happy Sharpie-ing!!
~Abby =)
Abby! This is such a great project! I love how they turned out. Plus, you are speaking my language: No Sew! Woot woot! 🙂 I pinned them. Won’t have time for holiday pillows, but maybe I’ll make some pillows for something else. 🙂
Hope you are having a wonderful week. Hugs, friend!
Thank you so much, friend! I hope you are doing well and that you’re having tons of fun wedding planning! Have a wonderful weekend!
~Abby =)
Gabby, this us awesome and terribly creative. Where did you get the deer shapes?
I use sharpies for everything!! All colors, fine tip, they all rock!
Aren’t Sharpies wonderful?! One of my deer shapes was part of the SantaLand theme at picmonkey.com. The other one I just found in a Google image search. Hope you have a wonderful weekend, Duffy!
~Abby =)
You are so clever, great post and project. Love your pillows, can’t tell you didn’t sew and they look so great. Seems like lately every time I want to sew something my machine is having a really bad day so I end up not making things I really wanted to. So glad I read your post. I’m going to try these. I want some pillows for the holidays and the deer would be great. I could leave off the words( or not). You make this look so easy and so great. I’ll have to read again so I see what kind of fabric you used for the pillows. The Sharpies are such a great idea. Will the wording bleed when the covers are washed? I always have to know if I can wash things as I’m messy. Hope you’re enjoying your holiday season with your boys and hubs. Happy days
Thanks so much, JaneEllen! I used duck fabric for the pillows. I haven’t washed them yet, but I don’t think the bleeding will be an issue. Have fun with your project!
~Abby =)
wow, I might have to try that if I get brave enough!!! Love them and pinning
Thank you so much, Christine! Hope you have a wonderful weekend!
~Abby =)
I LOVE how these pillows turned out! So festive! I also just realized we have the same couch, except I have the sectional version! Love the grey!
Can you tell me where you found the deer pattern to print for the pattern? I’m not very artistic and need all the help I can get. Thank you
Hi, Jean! One of them is part of the “SantaLand” theme at picmonkey.com and I found the other one in a google image search. I cannot draw to save my life, so tracing was the way to go for me too! Have a great weekend!
~Abby =)
Gotta love, IKEA, right? Thank you so much for visiting, friend! Have a great weekend!
~Abby =)
Oh-these are beautiful! I can’t wait to make some! I love that you used Sharpies-so easy!
Thank you so much, Melanie! Have a wonderful weekend!
~Abby =)
Love this idea and love your blog! I am visiting from Domestic Superhero. Thanks for sharing!
Carrie
Thanks so much for popping over, Carrie! Hope you’re having a wonderful week!
~Abby =)
Love it Abby- and great job on the no-sew. I will have to give it a try. The designs are so pretty- pinning!
Thank you, friend! After my last debacle, I knew it had to be no-sew all the way! 😀 Enjoy your day!
~Abby =)
These pillows are great. Thanks for inspiring me to try something new!
Thank you so much, Kathy! Who knew Sharpie could be so chic? Lol. Have a wonderful weekend!
~Abby =)
These pillows are so adorrable! Amd easy, too!
Thank you, Selene! Yes, you can’t beat no-sew! 😀 Hope you have a wonderful weekend and a Merry Christmas!
~Abby =)
I had no idea you could use Sharpies on fabric. I have been thinking about making a pillow with my chihuahua’s silhouette on it and this technique would be perfect. Thanks for the info.
Traci
Awww! That would be adorable! Sharpies for everything, I say! 😉 Hope you’re having a wonderful week, Traci!
~Abby =)
What a steady hand you must have! Amazing job!
Thank you, Julie! Tracing is my best friend, lol! Have a very Merry Christmas!!
~Abby =)
Love these pillows What did you fill in the deer with
Thanks, Dorothy! I just filled them in with Sharpie! Love those cool markers! Have a great night!
~Abby =)