The Easiest Way to Install Low Voltage Landscape Lighting
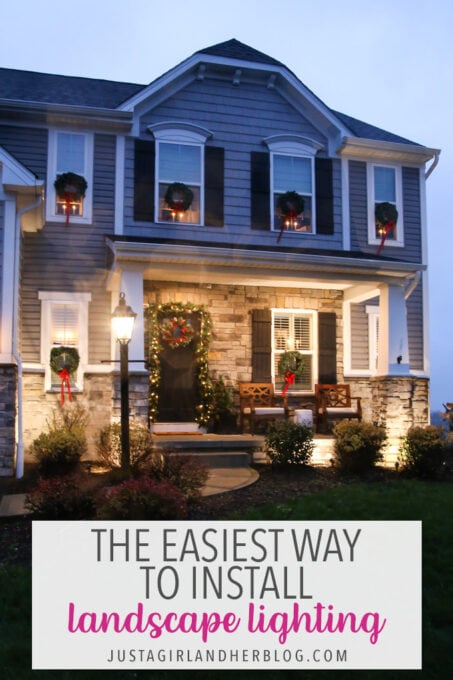
Learn how to install low voltage landscape lighting and give your home’s exterior a high-end, custom look!

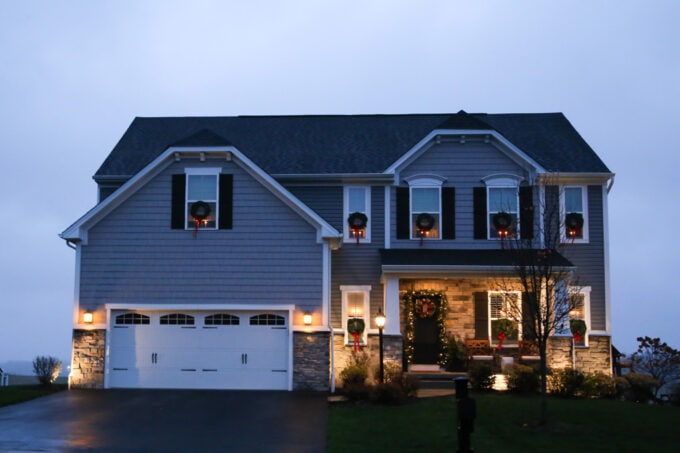
I love to drive through beautiful neighborhoods to check out the homes and get ideas. Recently I was driving around in the evening and realized that just about every home that caught my eye had lighting that illuminated their landscaping and gave a gorgeous soft glow to the house.
When I pointed this out to Donnie, he was totally on board with doing something similar for our home. And since he took this project and ran with it, I’m going to let him explain how to install low voltage landscape lighting for your own home!

A few months ago Abby came to me with the idea of installing landscape lighting in the front of our house. I love the finished and classy look of landscape lighting, but I assumed it was a difficult and expensive project. It turns out that installing low voltage landscape lighting is easier and cheaper than I thought, and it makes a huge impact on the look of our home after the sun goes down.
How to Install Low Voltage Landscape Lighting
This post contains affiliate links. For more information, see my disclosures here.
What is low voltage landscape lighting?
Low voltage lighting uses a transformer to reduce normal 120 volt lines to a lower voltage. For landscape lighting, this is typically 24 or 12 volts. The most common low voltage landscape lighting transformers reduce the voltage to 12 volts, which is what we used.
What are the advantages of low voltage landscape lighting?
For the average home installer, low voltage landscape lighting has some huge advantages:
- Safer to install than high voltage lighting options
- Safe to use in wet conditions
- Safe for pets, kids, and anyone that digs up the wires
- Does not require wires to be buried in conduit
- More energy efficient
- Easy to install because low voltage systems have no polarity (positive and negative wires)
Figuring Out the Landscape Lighting Supplies You’ll Need
Decide on a Layout for the Landscape Lights
The first step when installing low voltage landscape lighting is deciding on your layout. Abby and I decided to only install the landscape lighting in the front of the house. Down the road we may add lights to the side and backyards, but it wasn’t a priority right now.
Abby then mapped out approximately where she would like lights and how many. It was helpful to look at pictures online to get a better feel for how closely spaced or spread out the lights should be. Ultimately, we decided to use seven lights for the size and layout of our house.
Once we figured out where we wanted the lights, we also had to make a note of where we had available outdoor electrical outlets to be able to plug in our transformer(s). In our case, we had one electrical outlet just to the left of our front door and one outlet on each side of the house that we could potentially use.

In the image above, the pink boxes represent the locations of the outlets and the yellow circles represent where we planned to put the lights.
Ideally one transformer would cover all of our needs. We would plug in a transformer to outdoor outlets and run a line of all our lights from there. In our situation, this wasn’t possible since it would’ve required running a wire under our driveway and also under our front walk.
Because of those limitations, we realized we would need three separate transformers. Unfortunately, the transformers are the most expensive part of the entire process, but there was little we could do about it.

The light in zone one would plug into a transformer on the left side of our house. The lights in zone two would plug into a transformer by the front door. And the lights in zone three would plug into a transformer on the right side of our house.
Choosing Low Voltage Landscape Lighting Equipment
Purchasing all of the necessary equipment for this project was the most overwhelming part. There are just so many choices and options that it can be confusing at first. I’ll walk you through our equipment decisions.
The first thing I did was take a look at low voltage lighting options on Amazon. There are just so many choices I didn’t know where to start. Then Abby and I took a trip to Lowe’s and looked at their “Portfolio” brand of landscape lighting.
While it was helpful to see all of the different lighting options in person to get a better idea of what we needed, the Portfolio brand didn’t seem like it was a higher quality than other brands we had looked at, and the prices were definitely higher than what I was seeing on Amazon. So after weighing our options, we ultimately decided to purchase our equipment from Amazon, and we’ve been very happy with that decision.
Landscape Lighting Supplies We Used
Here is everything we used to install our landscape lighting:
- 3 Transformers (two 45 watt transformers and one 120 watt transformer)
- 7 Spotlights
- 100 Feet of 14/2 low voltage wire
- Connectors
- Wire strippers
- Electrical tape
- Siding clips

Choosing the Best Transformer
Transformers will be the biggest cost of this project. There are a number of calculators online to help you determine the power (wattage) of your transformer, but it’s very simple: Add up the total wattage of the lights used, multiply the total wattage by 1.25 (extra capacity to make up for power loss due to cable length), and make sure your transformer can accommodate that number.
Here’s how the numbers worked out for our three zones:
Zone 1: (1) 7 watt light x 1.25 = 8.75 watts.
Zone 2: (2) 7 watt lights x 1.25 = 17.5 watts.
And Zone 3: (4) 7 watt lights x 1.25 = 35 watts.
Keep in mind that wattage requirements are bare minimum. If you start to get close to the transformer’s capacity, you may notice a drop in brightness of your lights. Most people recommend getting transformers that will provide enough power and room for expansion in the future.
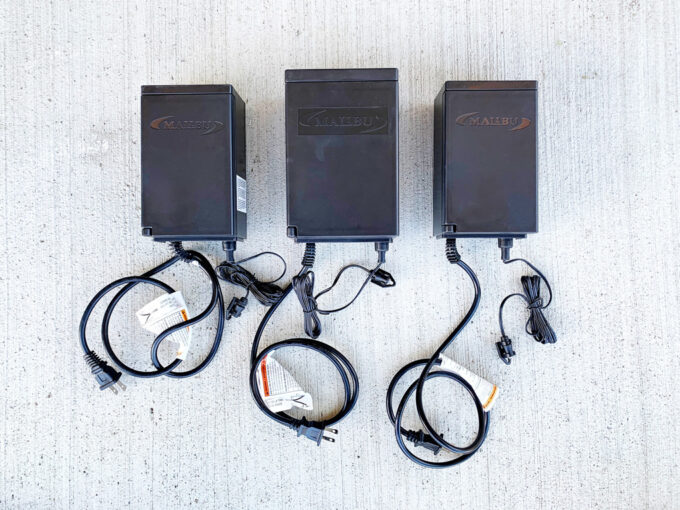
For our project, I purchased two 45 watt transformers and one 120 watt transformer, which was more than enough for what we needed.
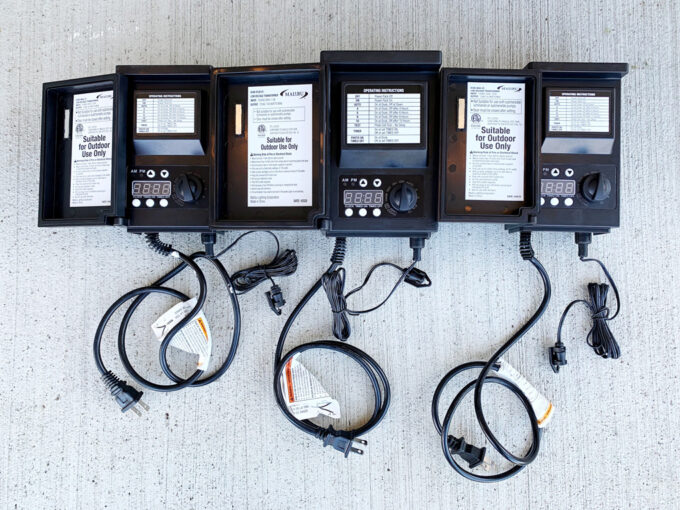
After looking at low voltage landscape light transformers on Amazon and reading reviews, I knew that I wanted transformers that looked nice, were weatherproof, included a photo sensor so the lights could turn on at night on their own, and also have a timer option to manually set when the lights would go on and off.
I decided on Malibu brand transformers. They have 45, 120, 200, 300, 600, and 900 watt options. We purchase two 45 watt transformers and one 120 watt transformer.
Choosing Low Voltage Landscape Lights
Although we looked at the Lowe’s Portfolio brand of landscape lights, we decided to purchase our lights from Amazon. The price was much better and the lights had everything we needed.
A few years ago it may have been worthwhile to consider non-LED lights, but now I just don’t think that makes any sense. The biggest disadvantage to LEDs used to be the cold color temperature, but now it’s easy to find LED lights in whatever color temperature you prefer.
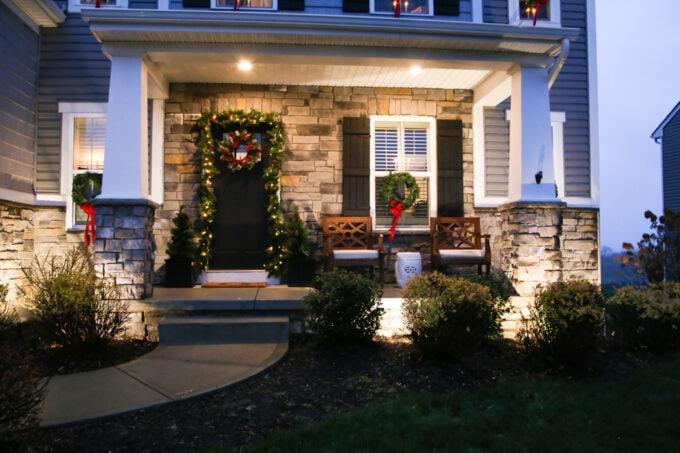
Our lights didn’t list a Kelvin rating for the color temperature, but they are listed as “warm white.” We’re happy with the color temperature, and it matches our porch lights and lamp post light nicely.
We also decided to purchase spotlights (as opposed to flood lights). I think this gives the nicest effect of shining up on the side of house. A bunch of floodlights shining up on the house may have overwhelmed everything.

I was really happy with the quality of our lights. They seem very sturdy and well made with heavy duty stakes, an angle adjustment knob, and metal light bodies. The lights are a matte black color, which blends in well during the daytime and is hardly noticeable.
We bought the 8 pack of lights but only ended up using seven for our layout.
Choosing Low Voltage Wire
Before purchasing our wire, I used a tape measure to get a very rough estimate of how much wire I would need. I wanted to make sure I had extra, so I purchased 100 feet of wire.

When looking at low voltage wire or landscape lighting cable on Amazon, you’ll see everything listed with two numbers. For example 14/2 or even 12/2.
The first number is the gauge of wire. A lower number or “gauge” means a thicker wire. For example, 12 gauge wire is thicker than 14 gauge wire.
The second number is the number of strands of wire in the cable. 14/2 means that it is 14 gauge wire with two strands in the cable. For low voltage landscape lighting, you will need two strands.
When it comes to gauge, it’s not an exact science. 12 and 14 gauge wire seem to be common for most projects.
As a general rule, the thicker the wire (lower gauge) the less voltage will drop over long distances. But even with 14 gauge wire, there will be no significant voltage loss unless you start getting out to wire lengths over 100 feet.
There are also some wattage considerations when choosing your wire. Every online source lists slightly different numbers, but if you are going to run close to 200 watts or more, 14 gauge wire may be too small.
I went back and forth between 12/2 and 14/2 wire. I ended up purchasing the 14 gauge wire because some Amazon reviewers had commented that the lights we purchased used 14 gauge wire. 12 gauge wire would have worked fine as well and in our situation would’ve made absolutely zero difference.
Don’t stress about the wire choice. For the vast majority of residential landscape lighting projects, 14 gauge or 12 gauge will work just fine.
Choosing Wire Connectors
The last thing you need for this project are the wire connectors. Fortunately, they are cheap, and there are plenty of options.
The wire connectors are used to connect the two short wire strands that extend from each light to the long wire that provides power to all of the lights in the strand.
The basic design of most connectors is really innovative. The long wire is slid into a wire holder on the connector, and then you tighten down the connector and the metal prongs tap directly into your long wire.
Even looking on Amazon for connectors, I still couldn’t visualize exactly how this would work, so I ended up buying two types of connectors.

The first type requires two connectors for each light. The second type requires just a single connector for each light because one connector utilizes both strands of the wire.
The second type can accommodate 10-18 gauge wire with the included and differently sized inserts. We were good to go with our 14 gauge wire, and the connects fit perfectly.
For our project, I ended up using the second type. Because only one connector was needed for each light, it’s a less bulky final result.

The connectors are cheap enough that I kept the type we didn’t end up using, just in case one of my connectors fails or I’d like to add additional lights.
Low Voltage Landscape Lighting- The Installation Process
To be honest, we spent more time researching and buying the equipment than we spent installing the lights. The installation is the easy part! Here are the steps we used:
1. Arrange the lights in your landscaping.
We had already thought through our general lighting layout, but on installation day Abby placed each light in the rough final location. She just lightly stuck each light into the ground with the attached stakes.
2. Attach the wire to the landscape lighting transformers.
We used three transformers, but we did this step one at a time. We used a wire stripper to remove the plastic wire casing from about 1/2” of wire.

Then we inserted the bare wire into the slot on the transformer and used a screwdriver to tighten the little metal screws on the back of the transformer that clamp down on the wire.

Remember: with low voltage landscape lighting, there is no polarity. No need to worry about positive and negative wires. It doesn’t make any difference which strand you place into which side.
3. Hang the transformers on the house.
For two of our transformer locations, we were able to use some siding clips that Abby had from another project to hang the transformers. I had never used siding clips before, but I was surprised how strong they are. We’ve even had some huge wind storms since the installation, and so far everything has stayed firmly in place.


The alternative would be to use a masonry bit and screw directly into the brick or stone on the house. We avoided this with the siding clips.
Our third transformer is on our porch. We decided to not attach it to the house but just hide it behind one of our planters.

4. Run wire from the transformer to all lights in the row.
We began to uncoil the wire and lay it on the ground, connecting all of our lights. We made sure to leave some slack so that we’d have a bit of flexibility if we decided to change our light locations.
(But leaving too much slack will just make it harder to bury the wire and is unnecessary.)
5. Attach the lights to the long wire using connectors.
This is where we used our handy landscape lighting wire connectors!
I stripped roughly 1/2” of wire casing on the two strands attached to our lights to expose the bare copper wire. Then I twisted the copper wire slightly to keep all of the tiny strands together.
I opened up the connector (1), then placed the long main wire into the connector (2). I placed the piece of the connector with the prongs (3) on top of the other connector piece (4). Then I tightened down on the connector knob so that the prongs would tap into the wire (5). Once the connector was properly attached to the main wire, we depressed the two tiny buttons on the top of the connector and slid in the two strands from the light.

We then repeated this step for all lights in our series.
6. Push the light stakes into the ground.
Once all of the lights were connected to the main wire, we pushed them all into the ground so they were firmly rooted and wouldn’t move anywhere.

7. Turn on the transformers and test the lights.
Once the lights were wired correctly and positioned, we turned on each transformer and made sure that all of the lights were working properly. We had no issues with this step.

8. View your lights at night.
That same night Abby went outside, turned on the transformers, and made adjustments to light locations to get the look she wanted. She also used the angle adjustment knob on the lights to make changes.
(It’s important to do this part at night so you can see exactly how your beautiful landscape lighting will look in its final position!)
9. Wrap the connectors in electrical tape.
This isn’t a required step, but it made me feel better. I used some black electrical tape and wrapped tightly around each wire connector.

I wasn’t worried about moisture or water getting into the connector, but I wanted to prevent the wires from pulling out from the connectors. With a few wraps of electrical tape, everything felt a little more secure.
10. Bury the wire.
When I say “bury,” all I mean is clearing away some mulch to create a shallow channel for the wire and covering the wire with the mulch we cleared. This shouldn’t take more than twenty minutes.
11. Set the timer on each transformer.
Our transformers have a lot of nice options for controlling the lights. They each include a photo sensor to detect light/dark and turn on lights when it’s dark outside.

I’ve never been a huge fan of these light sensors. It always seems like one sensor turns on five or ten minutes before another sensor. I wanted to avoid having a portion of my lights on and the other portion off.
I removed the light sensor on each transformer and instead decided to use the timer. Once I set the clock on the transformer, I could then set a specific time for the lights to turn on and a specific time for them to turn off each day.
I get to reveal the all-important final step, which is…
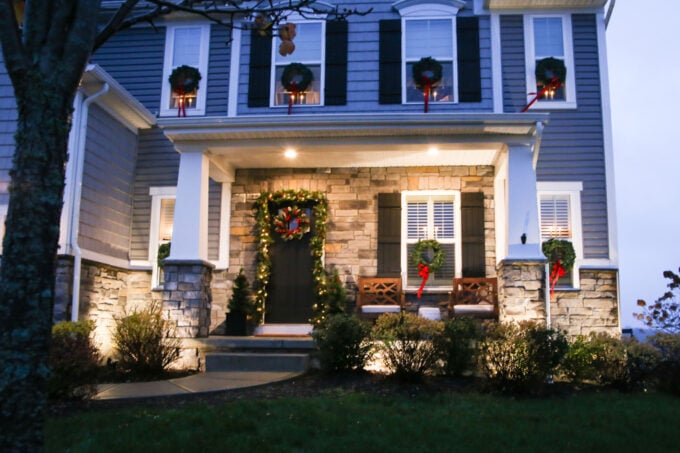
12. Enjoy your gorgeous low voltage landscape lighting!
I swear, I still squeal a little bit every time I pull up to our house at night and everything is lit up so beautifully! I feel like it makes our house look so much fancier. And I love that we got the lighting installed just in time to show off our Christmas decor too!
This was one of those projects that was intimidating to us at first, but once we knew what we needed, the process was pretty easy to carry out.
Do you have landscape lighting for your home? If you have any installation tips or tricks to add, I’d love to hear about them in the comments below!
And if you’re planning to add low voltage landscape lighting to your house, be sure to pin the image below so you can easily find this post later:

Here are a few more outdoor decor posts that you may find helpful:
How to Hang Christmas Wreaths on Exterior Windows
How to Hang a Christmas Garland Around the Front Door
Thank you so much for following along! Have a wonderful day!

This post contains affiliate links. For more information, see my disclosures here.
Thanks so much for this information! I have wanted to do this with out house for ages, but I thought it meant having to hire someone!
So glad it was helpful for you, Pam!
~Abby =)
It looks gorgeous. The instructions are so clear and easy to follow. I love this project.
Thanks so much, Sandy! Hope you have a great week! <3
~Abby =)
Love this Abby! I am a real estate agent and will be sharing with my clients! Thank you! Kat O.
Oh great! So glad it will be helpful! Have an awesome week!
~Abby =)
How much did it cost you for the project?
Our set up cost around $275. Have a great week!