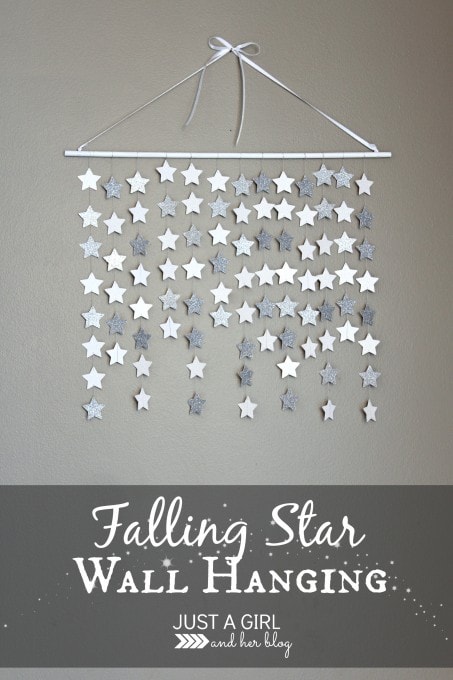
Falling Star Wall Hanging
Just as I thought I was alllllll done decorating for Christmas, I was flipping through my Christmas home tour photos and saw this:
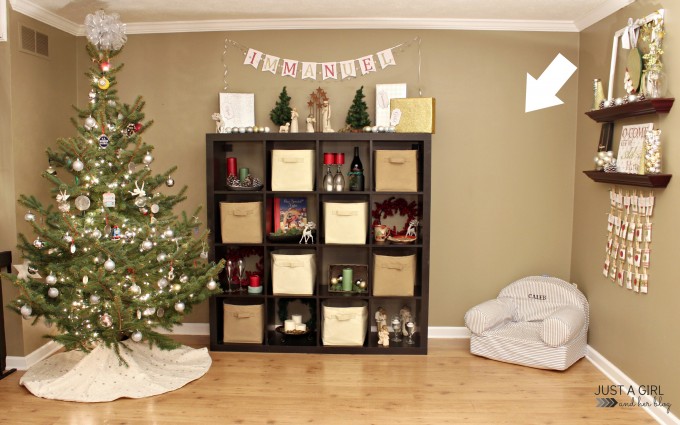
A big blank spot on my wall that was in desperate need of love and attention!!! We couldn’t have that, now could we? So I rounded up some materials I had around the house and got to work.
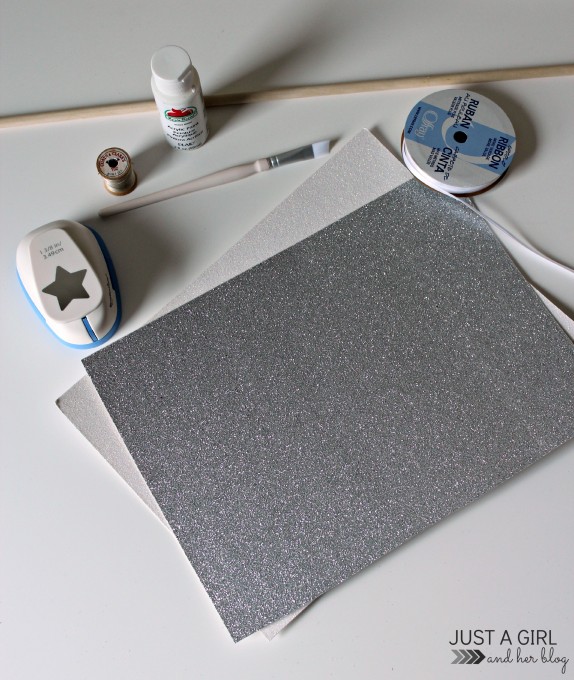
I used…
- Dowel Rod
- White Paint
- Paint Brush
- Needle & Thread
- White Ribbon
- Star Punch
- Sparkly White & Silver Scrapbook Paper
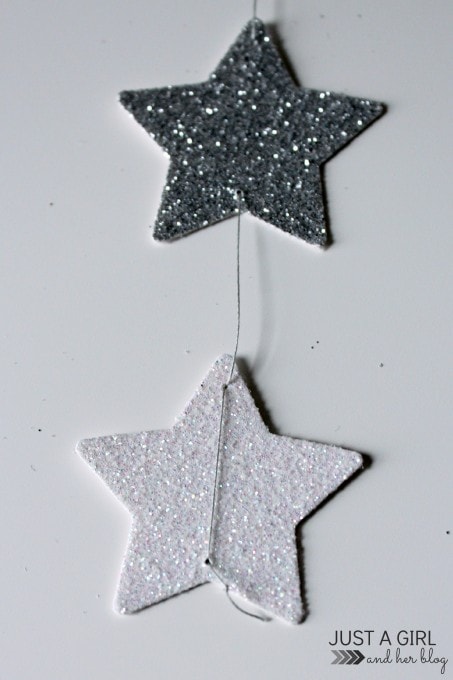
I first cut my dowel rod down to the correct size (okay, hubby cut my dowel rod down to the correct size) and painted it white. While I was waiting for it to dry, I cut out a million little stars from the scrapbook paper. (So there really are not a million, but there are a lot. 🙂 )

Then I just used my needle and thread to string them. I ended up doing seven strings of eight stars and six strings of six stars. The order was random; I just tried not to have too many silver or too many white stars together.

For the last star on each string, I went back through the holes a second time and tied a small knot at the end to secure it so my stars couldn’t fall off.
Then I just had to tie my strings of stars to my dowel rod, add a ribbon to hang it, and I was done!

And look– no more big blank space on my wall!

I really like the little falling star wall hanging as part of our Christmas decor, but I also think it would be a beautiful addition to a nursery or little girl’s room.
How have you incorporated stars into your holiday decor?

Abby, this is so pretty and I love that this could be for year-round OR a wonderful decoration for New Year’s Eve! Thank you so much for sharing and pinning! Hope you are having a great week and things aren’t too hectic (ha!) Have a wonderful Thursday!
Hectic? Is there a big holiday happening soon or something? 😉 Thank you so much, Miss Cindy! I hope your holiday preparations are going well and you’re getting some time to kick back and relax! Have a great weekend!
~Abby =)
this is just so beautiful!! what a brilliant idea and so simple to make. pinned
Natasha @ Serenity You
Thank you so much, Natasha! Hope you’re having a wonderful week!
~Abby =)
I LOVE THIS ABBY! It’s so pretty! I love the colors and of course the glitter! 🙂 Pinned
Thank you so much, friend! Hope you’re having a wonderful week!
~Abby =)
So pretty! I love how it seems to sparkle from far away! What happened to your pretty cubbies?? Ahhh…the joys of having little boys 🙂
Oh you knew those weren’t going to last long! Sigh…back to real life. 😀 At least the stars are up high, so I can leave them up for a while! Have a wonderful weekend, friend!
~Abby =)
would be adorable with hearts in reds and pinks….or really any shape in the color scheme for the room. or holiday items (shamrocks, easter eggs, etc.)
Oooh I could make a new one for every month! So many possibilities!!! 🙂 Thanks so much for stopping by, Lesley!
~Abby =)
This turned out so pretty. Any room could always use a little extra shimmer and sparkle and these falling stars are just that!
Thank you, Amy! I agree– everything is better with sparkles! 😀 Hope you have a wonderful weekend!
~Abby =)
I must have the star punch. 🙂
You must. I figure if I can’t have a Silhouette, I might as well have fun punches. So far I’ve collected a star, a heart, and circles in two sizes. Pretty soon it’s going to be cheaper for me to invest in the machine than to just keep buying punches. HEY! That argument might work with Donnie… 😉 Hope you’re having a great week, my friend!
~Abby =)
Simply lovely! Visiting from Design, Dining,
Diapers linky 😉
Thank you so much for popping over, Ursula! Have a wonderful weekend!
~Abby =)
Oh my I need to stop making things but keep seeing so many more I’d love to make. So much inspiration, I have trouble getting to sleep at night. I love it all so much. Your project is very versatile for year round use, great project, I love all the stars, trying to tell myself I can do that. I did find that with a punch with two levers to squeeze is so much easier on my arthritic hands. I’ve been punching circles to put on styro foam balls. How-to called for 1 inch punch but I had a 2″ so it just had to work. Got project from Lia Griffiths blog.
How fun your house must be with your wonderful handsome adorable boys, (the big boy also). Enjoy these times Abby, they’re so precious and fly by so quickly. Wishing you and yours the happiest of Christmas’s.
Thank you so much, JaneEllen! Have fun with all of your projects! Merry Christmas!
~Abby =)
Lovely♥
Thanks so much, Janice! Merry Christmas!
~Abby =)
So cute and This is so creative! I love how it turned out:) Abby!
Thank you, Krista! Hope you had a very Merry Christmas!
~Abby =)
Such a pretty and simple project with a huge wow factor!! Love it!! and it would look oh so cute in a baby’s room too! 🙂
Thank you so much, Dawn! I love when the simple ones pack a big punch! 😀 Happy New Year!
~Abby =)
I am new to your blog, but I am hooked! Your home is beautiful…I was wondering if you could tell me the paint colors you used throughout your house? Thanks! Amy
Thank you so much, Amy! You are so sweet! Most of the rooms in our home are painted with “Barnwood” by Valspar. (Lowes) Hope you’re having a great week!
~Abby =)
I’ll try to put this on a lamp 🙂
Oh, fun! Let me know how it goes! 🙂
~Abby =)