DIY Shelf Above Washer and Dryer
Create a DIY shelf above washer and dryer with this simple step-by-step tutorial!

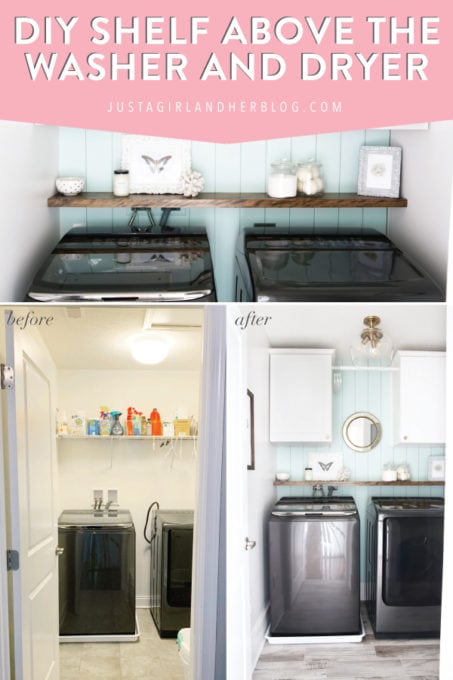
I was so thrilled to share our full laundry room reveal last week—finally! We’ve wanted to make major changes in this space for years now, so it was fun to finally see it come to fruition.
One of the projects I wanted to make sure I included in the laundry room renovation was installing a shelf above our washer and dryer. I wanted this shelf to serve a practical purpose—holding items we needed to keep close by. And I also wanted it to serve an aesthetic purpose—holding some pretty decorative items and helping to camouflage the washing machine hoses a little bit.

(You can see how the hoses for the washer stick out above the machine in this “before” photo of the laundry room.)
This DIY shelf ended up being a pretty quick project, and I love the difference it has made in our laundry room! Here is how we created it…
DIY Laundry Room Shelf for Above the Washer and Dryer
This post contains affiliate links. For more information, see my disclosures here.
Step 1- Gather all supplies needed to create your shelf above washer and dryer.
We used the following items to create our shelf:
- 1×8 Pine “Common Board” from Home Depot
- 1×2 Pine “Common Board” for the front edge of shelf
- Cove Moulding
- Miter Saw
- Oscillating Multi-Tool
- Wood Chisel
- Kreg Jig
- Wood Glue
- Long Level
- Sandpaper (400 + 320 grit) and Sanding Block
- Stain (I used Minwax Dark Walnut.) + Rag
- Polycrylic
- Foam Brush
- Brad Nailer
- Spackling
- Paint + Paint Brush
Step 2- Measure your space and cut wood pieces to size.
Once we purchased the wood pieces we needed, the first thing we did was take exact measurements of our laundry room space.

We wanted the shelf to go wall-to-wall, but it was more complicated than simply measuring the distance and cutting the board to the correct length. We wanted a tight fit, so we took our time with this part.
It turns out that the two back corners of our laundry room drywall are not perfect 90-degree angles. The walls open up a bit, so if we made 90-degree cuts, we would have a gap on the side of the shelf near the front edge. With our miter saw, we had to make cuts not at 90 degrees, but closer to 91 degrees. This made a perfect fit.
Step 3- Make any necessary notches in the board.
One of the reasons we wanted to install this shelf was to at least partially cover the space where the hoses for the washing machine come out of the wall. In our laundry room, there is a plastic frame surrounding the hose area. So we had to cut notches in our shelf to accommodate for the frame.
Once we had cut our board to the correct length, we held it in place and made marks for the various notches we would need to fit it around the frame. We then used a combination of a flush-cut oscillating multi-tool and a wood chisel to make the notches.

Step 3- Attach the 1×2 to the board to create the shelf.
Once our boards were cut down and notched correctly, it was time to add the front piece to the shelf. Adding this board helps the shelf to look thicker and more substantial. It also hides the shelf supports that we’ll attach to the wall.
We used Kreg-jig pocket holes to join the two boards together. The jig is easy to use and allows for adjustments based on the thickness of the two boards you are joining.

The Kreg-jig kit even comes with specially made pocket hole screws.

When it came time to actually join the two boards together, we made sure to clamp everything down tight and apply a small amount of wood glue before screwing the boards together.

In the picture below you can see the final result of the two joined boards.

Step 4- Cut the cove moulding and install.
We opted to use cove moulding to support our shelf because it was strong enough to hold it up but small enough that we would be able to hide the moulding underneath the shelf. We happened to have some cove moulding from previous window trim projects, but shoe moulding would work as well
Once we knew the desired height of the shelf, we cut (including 45-degree inside corners) and installed the cove moulding. We used a long level to make sure the moulding (and then the shelf on top) would be level.

We attached the cove moulding with our Ryobi 18-gauge brad nailer.

Step 5- Patch and paint the cove moulding.
Even though the cove moulding will be hidden under our shelf, there is still a chance that we could catch a glimpse of it from different angles, so we wanted to make sure it blended in as well as possible.
We used spackling to patch the holes that had been left from the brad nailer. We then sanded the moulding until it was smooth and wiped it down with a damp cloth.

Next, we painted the moulding to match the wall it was attached to. For us, that meant that we painted the pieces on the side walls Behr Marquee Cameo White. And we painted the pieces on the back wall Sherwin Williams Rainwashed (mixed at half strength).

Step 6- Stain and seal the shelf.
While Donnie was working on the cove moulding, I was making the shelf pretty! First, I used 320 grit sand paper and a sanding block to make sure every surface of my shelf was smooth. After going over everything with the 320 grit, I wiped down the shelf with a damp cloth and went over it again with 400 grit sand paper.

When I was satisfied that the shelf was as smooth as it was going to get, it was time to stain! I just used a simple rag to apply the stain to my shelf. (We used Minwax Dark Walnut stain.) I only needed one coat to get the shade I was going for.

I let the stain dry for 24 hours. Then, using a foam brush, I applied a coat of clear polycrylic to seal the shelf. After letting it dry for two hours, I gave the shelf a light sanding, wiped it down to remove the dust, and applied a second coat of polycrylic. I then repeated the process to apply a third coat.

After the third coat of polycrylic, I let the shelf dry for 24 hours just to be safe, and then it was time to install it in the laundry room.
Step 7- Install the shelf above washer and dryer and enjoy!
Installation was easy. We simply set the shelf onto the supports we created along the wall, and we were good to go! The supports were strong enough that we didn’t have to reinforce it with screws or anything like that.

Because we intentionally created a tight fit so the shelf would span wall to wall, we did have to touch up the wall paint a little bit where it got smudged when we dropped the shelf into place. It was a really easy fix, though.

I was a little paranoid and didn’t want to mess up our new beautiful shelf, so I waited a few days before I added items on top to make it pretty.

I love having a place to set our items. And I REALLY like that the washing machine hoses are now more inconspicuous than they used to be! This is one of those simple projects that can really make a big difference, and it was so worth it in this case.

Have you done any updates to your laundry room recently? I’d love to hear about them in the comments below!
And if you’re planning on adding a DIY shelf above washer and dryer in your house, be sure to pin the image below so you can find this tutorial again later!
Thank you so much for following along! Have a wonderful day!

This post contains affiliate links. For more information, see my disclosures here.
Where did you get that cute butterfly picture? I’m currently redecorating my girl room with butterflies.
Hi, Jena! The butterfly picture is a printable from an Etsy shop called kiwiNberries ! Your daughters’ room sounds like it’s going to be adorable!
Hi abby, I was wondering what washer and dryer you have and if you recommend them?
Hi, Amber! Our washer and dryer are Samsung, and while they are okay, I wouldn’t rave about them. Sometimes it feels like they’re either too hard on the clothes or don’t get out stains well enough. Most of the time they work just fine, but I will probably buy a different brand when these ones give out. I hope that helps!
Beautiful addition to your laundry room Abby! I just completed a total overhaul of my laundry room dated from the 70’s. The dark cumbersome cabinets were torn out and tossed, floor replaced, new door and baseboards, a window blind introduced, walls patched and painted and then we waited 4 weeks for our new cabinets (due to Covid 19). It was worth the wait. The white streamlined cabinets are multifunctional and neatly store our cleaning supplies and extra paper towels/toilet paper as well as our pool towels. So much extra storage! I love the folding area we incorporated as well so that I wash, dry, fold, repeat – just like my new sign says. I love walking into this room every day. It always brings a smile to my face.
Oh wow! Sounds like quite the transformation. Enjoy!! <3
~Abby =)
I love your laundry so much ima steal your ideas!
My laundry is quite different to yours tho, so it won’t really look the same. Plus i live in a different hemisphere, so i will have to settle for a different shade of paint, lol.
Aw thanks so much, Dawn! Steal away! 🙂 Hope you have a great week! <3
~Abby =)
Absolutely wonderful! You did a brilliant job, it looks fantastic.
You are too sweet! Thanks so much, Amanda! Hope you have a great week! <3
~Abby =)