DIY Rustic Pumpkin Stand
This post is sponsored by The Home Depot.
I realize the temps are still reaching the 90s in many places around the country, but we are in full-on fall mode here in the Just a Girl and Her Blog household! The Cs are back in school, my fall floating shelves are decorated, AND I wore plaid this weekend, so there’s definitely no going back now. 😉 And what would fall be without some pumpkins and DIY projects, particularly when you can knock both of those things out in one fell swoop?!
We recently put together the cutest little rustic pumpkin stand that you ever did see for our living room, and I’m so delighted to be teaming up with some of my favorite bloggy buddies to share our many different takes on this project with you today! Here’s what we used to make our pumpkin stand (all supplies can be found at The Home Depot):
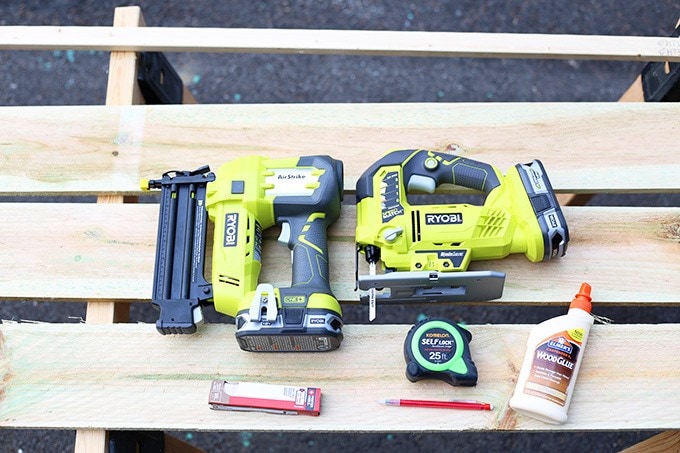
- 2 – 72″ x 5-1/2″ cedar fence pickets, square edged
- 1 – 1×2 x 4 feet long
- 1″ brads
- wood glue
- measuring tape
- Ryobi ONE+ cordless jigsaw
- Ryobi Airstrike 18-gauge brad nailer
- pencil
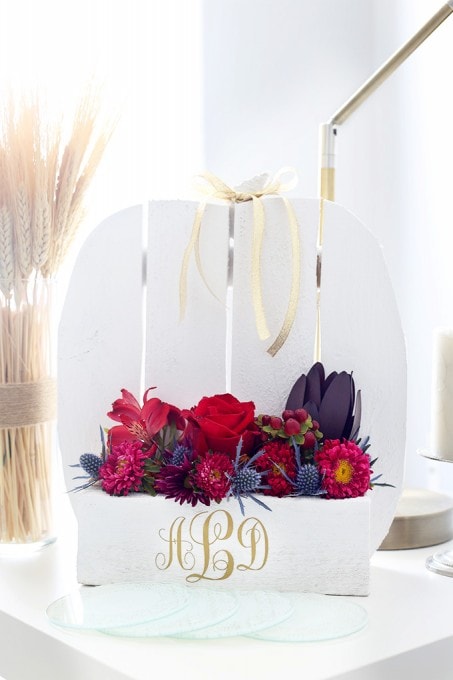
For this project, I envisioned a beautiful little floral display that I could put on the end table next to our couch in the living room, so we made our pumpkin a bit smaller than some of the others so it would fit.
Step 1- Make your cuts.

{We actually ended up making two pumpkins– hence the two sets of supplies!}
Because we wanted to make the pumpkin stand small enough to sit on our end table, we ripped the cedar fence pickets in half and cut four pieces to 12″ in length. We took other ripped planks and cut the following lengths out of them: 8.5″, 7″, and 2 pieces – 2.5″. Finally, we cut the 1×2 into two 12″ lengths for the back braces.
Step 2- Create the backing of the pumpkin.

Next we laid out the four 12″ pieces in a on our work surface, giving us about 12″ in width. We placed the cut 1x2s about 3″ from the top and bottom of the cedar boards and used the Ryobi Airstrike to attach the 1x2s to the boards. (It’s okay if your 1x2s hang over the sides a little bit. We’ll end up cutting them off later anyway.)
Step 3- Draw the pumpkin shape.
I don’t know about you, but I’m not all that confident in my freehand pumpkin drawing skills. 🙂 To remedy this, I came up with an easy solution that guarantees me a perfectly symmetrical pumpkin.
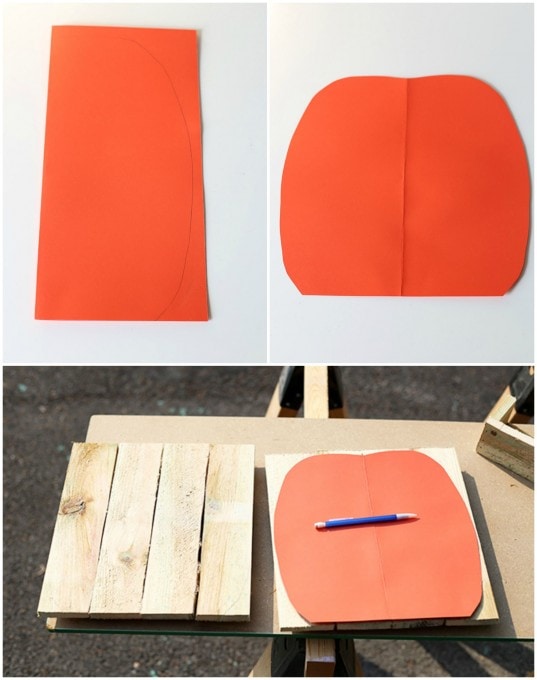
I took a piece of scrapbook paper that was about the same size as the backing I just created and folded it in half. Then, making sure to leave the bottom of my pumpkin flat, I drew half of a pumpkin shape on the folded piece of paper and cut it out. When I unfolded the paper, I had a symmetrical pumpkin that fit perfectly on my boards. Score! If you’re making a larger pumpkin, you could use a piece of gift wrap or newspaper to make your pumpkin shape.
Once I had my paper shape, I just traced it onto my boards with a pencil and used the jigsaw to cut on the lines.
Step 4- Create front box and attach to pumpkin.
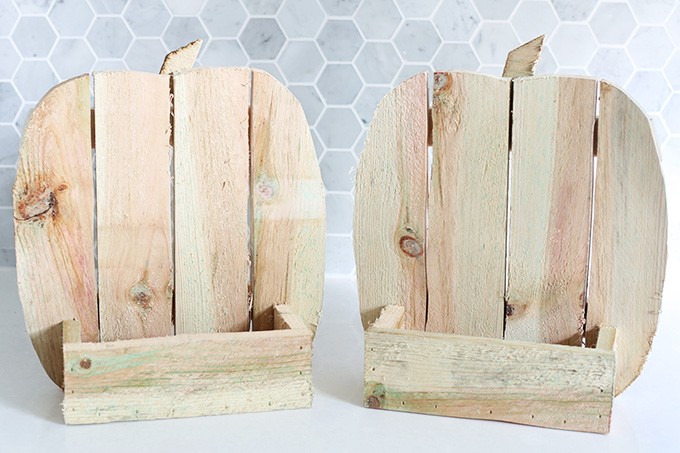
Once the pumpkin shape was cut out, we made the little front box by attaching the 8.5″ front piece to the two 2.5″ pieces using the brad nailer and wood glue. We then added the 7″ bottom piece using the same method and attached the box to the pumpkin. Finally, we used a small scrap piece of our wood to make the pumpkin’s “stem,” and attached that with the brad nailer and wood glue as well, and our pumpkins were ready to be prettified!!
Step 5- Decorate!
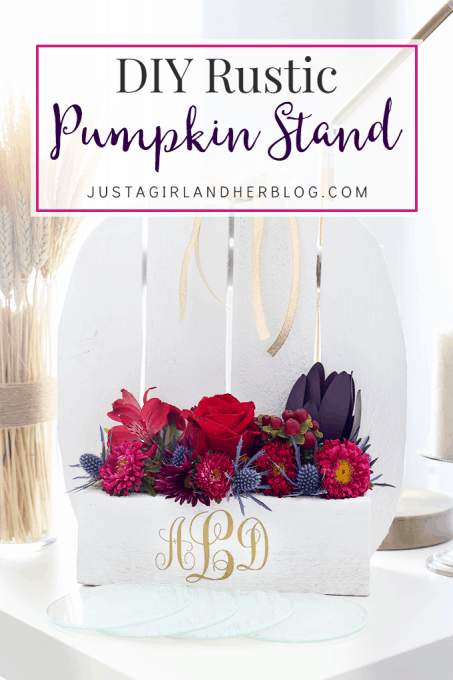
For me, this was the most fun part because there were so many possibilities of what I could do! After I sanded it down, I decided to paint my pumpkin in Behr Marquee’s Cameo White. I knew I wanted my pumpkin stand to hold flowers, so I grabbed three little glass candle cups, which just happened to be the perfect size to fit in the front box of the pumpkin and act as mini vases.

Finally, I added some sparkly touches with gold ribbon and a gold monogram I cut out of adhesive vinyl with my cutting machine and had…
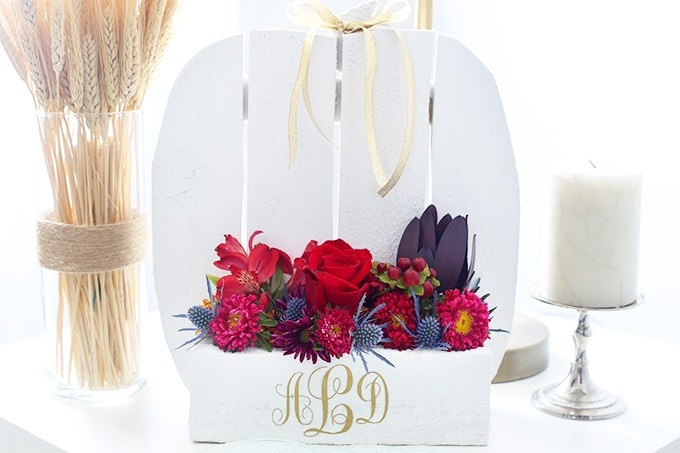
…my beautifully rustic {and kind of glammy 😉 } pumpkin stand!!! Mine is in our living room on the end table, but after I made it I thought that these could be a beautiful centerpiece for a fall wedding! You could use any type of flowers and match up the monogram color too!
Super cute, and really so easy to make! And guess what?! You can make your own beautiful little rustic pumpkin stand too!
The Home Depot offers Workshops at all of their locations for do-it-yourselfers of all ages and experience levels. There are three types of Workshops offered — Do-It-Yourself (DIY), Do-It-Herself (DIH) and Kids — where customers can learn how to build decor projects, how to make easy home repairs and how to operate tools through demonstrations and step-by-step instructions.
The Home Depot’s Workshops are designed to provide a mix of associate-led instruction, demonstration, and some hands-on learning. Materials can be purchased to make your own project. For more information, contact your local Home Depot store or visit visit the workshops page on Home Depot’s website.
My oh-so-talented bloggy friends are all sharing their take on the rustic pumpkin stand for all around the house, so be sure to pop around and visit all of their amazing projects:
Outdoors
- Domestically Speaking
- Redhead Can Decorate
- My Uncommon Slice of Suburbia
- Setting for Four
- Little Red Brick House
Kitchen
Guest Room
Living Room
Dining Room
Thank you so much for stopping by, sweet friends! Happy DIY-ing!

I acknowledge that The Home Depot is partnering with me to participate in this Workshops Program (the “Program”). As a part of the Program, I am receiving compensation in the form of products and services, for the purpose of promoting The Home Depot. All expressed opinions and experiences are my own words. My post complies with the Word Of Mouth Marketing Association (WOMMA) Ethics Code and applicable Federal Trade Commission guidelines.
You did a great job, Abby! Love the monogram and those flowers are gorgeous!
Thank you so much, Erin! This was such a fun project!
~Abby =)
Oh my gosh, Abby! This is SO darn cute! Oh, and the monogram is even better! LOVE!
Carrie
curlycraftymom.com
Thank you, friend! I will monogram anything that will sit still long enough. 🙂 Hope you’re having a wonderful week!
~Abby =)
This is beautiful and quite unique in my opinion. It would be perfect for our fall home decoration. Thanks for the inspiration 🙂
Thank you so much, Reelika! Hope you’re having a wonderful week!
~Abby =)
What an awesome project and so good looking besides being so versatile. Could make different shapes for holidays with this idea. Your pumpkin stand is perfect for how you’ve used it and would be so great as table centerpiece for Thanksgiving, so many ways to decorate it and so nice as a gift for someone, especially monogrammed. You are so clever. Will have to visit other sites to see how they made theirs and decorated them. So many outstanding ideas. Have great week
Thank you so much, JaneEllen! I love your idea of using it as a Thanksgiving centerpiece! Hope you are doing well! <3
~Abby =)
This is darling! Definitely going to have to try something similar. Thanks for the inspiration!
Visiting from LorimerLiving.Com
XO, Jaclyn
Thank you so much, Jaclyn! Hope you’re having a wonderful week!
~Abby =)
You definitely win the award for the most sophisticated pumpkin out of all of our projects! So pretty and you so completely right that it would be beautiful at a wedding.
Thank you so much, Jamie! It was so fun to put our unique spin on it– I loved seeing what everyone had done! Hope you’re having a wonderful week!
~Abby =)
Really beautiful. The fall flowers and bright colors really pop against the pumpkin.
Thank you so much, Karen!! Hope you’re having a wonderful week!
~Abby =)
I love how your flowers pop against the white with just those glam little touches of gold! This turned out fabulously!
Thank you so much, Ange! You are the sweetest! Hope you’re having a wonderful week!
~Abby =)
Love your monogram touch!
Thank you so much, friend!!
~Abby =)
That is just darling!! Love the monogram!!
Thank you, friend! You are the sweetest! Hope you’re having a great week!
~Abby =)
Super cute, Abby! I love how you customized yours!!
That is absolutely adorable and I love the monograms. It does make it look so glammy.
LOVE this Abby!!
Love this!!! Great little project and sooooo cute and perfect for fall, love how bright and charming it is, great addition to any homes accessories.
Lauren Baxter | Lovely Decor
xx
OMG, so cute Abby!! I want one 😉 And of course I love the white.
Hugs, Jamie
Love the look of the monogram – this is a very elegant take! It was fun to see so many different ways to use this!
I love this Abby! The white wood pumpkin looks perfect with those pretty fall-colored flowers!
I love your rustic pumpkin stands, Abby! Perfect for fall!!!