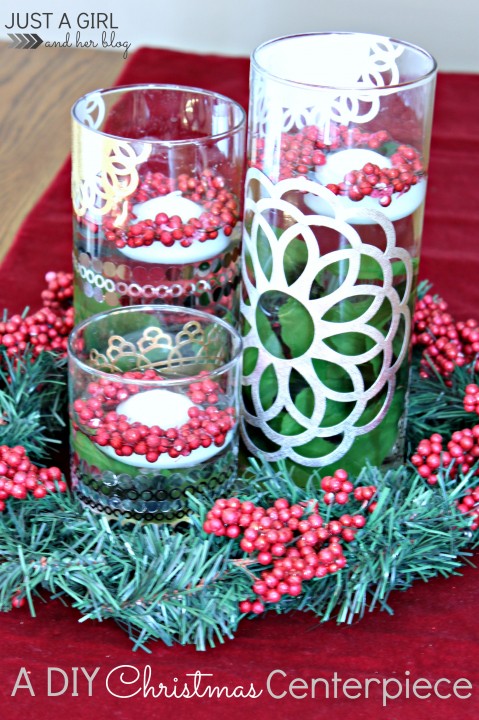
A DIY Christmas Centerpiece
*This is a sponsored post written by me on behalf of Blue Print Social for Martha Stewart Crafts by Plaid. All opinions are 100% mine.*
Christmas will be here before we know it, and with lots of crafts to complete before the big day gets here, I’m getting started early! Martha Stewart Crafts recently asked me to test out some of their fabulous decoupage supplies, and since I am pretty much a craft supply hoarder, I of course said “YES!!!” right away! I was in need of a centerpiece for my Christmas table, and when I opened the box of supplies, I knew just what I wanted to do with them.
Here’s what I used to make my DIY Christmas Centerpiece:

- Martha Stewart Crafts Multi-Surface Gloss Decoupage {which is dishwasher safe–yay!} and Brush
- Glass Candle Jars in 3 Sizes
- Martha Stewart Crafts Silver/Brushed Pewter Decoupage Metallic Trims
- Martha Stewart Crafts Metallic Decoupage Paper Doilies
- Wreath
- Floral Berries
- Floating Candles

I started out with my largest glass jar and one of the metallic paper doilies, cut down to the size I wanted. Using my brush, I painted the gloss decoupage on the jar and on the back of the doily, then placed the doily onto the jar. I smoothed it out, working from the center out to the edges.

I repeated the process with two more doilies, placing them on different spots on my jar. Occasionally, the edges of the doilies would pop up from the glass after I had attached it, but I simply put a tiny bit more decoupage on the back of the doily and smoothed it down, and it stayed in place perfectly.

Once the doilies had dried completely, I put a coat of decoupage over each one, being careful to stop just outside the edge of the doily so that there wasn’t an evident line where the decoupage stopped. I again let it dry for a few hours and put a second coat of decoupage over the doilies.

Next I started on the smallest jar. I wanted to use the metallic trim on this one, so I measured and cut my trim to fit around the jar.

I used a similar process with the trim that I had with the doilies. I placed decoupage both on the jar and the metallic pieces, then pressed them onto the jar, smoothing them out. Because I had chosen such a slippery surface, the ends of the trim pieces kept popping up, so I used a small piece of clear tape to hold them down while they dried. I added a few coats of decoupage over top, leaving drying time in between, and it was good to go!

Finally, for my third jar, I combined the doilies and metallic trim and used the same techniques described above to attach them.

Once all three jars were dry, it was time to put them together to form the centerpiece. I started by adding some water, greenery, berries, and a floating candle to each jar.

Then as a final touch, I spruced up a dollar store wreath with some of my extra berry sprigs and placed my newly-decorated jars inside to complete my centerpiece!


I think this will be a great addition to my Christmas table, and I can’t wait to see the whole thing come together! I had never worked with the Martha Stewart Crafts metallic doilies or trim before, but they were a lot of fun, and I can definitely see myself incorporating them into future projects.
Looking for some Martha supplies of your own? The full line of craft paint, glass paint, decoupage, and jewelry-making supplies can be found at Michael’s stores or on the web at Plaid Crafts’ online store. To be inspired by more projects made with Martha Stewart Crafts supplies, visit them on Facebook, check out Plaid’s Martha Stewart Crafts board on Pinterest, or sign up for their email newsletter.
Some of my other bloggy friends are sharing their Martha Stewart Crafts Glass Paint and Decoupage projects, too! Make sure to pop on over and check them out here:
Update: Check out how I switched up this centerpiece a little bit on for our Christmas tablescape!

Have you started on your Christmas centerpiece yet? What are your favorite supplies?

*This is a sponsored post written by me on behalf of Blue Print Social for Martha Stewart Crafts by Plaid. All opinions are 100% mine. For more information, see my disclosures here.*
AMAZING job, Abby!!! I have to say…even though Martha hurt my feelings to the max with her mean blogger comments, the lady knows how to make some craft supplies! I love the gold…totally smitten!
xo Kylie
She certainly does…give me some metallics and you’ve won me over, lol. Hope you’re having a great week, Kylie!
~Abby =)
These are so cute, Abby! I even picked up a couple of glass vases during my latest thrifting expedition, but I wasn’t sure what to do with them. Thanks for the inspiration! Dee 🙂
Thanks so much, Dee! Ooh I love thrifted vases! Have fun with them!
~Abby =)
I love this! It turned out so great! Thanks for sharing it with us. 🙂
Thank you so much, Calia! {Gorgeous name, btw!} I’m so glad you stopped by! Hope you’re having a wonderful week!
~Abby =)
Love these Abby! The gold and silver look so pretty together! 🙂
Thank you so much, friend! I am loving the metallics this year! Hope you’re having a wonderful day!
~Abby =)
They are just lovely and perfect for the holidays…thanks for sharing. I was so inspired I just placed an order online at the Plaid store LOL! My wallet thanks you too 😉
hugz,
Suzanne
Lol! Thank you so much, Suzanne! I’m sure yours will be lovely! Happy decoupaging! 😀
~Abby =)
Super cute! I did something similar for my daughter’s birthday last year. I love how something so simple can add so much character!
Thank you, Tiffany! I love a simple project that makes a big impact! Hope you are having a wonderful week!
~Abby =)
Very pretty and festive! So, confession: I’m a blogger and I’ve never decoupaged (yet)… is that even legal? 🙂
Lol! Up until about a month ago I had never done anything with burlap. I thought they were going to kick me out of blogland, lol. THanks so much, Kate! Hope you’re having a great week!
~Abby =)
So pretty Abby! I love what you did with your products- aren’t the doilies stunning??
I loved your doily teacups too, Krista! They are so fun to work with, right?! Hope you’re having a great week, my friend!
~Abby =)
Beautiful centerpiece Abby! I love the different papers you used to create a gorgeous display- xo
Thank you so much, Tanya! You are so sweet! Hope you’re having a wonderful week!
~Abby =)
I came across your page while searching ideas for centerpieces this year and I love yours! I’m not sure I’m crafty enough to try myself though!