Dollar Decor- Girly Glitter Vases

While hubby is currently tackling our master bath, I am in the midst of sprucing up our master bedroom. {You can check out all the before pictures here. Don’t ask to see it in its current state–it’s a disaster area!}
Something I’ve realized as I’ve been working on this project is that all of those little bedroom decor items can really add up– frames, art, accessories, pillows, throws, curtains, lamps– and that’s not including even pricier items like bedding and furniture! If you’ve read this blog for very long, you know that I am all about scrimping and saving whenever possible, so over the next few weeks, I thought I’d share some of the frugal ideas I come up with as I add decor to our room.
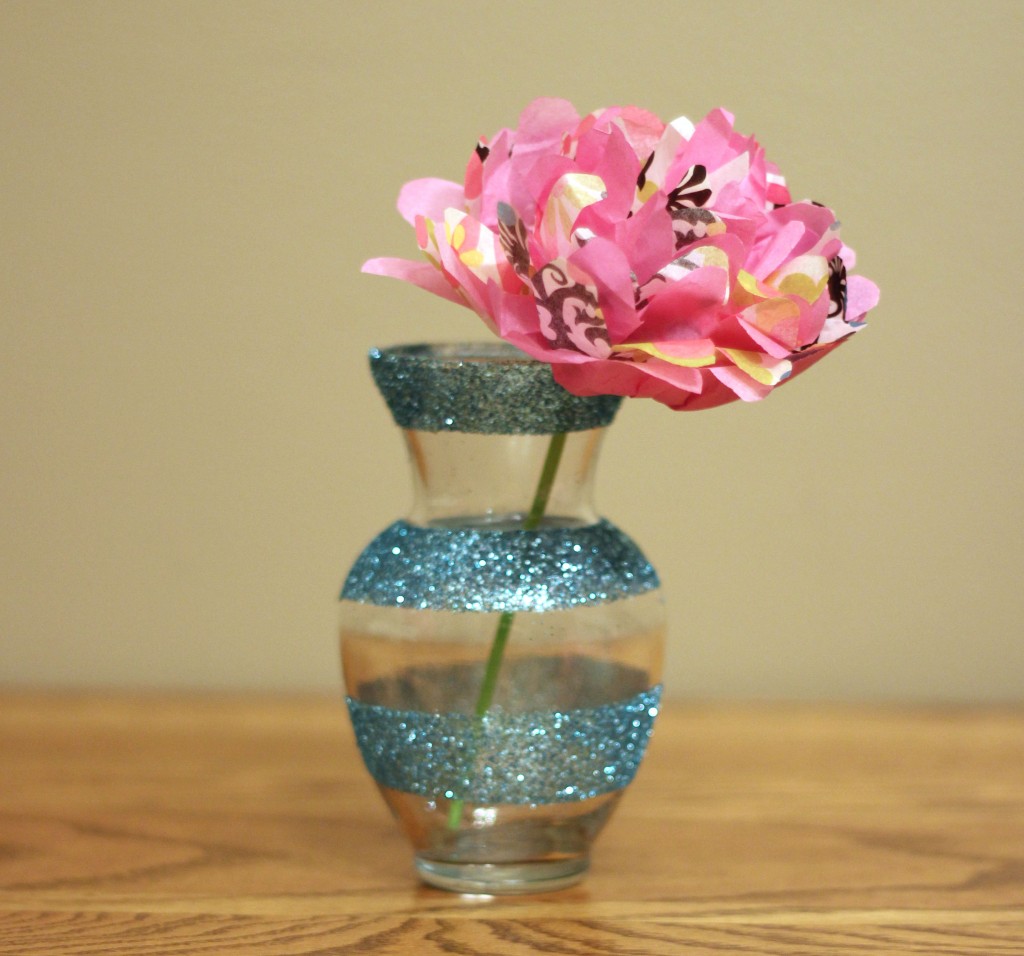
First on the docket–glitter vases! I love everything girly, so when I started seeing all styles of glitter vases around blogland, I just couldn’t help but get in on the action. Here’s what I used to create these cute, budget-friendly treasures:

- Vases {I got mine on sale at Michael’s, but I know the dollar store carries something similar.}
- Painter’s tape {already owned}
- Spray adhesive {already owned}
- Glitter {I bought mine for $1.50-ish at Michael’s, but if you have daughters, just go raid their room– you’re bound to find some in there! ;)}
Step 1- Tape your vase.

I thought this was the hardest part! Apparently it is really hard to make a straight tape line on a round vase. {Duh!} Square vases would have been much easier to tape, but I eventually got the round one to work. I chose to do a striped pattern, but you could do anything you like! Just keep in mind that you’ll want to put tape everywhere you do not want to have glitter, including inside the mouth of our vase.
Step 2- Spray and pour.

I sprayed my adhesive on one stripe at a time, then poured glitter on the adhesive and shook off any extra. {You’ll want to do this step over a plastic bag or some newspaper–it gets messy!}
Step 3- Let dry & remove tape.

I allowed my vases to sit for about 10 minutes, long enough for the glitter to set, but not long enough for it to pull right off with the tape. I then carefully removed my tape, trying to avoid touching the glittery stripes when possible.
Note to type-A personalities like myself: it will not be perfect. Don’t panic. Fortunately the spray adhesive was pretty forgiving at this point, and I was able to scrape off any unwanted glitter and touch up uneven lines with just my fingernail.
Now you can just pop a pretty paper flower into your vase and sit back and enjoy! I love this project because it is simple and inexpensive, but it can really add a lot of color and interest to a space.
Be sure to pop back in for more “Dollar Decor” ideas as we finish up the rest of our space! Have a great Monday!
What are your tips for saving on decor?

These are sooo cute! Love how easy it is to take it from drab to fab!
Hope you hop over and share with my Pink Hippo party @ https://pinkapotamus.blogspot.com/2013/04/pink-hippo-party-124.html
xoxo
Amie @ Pinkapotamus
Thank you, Aime! And thanks for the invite! Have a great week!
~Abby =)
I love these! So pretty! My 10 year old daughter would love one in her room:)
Thank you, Shannon! I have boys, so I have to live vicariously through you girl-moms in the kid decor department! 😉 Thanks so much for stopping by!
~Abby =)
Very cute Abby! Enjoy your week!~~Angela
Thank you so much, Angela! You are the sweetest! Hope you’re having a great day!
~Abby =)
Really pretttttyyyy!!! I love them!
Thank you, Arlena! Hope you’re having a great day!
~Abby =)
Your vases came out so pretty! Love the glitter color, too!
Selene @ Restoration Beauty
What a cute idea! I love anything that sparkles…really I do. 😉 You are so creative with all the things you come up with. Love it!
Nancy
Thanks! I love sparkles too! I’m glad someone else appreciates them–all my boys were whining because they were finding blue glitter on themselves, lol. They can deal with it! 😉 Hope you’re having a great night!
~Abby =)
Fun idea Abby! So creative and sparkly… thanks for sharing it:)
Krista
Thank you, Krista! Hope you had a great weekend!
~Abby =)
This is SO creative! My daughter was looking at this with me and we had a great idea to copy this on smaller glass jars for her makeup brushes! LOVE IT!
~Sonya
Ooh I love that idea! I really need to live vicariously through you girl-moms for that sort of thing! I’m the only glitter fan in this house…wouldn’t trade my little guys for the world, though! Thanks so much for stopping by!
~Abby =)
OooOoo! It’s all glittery! I really like your frugal ideas. I don’t like spending lots of money either, so its nice to see other bloggers being cost conscientious. Working with what you have is a fabulous idea. I love that paper flower, btw! Cute paper choice!!!
Hugs!!
Bethany
Thanks, friend! You are such an encouragement to me! You are truly the best! Hugs!!
~Abby =)
Super cute!! Does the glitter flake very much now that it’s dry?
Thanks, Jerri! It flaked a little at first, but now the adhesive really seems to be holding it well. Thanks so much for stopping by!
~Abby =)
Soo cute! You had me from the start of the word glitter!! 🙂
Thanks, Katie! I <3 glitter too! So fun and girly! Thanks so much for reading! Have a great day!
~Abby =)
Love these Abby! like you I love updating things around our house instead of buying expensive things! 🙂 the vases from Michael’s are beautiful and now with the glitter they look fantastic !!! 🙂 (I love glitter!)
Thanks, Ingrid! I love glitter too! I at least need some girly decor since I’m outnumbered by males in my house! 😉 Hope you’re having a wonderful week!
~Abby =)
Very nice. I love crafts you can make with Dollar Store supplies.
Thanks, Genie! The dollar store and I are BFFs. LOVE it! 🙂 Thanks so much for stopping by!
~Abby =)
Thanks for sharing these at the Project Inspire{d} linky party this week Abby! 🙂
Nancy
Thank YOU for hosting! Have a great day, Nancy! 🙂
~Abby =)
I’m signing up as a new follower and pinning this. Love, love, love this idea. It’d be great as well for a birthday bouquet for any gal pal!
Thank you so much, Michelle! You’re so sweet! Love the birthday bouquet idea! Hope you’re having a great week!
~Abby =)
Great idea. We have a link party called Wednesdays Adorned From Above Blog Hop and would love to have you share this and any other posts with everyone. It runs from Tuesday night through midnight Sunday. Here is the link to the party.
https://www.adornedfromabove.com/2013/04/wednesdays-adorned-from-above-blog-hop_30.html
We hope to see you there.
Debi and Charly @ Adorned From Above
Thank you so much for the invite, ladies! I linked up! Have a great week!
~Abby =)
So cute and fun! I love anything glitter! Thanks so much for linking up to Give Me The Goods Monday! We love having you party with us and can’t wait to see what goods you bring next week! Jenna @ Rain on a Tin Roof
Thank you, Jenna! Have a wonderful weekend!
~Abby =)
This is a super cute idea! I am new to your blog from southern charm! I would love for you to stop by and hopefully you will want to follow my blog back! Nicole!
Thank you so much, Nicole! Popping over to your blog now! Have a great weekend!
~Abby =)
Abby, these vases are adorable! I can imagine the frustration with the tape issue! (saw it on Strut your Stuff)
Thanks for popping over from Strut Your Stuff, Krystie! The tape definitely did not want to be tamed, but I figured it out! 😉 Hope you’re having a great weekend!
~Abby =)
lovely!!! That spray adhesive is great stuff :o) I came over from Six Sisters… Hope your weekend has been great! Emily @ Nap-Time Creations
Thanks for popping over, Emily! Gotta love spray adhesive! 😉 Hope you’re having a great afternoon!
~Abby =)
That is so clever, easy, and inexpensive! I love it! Thanks for sharing this wonderful idea. Can’t wait to give this a try.
Thanks so much, Peechee! I hope you enjoy it! Have a wonderful afternoon!
~Abby =)
Thanks for linking this up on Serenity Saturday Link party!
love this vase Abby!!
Thank you, Natasha! So glad you stopped by! <3
~Abby =)
LOVE the vases Abby!!!!
Thanks so much for sharing this at The DIY Dreamer… From Dream To Reality! Can’t wait to see what you link up tomorrow evening!
Thank you so much, Christine! “See” you tomorrow! 😉 Happy Monday!
~Abby =)
These are so cute! I am definitely wanting to try this out. I came over from the Monday Funday Link Party. Looking forward to checking out the rest of your blog. Hope you will check mine out!
lovepastatoolbelt.com
Thanks so much, Emily! Heading over to your blog now! Have a great day!
~Abby =)
These vases are so cute! I recently did two vases of my own using Mod Podge, gold glitter, and mason jars. I love that you used teal though!
These pinecones are just too cute! I’ll have to keep them in mind for the holidays this year!
I’d love for you to link this up to my glitter party here: https://www.framedfrosting.com/2013/06/glitter-craft-with-what-youve-got-4.html
Danielle at Framed Frosting
Thanks so much for the invite, Danielle! Have a great weekend!
~Abby =)